Showing posts with label Bulky. Show all posts

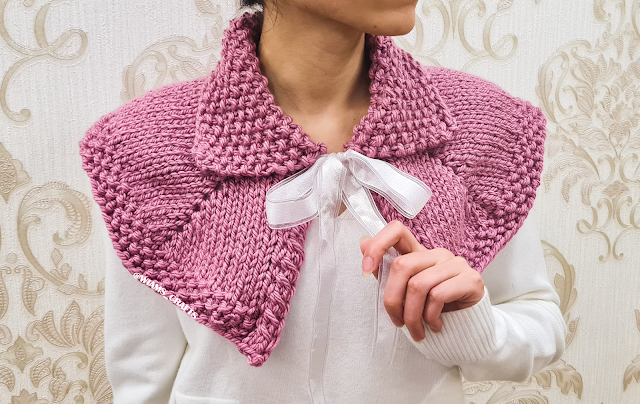
Claire Inspired Cowl


Hi everyone! I've been fond of the knitted garments that Outlander characters wear for quite a while now and have been told by multiple people to just go for it and make something inspired by them. I know how popular the series is, and after the release of every season my timeline gets flooded with knitters making their beautiful yet simple shawls and scarves. But this time, when I saw Claire wearing this specific cowl, I wanted to make one myself after I instantly fell in love with it. Adding one or two of my touches, such as porthole eyelet as a method of increasing stitches, may seem to have made it slightly difficult to knit, but you can watch my tutorial video and see how easy it is once you get the into the rhythm of it. If you’re waiting for the next episode of Outlander, you might want to use your time making this quick one skein project. Have a nice knitting day guys!

Skill level: Intermediate

Get printable PDF for this pattern:  or 


 Materials:

  • Suggested yarn: Red Heart Super Saver, 100% acrylic, 7 oz. (198 g), 264 yards (333 m), in the color "Light Raspberry": 1 skein.
  • Circular knitting needles 24" (60 cm) long, size US 10 (6 mm). 
  • Tapestry needle.
  • Ribbon, 1" (2.5 cm) wide and 53" (135 cm) long.


Measurements: Back yoke height = 6.5" (17 cm), edge circumference = 45" (115 cm), approx.

Yardage: 273- 275 yards (248- 250 m), approx.

Gauge: 11 sts and 14 rows = 4" x 4" (10 cm x 10 cm) in stockinette stitch.


Knitting terms:

  • st: stitch.
  • sts: stitches.
  • k: knit.
  • p: purl.
  • sl st: slip stitch.
  • k2tog: knit 2 sts together.
  • ssk: slip, slip, then knit the 2 slipped sts together through back loops.
  • kyokrb (porthole eyelet): (k 1, yarn over, k 1) into the stitch one row below. For more on how to Knit this, you can watch this tutorial video I made: 


Instructions:

Cast on 43 sts using Stretchy method. Follow the instructions in my tutorial video to learn how:

Now work as follows:

Collar:

Seed Pattern Row: k 1, p 1, repeat to last st, k 1.

Repeat seed pattern row sixteen more times. 

Yoke:

Note: to get a neat side edge, always slip first st purl-wise.

Row 1 (dividing row): p 1, yo, k2tog, p 1, k 2, kyokrb, k 8, kyokrb, k 11, kyokrb, k 8, kyokrb, k 2, p 1, ssk, yo, p 1.

Row 2: k 1, p 2, k 1, p to last 4 sts, k 1, p 2, k 1.

Row 3: p 1, switch the next 2 sts, placing the second one in front, and k them, p 1, *k to middle st of next porthole eyelet, kyokrb, repeat from * three more times, k to last 4 sts, p 1, switch the next 2 sts, placing the second one to the back, and k them, p 1.

Row 4: repeat row 2.

Repeat rows 3 and 4 nine more times, then work the last rows as follows:

Edge band:

Row 1: p 1, switch the next 2 sts placing the second in front and k them, *p 1, k 1, repeat from * to last 4 sts, p 1, switch the next 2 sts placing the second to back and k them, p 1.

Row 2: k 1, p 2, k 1, *k 1, p 1, repeat from * to last 5 sts, k 2, p 2, k 1. 

Repeat rows 1 and 2 once more. Bind off all sts. Weave in loose ends. Insert the ribbon through (yo, eyelets and yo) of the first row under the collar. Trim the ribbon's edges to get a neat look.


Lastly, feel free to leave a comment if you have any questions or find something confusing in the pattern.

Happy crocheting/knitting! follow me on Instagram @wiams_crafts and Twitter @wiamscrafts to see my upcoming projects.

Bold Stripes Skirt

Hi knitters! Back in my twenties and thirties, I used to sew every piece of clothing I wore myself, and making skirts was my specialty. I've probably sewn and worn every kind of skirt that was popular back then. Nowadays I may no longer sew as I used to, but I still have passion for skirt making. That's why when I saw this 'mosaic' yarn at the store, I knew I had to make one. My debut knitted skirt design is simple, with bold lines, and a clear statement. It is an easy pattern, made with only knit and purl stitches, and the length is easily customizable to be as long or short as you prefer. So here is a quick winter project for you that you can finish in a day or two. If this skirt design does well, I'm planning to make more, perhaps longer and flowy-er ones, using thinner types of yarn, but non the less simple and easy to make. So, stay tuned to all my future projects, especially the matching crop top that I'm working on right now. Happy holidays everyone!

Skill level: Easy

Get printable PDF for this pattern:   or  

The matching top is finally here! click the link to see the post: Bold Stripes Top


Materials:

  • Yarn: Alize Superlana Midi Mosaic, 25% wool, 75% acrylic, 3.53 oz (100 g), 186 yards (170 m), in the color 5245: 2 (3, 3) skeins.
  • Circular knitting needles, 24" (60 cm) long, sizes US 8 (5 mm), (7 mm) and US 11 (8 mm).  
  • Tapestry needle.
  • Ring stitch marker.

Sizes and measurements:

Size Waist Hips Skirt Length
XS/S 26"- 28" (66- 70 cm) 36"- 37" (90- 94 cm) 18" (46 cm)
M/L 29"- 31" (74- 78 cm) 39"- 40" (98- 102 cm) 19.5" (50 cm)
XL/2XL 32"- 35.5" (82- 90 cm) 42"- 45" (106- 114 cm) 21.5" (54 cm)


Yardage: 

  • Size XS/S: 370- 372 yards (338- 340 m), approx.
  • Size M/L: 435- 437 yards (398- 400 m), approx. 
  • Size XL/2XL: 490- 492 yards (448- 450 m), approx.

Gauge: 14 sts and 18 rounds = 4"x 4" (10 cm x 10 cm) in stockinette stitch and 7 mm knitting needles.

Knitting Terms:

  • st: stitch.
  • sts: stitches.
  • k: knit.
  • p: purl.


Instructions:

With 5 mm circular knitting needles, cast on 108 (120, 132) sts. Join in the round. Don't know how to join in the round? here is a short tutorial on how to do it (from 0:26 - 1:15 min): 


Put a ring stitch marker at the beginning of rounds, work as follows:

Rib round: k 2, p 1, k 1, p 1, k 1, repeat to end.

Repeat the rib round 10 (12, 12) times. Change to 7 mm circular needles, then knit the next round as follows:

Basic round: p 5, k 3, p 4, repeat to end.

Repeat the round until skirt length measures 32 (34, 36) cm


Pattern Rounds:

Round 1: p 4, k 1, p 1, k 3, p 3, repeat to end.

Round 2: p 3, k 3, p 1, k 3, p 2, repeat to end.

Round 3: p 2, k 3, p 3, k 3, p 1, repeat to end.

Round 4: p 1, k 3, p 5, k 3, repeat to end.

Round 5: k 3, p 7, k 1, p 1, repeat to end.

Round 6: k 2, p 9, k 1, repeat to end.

Round 7: k 1, p 1, k 1, p 7, k 2, repeat to end.

Round 8: p 1, k 3, p 5, k 3, repeat to end.

Round 9: p 2, k 3, p 3, k 3, p 1, repeat to end.

Round 10: p 3, k 3, p 1, k 3, p 2, repeat to end.

Round 11: p 4, k 1, p 1, k 3, p 3, repeat to end.

Change to 8 mm circular needles and repeat the basic round 4 (6, 8) times.

Work rib round 5 (5, 7) times, then bind off all sts. Weave in loose ends.

(Click to enlarge)


Lastly, feel free to leave a comment if you have any questions or find something confusing in the pattern.

Happy crocheting/knitting! follow me on Instagram @wiams_crafts and Twitter @wiamscrafts to see my upcoming projects.

Ginger Basket Shawlette

Hello everyone! It's been a long time since I've designed a project using bulky yarn, so I was glad I got to do a shawlette with it this time around. While travelling to visit my sisters, I went to a nearby crafts store, and I found my eyes wondering towards the bulky and chunky yarn section there. Despite my daughter’s objection to my “typical choice of colors”, I ended up buying this classic brownish yarn that reminded me of gingerbread, with absolutely no idea what to make with it (as usual). After rattling my brain for an idea, and few trials later, I settled on this simple knit and purl pattern, which I am so fond of these days. Combining this weaving base pattern with an asymmetrical shape, gave this shawlette its unique look. In addition, I used the clear edging method for both the side and the binding off row, to achieve this specific sharp appearance. So, there you have it, a warm, cozy, and elegant shawlette with an added bonus of being a very quick project to finish. I hope you have a lovely time knitting it and wearing it!

Skill level: Easy

GET printable PDF for this pattern hereor from Ravelry here: 


Materials:

  • Yarn: Alize Superlana Megafil, 25% wool, 75% acrylic, 3.53 oz (100 g), 60 yards (55 m), in the color 499: 4 skeins.
  • Circular knitting needles, 32" (80 cm) long, size US 17 (12 mm).  
  • Tapestry needle.

Measurements: width = 26" (66 cm), length = 40" (100 cm), approx.

Yardage: 235 - 240 yards (215 - 220 m), approx.

Gauge: 8 sts and 10 rows = 4"x 4" (10 cm x 10 cm) in stockinette stitch.


Knitting Terms 

  • st: stitch.
  • sts: stitches.
  • k: knit.
  • p: purl.
  • yo: yarn over.
  • k2tog: knit 2 sts together.
  • ssk: slip, slip, knit the 2 sts together through back loops.
  • ktbl: knit one stitch through back loop.
  • ptbl: purl one stitch through back loop.


Instructions:

Cast on 4 sts, then work as follows:

Row 1 (wrong side): p to end.

Row 2: sl st 1, k 1, yo, k 1, ktbl. (5 sts)

Row 3: sl st, p to last 2 sts, sl st 1, p 1.

Row 4: sl st 1, k 1, yo, k 2, ktbl. (6 sts)

Row 5: sl st 1, p to last 2 sts, sl st 1, p 1.

Row 6: sl st 1, k 1, yo, p 1, k 2, ktbl. (7 sts)

Row 7: sl st 1, p 2, k 1, p 1, sl st 1, p 1.

Row 8: sl st 1, k 1, yo, p 2, k 2, ktbl. (8 sts)

Row 9: sl st 1, p 2, k 2, p 1, sl st 1, p 1.

Row 10: sl st 1, k 1, yo, p 3, k 2, ktbl. (9 sts)

Row 11: sl st 1, p 2, k 3, p 1, sl st 1, p 1.

Row 12: sl st 1, k 1, yo, p 4, k 2, ktbl. (10 sts)

Row 13: sl st 1, p 2, k 4, p 1, sl st 1, p 1.

Row 14: sl st 1, k 1, yo, k 1, yo, k 3, yo, k2tog, k 1, ktbl. (12 sts)

Row 15: sl st 1, p to last 2 sts, sl st 1, p 1.

Row 16: sl st 1, k 1, yo, p 3, k 3, p 3, ptbl. (13 sts)

Row 17: sl st 1, k 3, p 3, k 3, p 1, sl st 1, p 1.

Row 18: sl st 1, k 1, yo, p 4, k 3, p 3, ptbl. (14 sts)

Row 19: sl st 1, k 3, p 3, k 4, p 1, sl st 1, p 1.

Row 20: sl st 1, k 1, yo, k 1, yo, k 3, yo, k2tog, k 1, ssk, yo, k 2, ktbl. (16 sts)

Row 21: sl st 1, p to last 2 sts, sl st 1, p 1.

Row 22: sl st 1, k 1, yo, p 3, k 3, p 5, k 2, ktbl. (17 sts)

Row 23: sl st 1, p 2, k 5, p 3, k 3, p 1, sl st 1, p 1.

Row 24: sl st 1, k 1, yo, p 4, k 3, p 5, k 2, ktbl. (18 sts)

Row 25: sl st 1, p 2, k 5, p 3, k 4, p 1, sl st 1, p 1.

Row 26: sl st 1, k 1, yo, k 1, yo, k 3, yo, k2tog, k 1, ssk, yo, k 3, yo, k2tog, k 1, ktbl. (20 sts)

Row 27: sl st 1, p to last 2 sts, sl st 1, p 1.

Row 28: sl st 1, k 1, yo, p 3, k 3, p 5, k 3, p 3, ptbl. (21 sts)

Row 29: sl st 1, k 3, p 3, k 5, p 3, k 3, p 1, sl st 1, p 1.

Row 30: sl st 1, k 1, yo, p 4, k 3, p 5, k 3, p 3, ptbl. (22 sts)

Row 31: sl st 1, k 3, p 3, k 5, p 3, k 4, p 1, sl st 1, p 1.


General Pattern:

Row 32: sl st 1, k 1, yo, k 1, *yo, k 3, yo, k2tog, k 1, ssk, repeat from * to last 3 sts, yo, k 2, ktbl. 

Row 33: sl st 1, p to last 2 sts, sl st 1, p 1.

Row 34: sl st 1, k 1, yo, p 3, *k 3, p 5, repeat from * to last 3 sts, k 2, ktbl. 

Row 35: sl st 1, p 2, *k 5, p 3, repeat from * to last 6 sts, k 3, p 1, sl st 1, p 1.

Row 36: sl st 1, k 1, yo, p 4, *k 3, p 5, repeat from * to last 3 sts, k 2, ktbl. 

Row 37: sl st 1, p 2, *k 5, p 3, repeat from * to last 7 sts, k 4, p 1, sl st 1, p 1.

Row 38: sl st 1, k 1, yo, k 1, *yo, k 3, yo, k2tog, k 1, ssk, repeat from * to last 7 sts, yo, k 3, yo, k2tog, k 1, ktbl. 

Row 39: sl st 1, p to last 2 sts, sl st 1, p 1.

Row 40: sl st 1, k 1, yo, p 3, *k 3, p 5, repeat from * to last 7 sts, k 3, p 3, ptbl. 

Row 41: sl st 1, k 3, *p 3, k 5, repeat from * to last 9 sts, p 3, k 3, p 1, sl st 1, p 1.

Row 42: sl st 1, k 1, yo, p 4,* k 3, p 5, repeat from * to last 7 sts, k 3, p 3, ptbl. 

Row 43: sl st 1, k 3, *p 3, k 5, repeat from * to last 10 sts, p 3, k 4, p 1, sl st 1, p 1.

Repeat the general pattern rows six more times (or as many as you prefer). 

I-cord bind off row: 

k 2 sts, *slip the 2 sts back to left needle, k first st again, ssk next 2 sts, repeat from * to end, k2tog the last 2 sts. Weave in loose ends. Block and enjoy wearing.

Here is a video tutorial that I made for the I-cord bind off method:


Lastly, feel free to leave a comment if you have any questions or find something confusing in the pattern.

Happy crocheting/knitting! follow me on Instagram @wiams_crafts and Twitter @wiamscrafts to see my upcoming projects.

Honey Chocolate Cowl

Hello everyone! It's very fun making a simple and quick-to-knit project using leftover yarn from previous projects. The challenge is creating a design that uses just what's left without having to go and purchase more of it -because you overshot- which beats the purpose (I'm obviously speaking from experience, haha!). Sometimes though, you have just enough material left to come up with a beautiful piece that complements the main one. For example, one of my favorite works, the Hashtag Jacket, the leftovers of which I turned into a Slouchy and Mittens matching set. Now, I've made many cowls from bulky yarn in the past, because I think it keeps the neck especially cozy during really cold days. This Nako Spaghetti Effect yarn (left unused from my Scalloped Chocolate Shawlette and Hat) is so easy to knit using 8 mm to 10 mm needles, and looks so stunning even with a simple garter pattern. I found that garter stitch and lace pattern worked in stripes of two colors gave the cowl the wavy shape I was aiming for. I hope you like it and enjoy making it.

Skill level: Easy


Materials:

  • Yarn: Nako, Spaghetti Effect, 25% wool, 75% premium acrylic, 100 g/ 3.53 oz, 60 m/ 65.6 yards. Color: 75533: 1 skein, color: 7511: 1 skein.
  • Circular knitting needles 60 cm/ 24" long, size US 11 (8 mm).
  • Tapestry needle.
  • Ring stitch marker.


Measurements: 
  • Height: 8" (20 cm), approx.
  • Diameter: Upper: 25" (64 cm), lower: 33" (84 cm).

Yardage: 116-118 yards (106-108 m) approx.

Gauge: 10 sts x 17 rows = 4"x 4" (10 cm x 10 cm) in garter pattern.

Knitting Terms: 
  • st: stitch.
  • sts: stitches.
  • k: knit.
  • p: purl.
  • k2tog: knit 2 sts together.
  • ssk: slip, slip, knit the 2 sts together through back loops.


Instructions:

With dark brown, cast on 72 sts, join in the round. Don't know how to join in the round? here is a short tutorial on how to do it (from 0:26 - 1:15 min): 
  Put the ring stitch marker at the beginning of rounds. work as follows:

Round 1: k all sts.

Round 2: p all sts.

General Pattern:

Round 1: (k2tog, yo) three times, k 6, repeat to end.

Round 2: k 6, p 6, repeat to end.

Repeat rounds 1 and 2 three times.

Bind light brown yarn (don't cut dark brown yarn), work as follows;

Round 3: k 6, (yo, ssk) three times, repeat to end.

Round 4: p 6, k 6, repeat to end.

Repeat rounds 3 and 4 three times.

Repeat the general pattern once more, then repeat the first six rounds with the dark brown yarn, p one round.

Stretchy bind off row: k 2, slip the 2 sts back to left needle, k2tog, *k 1, slip the 2 sts back to left needle, k2tog, repeat from * to end. You can watch my tutorial video for the stretchy bind off method here: 


Weave in loose ends.


Lastly, feel free to leave a comment if you have any questions or find something confusing in the pattern.

Happy crocheting/knitting! follow me on Instagram @wiams_crafts and Twitter @wiamscrafts to see my upcoming projects.

Scalloped Chocolate Hat


Hello everyone! As promised, this post is for a matching hat that goes with my Scalloped Chocolate Shawlette. I've made two sizes; a small one that fits the standard head size, and a large size that would suits bigger heads, or if you like the oversize look (please see the measurements in detail below). The scallops this time are in the beginning rows, and I went with a different technique to obtain them. By going through the tutorial photos, you will realize how easy it is to knit this hat, so make sure to take a good look at them as you read the instruction. I hope this shawl/hat set will get you a warm feeling in the coming cold days.

Stay safe and healthy.  

Scalloped Chocolate Shawlette:


Level: Intermediate


Materials:

  • Yarn: Nako, Spaghetti Effect, 25% wool, 75% premium acrylic, 100 g/ 3.53 oz, 60 m/ 65.6 yards. Size S: 1 skeins, in color: 75533. Size L: 2 skeins, in color: 7511.
  • Circular knitting needles 40 cm/ 16" long, size US 15 (10 mm).
  • Tapestry needle.


Measurements:  
  • Size S: head circumference = 20.5"- 21.3" (50 - 52 cm), height = 8.5" (21.5 cm).
  • Size L: head circumference = 22"- 23" (56 - 58 cm), height = 9" (23 cm).

Yardage:
  • Size S: 55- 57 m (60- 62 yards) approx.
  • Size L: 78- 80 m (85- 87 yards) approx.

Gauge: 10 sts x 17 rows = 4"x 4" (10 cm x 10 cm) in garter pattern.


Knitting Terms 
  • st: stitch.
  • sts: stitches.
  • k: knit.
  • p: purl.
  • ssk: slip, slip, knit the 2 sts together through back loops.


Instructions:

Cast on 49 (56) sts. Join in the round. Don't know how to join in the round? here is a short tutorial on how to do it (from 0:26 - 1:15 min): 
  
Put the ring stitch marker at the beginning of rounds. work as follows:

Round 1: p all sts.

Round 2: k all sts.

Repeat rounds (1 and 2) three times, p another round, then work as follows:

Scallops making round: 

1. *insert right needle in every purl popping out sts under the first st (three sts of purl rounds).


2. k st.


3. Pass the three strands over the knitted st.


4. k 6 (7), repeat from * to end. 


5. Repeat rounds (1 and 2) six (seven) times, then p one more round.


Decreasing Rounds:

Round 1: ssk, k 5 (6), repeat to end.

Round 2: k 1, p 5 (6), repeat to end.

Round 3: ssk, k 4 (5), repeat to end.

Round 4: k 1, p 4 (5), repeat to end.

Round 5: ssk, k 3 (4), repeat to end.

Round 6: k 1, p 3 (4), repeat to end.

Round 7: ssk, k 2 (3), repeat to end.

Round 8: k 1, p 2 (3), repeat to end.

Round 9: ssk, k 1 (2), repeat to end.


Size S:

Round 10: k 1, p 1, repeat to end.

Round 11: ssk, repeat to end. 7 sts


Size L:

Round 10: ssk, p 1, repeat to end.

Round 11: ssk, repeat to end. 7 sts

Cut a 10 cm / 4" long yarn, Pull it through all sts and tighten tog. Weave in loose ends. 


Lastly, feel free to leave a comment if you have any questions or find something confusing in the pattern.

Happy crocheting/knitting! follow me on Instagram @wiams_crafts and Twitter @wiamscrafts to see my upcoming projects.