Showing posts with label Ombre. Show all posts

Ocean Depths Shawl


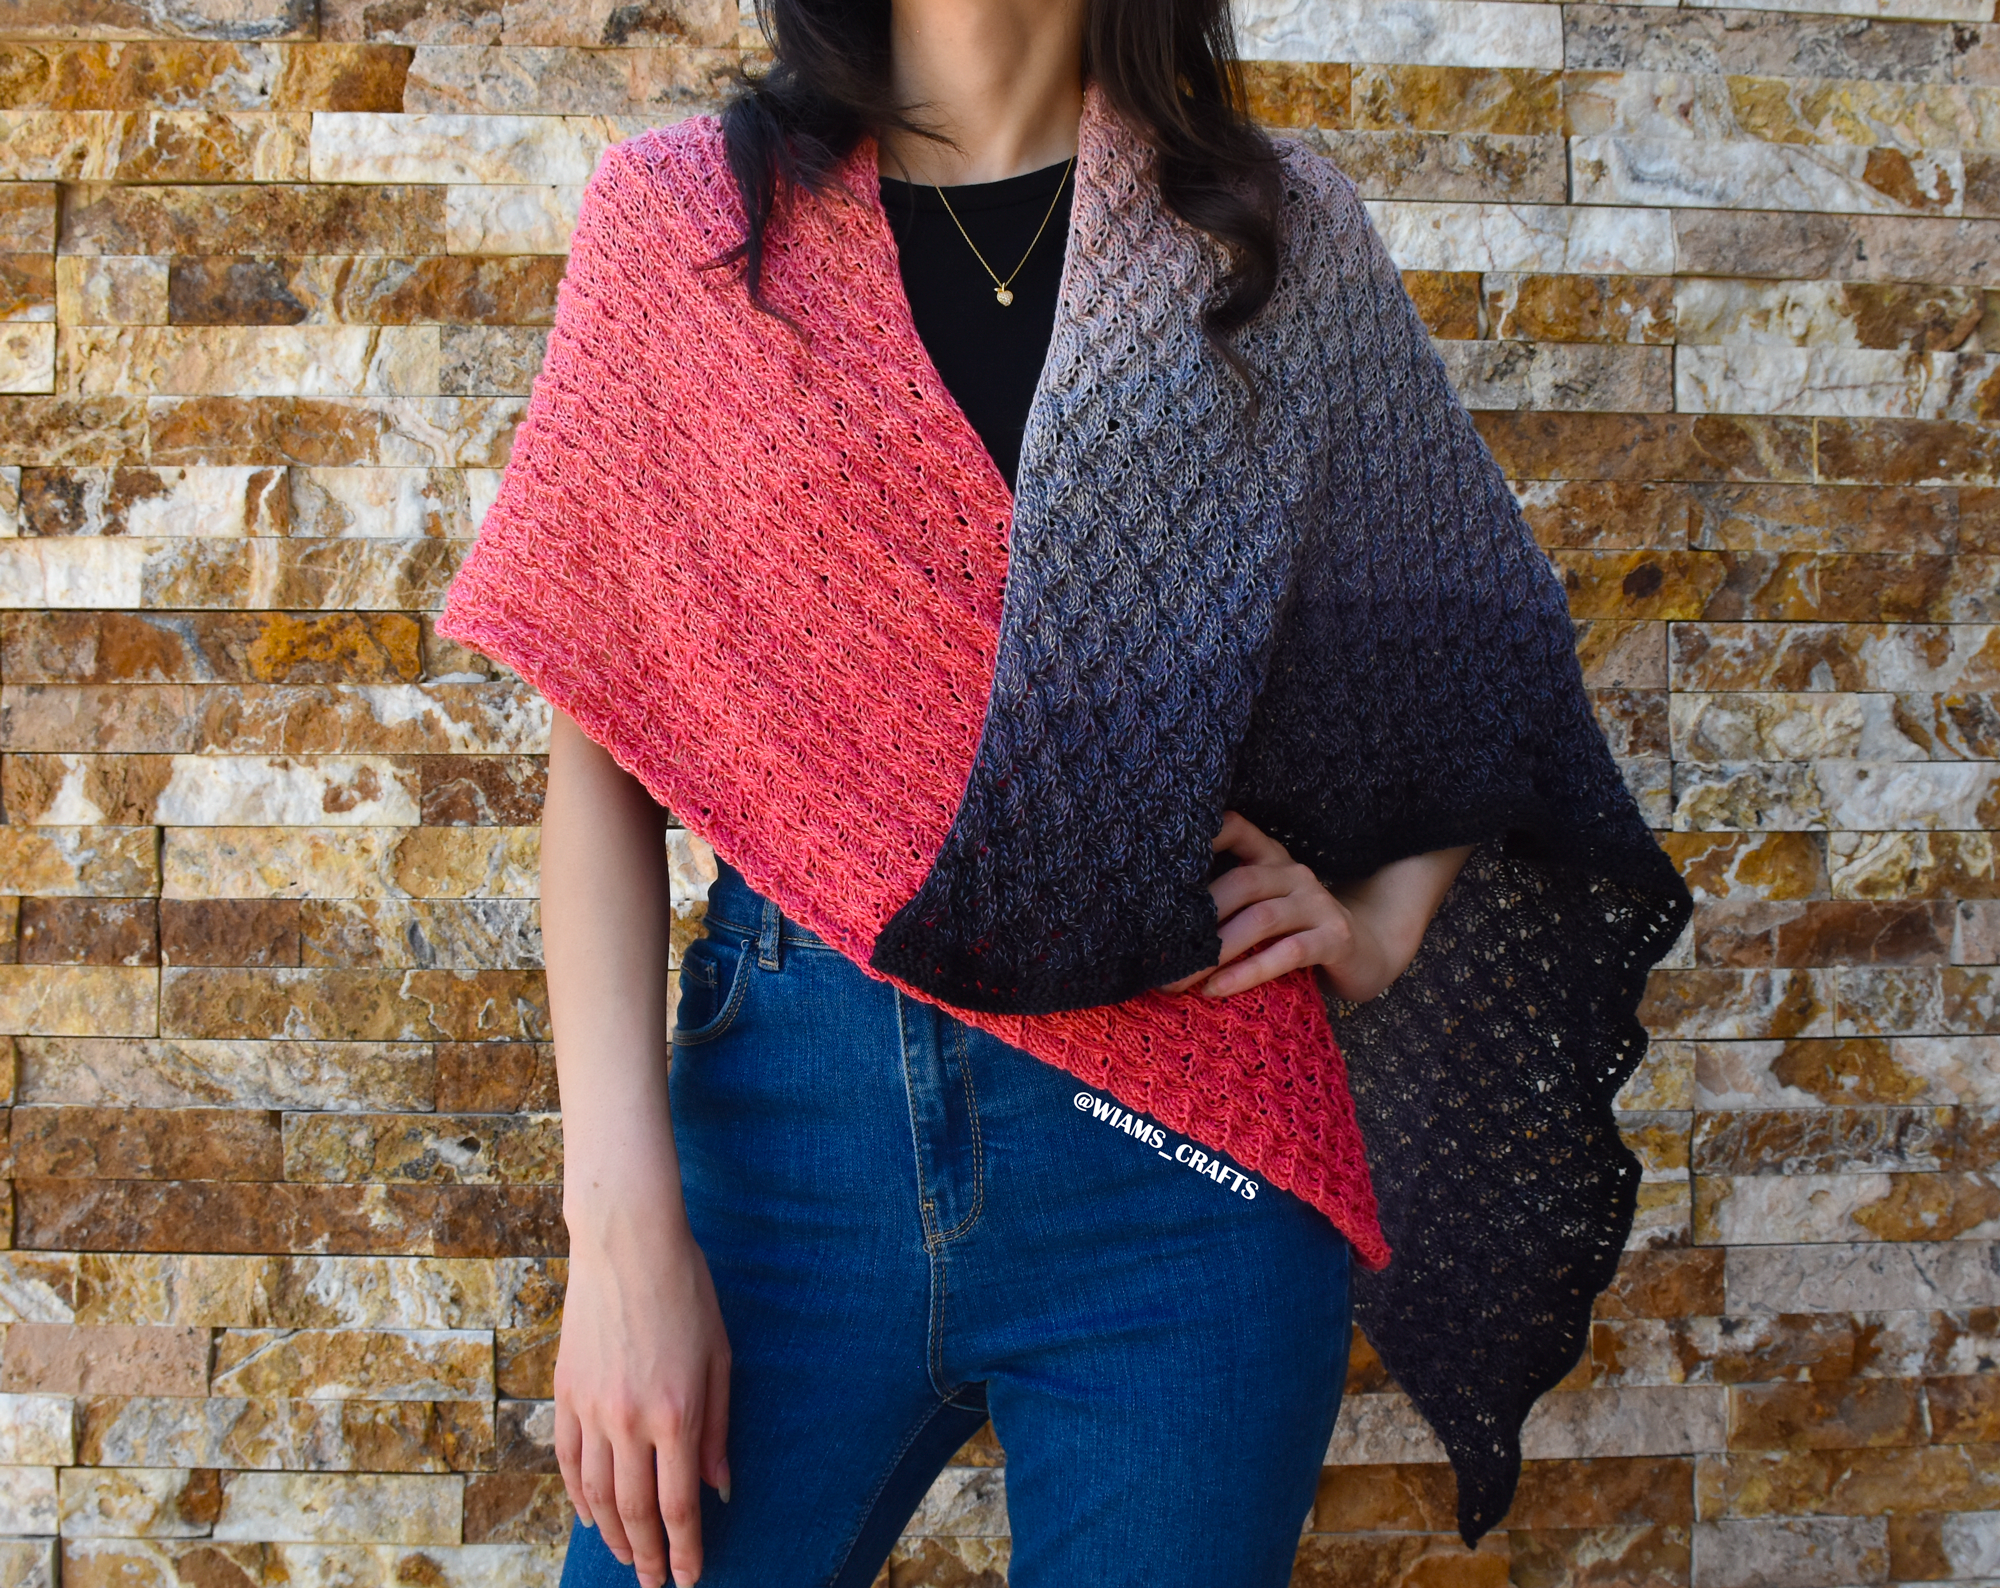
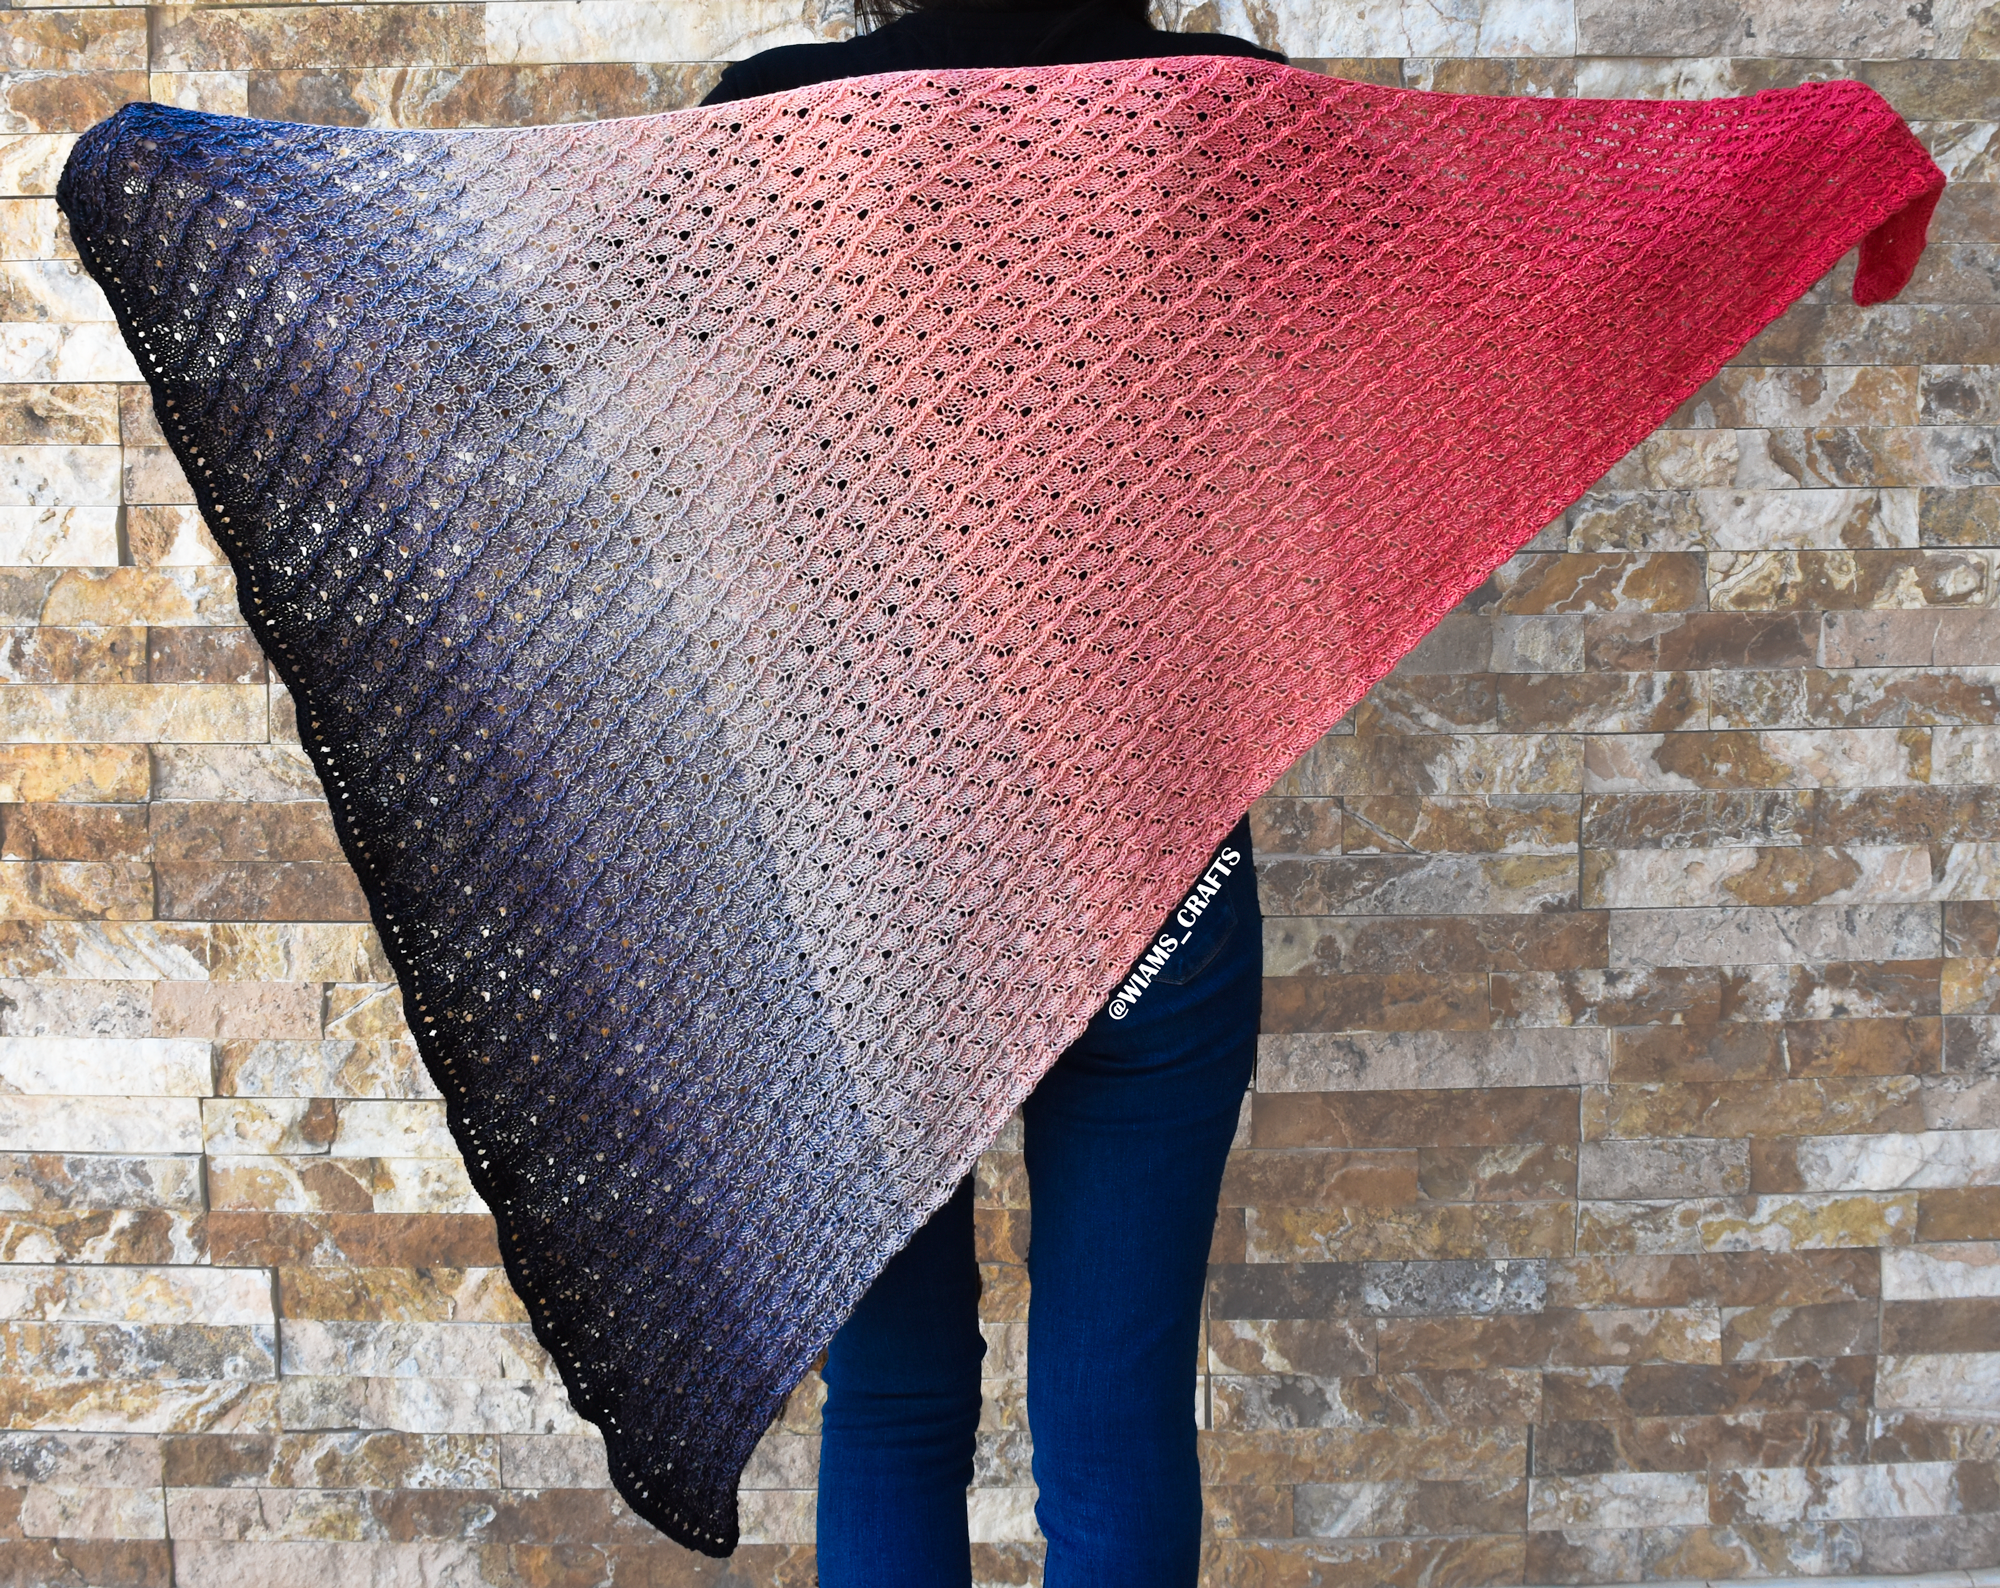
Wrap yourself in a piece of night sky with this cozy gradient shawl. Designed with simple stitches and a flowing square-to-triangle construction, it creates a beautiful ombré effect that shifts from deep navy to soft silver-grey. Whether draped over your shoulders for elegance or wrapped snugly for warmth, this shawl is as practical as it is striking. In this post, you’ll find step-by-step instructions to knit your own version, perfect for both relaxing evenings and adding a touch of handmade charm to any outfit. 


Overview:

  • Skill level: Intermediate
  • Instructions style: written pattern.
  • Yarn weight: #worsted
  • Available sizes: one size (see detailed measurements below).
  • Size customization: you can adjust the size to be smaller by reducing the size of the center square.
  • Knitting direction: see image below.


Get the ad-free, printable PDF of this pattern from my store: Ravelry

Or click here to jump to the instructions.

Want to pin this project for later? Just hover or click on any of the images in this post then click the red "save" button.


Materials:

  • Suggested yarn: Nako Mussels, 15% mohair, 20% polyamide, 65% premium acrylic, 13.35 oz (350 g), 951 yards (870 m), in the color "20451", 1 skein.
  • Circular knitting needles, 16", 24", 32" and 40" (40, 60, 80 and 100 cm), size US 9 (5.5 mm).
  • A set of double-pointed knitting needles, size US 9 (5.5 mm).
  • Tapestry needle.
  • Ring stitch markers.

Measurements: width = 45" (115 cm), length = 87" (220 cm), approx.

Yardage: 910 - 913 yards (833 - 835 m), approx.

Gauge: 14 sts and 24 rows = 4" x 4" (10 cm x 10 cm) in stockinette pattern and US 9 (5.5 mm) needles.

Knitting Terms:

  • st: stitch.
  • sts: stitches.
  • k: knit.
  • p: purl.
  • yo: yarn over.


Instructions:

With 16" (40 cm) long circular needles (or the set of double-pointed knitting needles) make a magic ring and cast on 8 sts into it.

Round 1: k 1, yo, repeat to end. (16 sts)

Round 2: k to end. insert a rsm at the beginning of the round.

Note 1: The first few rounds may feel a bit tricky, but please be patient, the number of stitches will increase soon, making it easier to work with.

Note 2: If you begin knitting with double-pointed needles, you can switch to circular needles whenever you prefer. As the stitch count increases, change to circular needles of appropriate length.

Round 3: k 2, yo, k 1 (insert a rsm before and after this corner st), yo, k 1, repeat to end. (24 sts)

Round 4: k to end.

Round 5: k to next rsm (corner st), yo, k 1, yo, repeat three more times, k to end.

Round 6: k to end.

Repeat Rounds 5 and 6 until there are 77 stitches between each pair of corner stitches, ending with Round 6.

Round 7: p to next rsm (corner st), yo, k, yo, repeat three more times, p to end.

Round 8: k to end.

Repeat Rounds 7 and 8 eight more times, then work Round 7 once more (you will have 95 sts between each pair of corner sts). Next round:

Dividing round (right side) 

  1. Bind off sts knit-wise to four sts after first corner st. 
  2. k to four sts before next corner, bind off nine sts, repeat step 2 once more. 
  3. k to four sts before last corner. Bind off all remaining sts.

Slip the sts of the first square side into separate knitting needles (87 sts) and slip the remaining sts of the third and fourth sides into secured threads separately.

Left triangle:

Bind on yarn before second corner, work as follows:

  1. Knit seven rows, then bind off four sts at the beginning of next row, 
  2. Repeat step one to last seven sts. 
  3. Knit seven rows. Bind off the seven sts.

Right triangle:

Bind on yarn before the fourth corner, work as follows:

  1. Knit seven rows, then bind off four sts at the beginning of next row, 
  2. Repeat step one to last seven sts. 
  3. Knit seven rows. Bind off the seven sts.

Bottom triangle:

Bind on yarn to last (87 sts) at the bottom before the third corner, work as follows:

  1. Knit six rows, then bind off four sts at the beginning of next two rows. 
  2. Repeat step one to last seven sts. 
  3. Knit seven rows. Bind off the seven sts.

Weave in loose ends.


Lastly, feel free to leave a comment if you have any questions or find something confusing in the pattern.

Happy crocheting/knitting! follow me on Instagram @wiams_crafts and Twitter @wiamscrafts to see my upcoming projects.

Ocean Whisper Scarf

Hello Friends! It's summer time and since the town I live in is really hot most of the days during this season, I try to choose lighter (preferably a cotton yarn) for my projects, because I feel uncomfortable and hot as the piece grows bigger on my lap. My new design is a mixture between a scarf and a shawl, and I've used the short rows method to reach it. It is actually simple to make; start a long side that you can get by repeating a two rows general pattern, then the second part that you can get by repeating what I've named the Crescent part, at last you go back to the two rows general pattern. You can make it longer if you want to just by knitting more repetitions of the general pattern. The ombre yarn contributed a lot in giving the gorgeous final look because of the beautiful rays of white and blue all over the crescent part and the both sides. I wish have relexifying times making this scarf, and be proud among all eyes on you wearing it! 

Overview:

  • Skill level: Intermediate.
  • Instructions style: written pattern + chart.
  • Yarn weight: #2/fine/sport.
  • Available sizes: one size (see detailed measurements below).
  • Size customization: you can make the scarf wider by increasing the number of stitches you cast on. The number of added stitches MUST be a multiple of ten. You can make the scarf longer by repeating the general pattern more times than mentioned in the instructions on both sides of the scarf.


Get the ad-free, printable PDF of this pattern from my store:

Or click here to jump to the instructions.

Want to pin this project for later? Just hover or click on any of the images in this post then click the red "save" button.


Materials:

  • Suggested yarn: YarnArt, Bali, 80% cotton, 20% polyester, 3.52 oz (100 g), 235 yards (215 m), in the color 3206: 4 skeins.
  • Circular knitting needles, 32" (80 cm) long, size US 7 (4.5 mm). 
  • Tapestry needle.
  • Stitch holder.
  • Stitch markers.


Measurements: width = 13.5" (34 cm), length = 24" (61 cm), crescent radius = 13.5" (34 cm), approx.

Yardage: 910- 915 yards (830- 835 m), approx.

Gauge: 24 sts and 32 rows = 4" x 4" (10 cm x 10 cm) in stockinette stitch.


Knitting terms: 

  • st: stitch.
  • sts: stitches.
  • k: knit.
  • p: purl.
  • yo: yarn over.
  • k2tog: knit two stitches together.
  • ssk: slip, slip, knit the two slipped stitches through back loops.
  • sth: stitch holder.
  • stm: stitch marker.


Instructions:

Cast on 96 sts.

General pattern:

Row 1: k 3, *yo, k 3,  hold next two sts on sth to front, k2tog the next two sts, ssk the two st on hold, k 3, repeat from * to last 3 sts, k 3.

Row 2: k 3, *yo, p 9, repeat from * to last 3 sts, k 3.

Repeat the general pattern sixty-seven more times.

Crescent pattern:

To make work easier, put a stm after fourteen, twenty-four, thirty-four, forty-four, fifty-four, sixty-four, seventy-four, and eighty-four sts. 

Row 3: k 3, yo, k 3, hold next two sts on sth to front, k2tog the next two sts, ssk the two st on hold, k 3, bring yarn to front, slip next st, turn yarn to back, slip the slipped st back to left needle, turn.

Row 4: yo, p to last 3 sts, k 3. Remove first stm.

Row 5: k 3, yo, *k 3, hold next two sts on sth to front, k2tog the next two sts, ssk the two st on hold, k 3, repeat from * to one st before next stm, bring yarn to front, slip next st, turn yarn to back, slip the slipped st back to left needle, turn.

Row 6: (yo, p 9), repeat to last 3 sts, k 3. Remove next stm.

Repeat rows 5-6 until all stm are removed, then repeat the general pattern twice, the crescent pattern ends.

Repeat the crescent pattern thirteen more times.

Repeat the general pattern sixty-seven times, then repeat row 1 once. Bind off all sts. 

Weave in loose ends. Block if needed. 


Lastly, feel free to leave a comment if you have any questions or find something confusing in the pattern.

Happy crocheting/knitting! follow me on Instagram @wiams_crafts and Twitter @wiamscrafts to see my upcoming projects.

Watermelon Delights Shawl

Hello knitters! As the last days of spring are soon to pass and summer is fast approaching, it is high time for me to switch to some cotton and light yarn projects, and what’s better than a lacy and light shawl to wear over your tank top or swimsuit, or when it gets chilly at night. I will be the first to admit that knitting with fine yarn might be irking sometimes; you might get frustrated as the progress in knitting is slow, and you don’t get the same rapid sense of achievement and rejoice as when you work with bulkier yarn. However, the reward of holding the finished piece afterwards is so worth it. Even after many years of knitting, I always feel so proud and accomplished once I see my finished work worn and appreciated.

I had previously worked with Scheepjes yarn more than two years ago, when I made Wrap Me in Sunshine Shawl. Many of you have shown love for that project, to which I am eternally humbled and grateful, however I didn't have plans to buy more (see rant about fine yarn above). But since I received it as a gift (again!), I decided to use it, making a simpler design this time. It is an asymmetrical shawl that starts with flowing lines, appearing once you’ve repeated the general pattern several times, followed by a stripe of eyelets along the wider side, and that is it. It's a beautiful and elegant one-cake shawl, and I hope you find it interesting and make one for yourselves this summer. 

Overview:

  • Skill level: Intermediate.
  • Instructions style: written pattern.
  • Yarn weight: #1/super fine/Fingering.
  • Available sizes: one size (see detailed measurements below).

Get the ad-free, printable PDF of this pattern from my store:

Or click here to jump to the instructions.

Want to pin this project for later? Just hover or click on any of the images in this post then click the red "save" button.


Materials:

  • Yarn: Scheepjes Whirl, 60% cotton, 40% acrylic, 7.6-7.9 oz (215-225 g), 1094 yards (1000 m), in the color Watermelon Hell Raiser (784): 1 cake.
  • Circular knitting needles 32" (80 cm) long, size US 5 (3.75 mm).
  • Tapestry needle.

Measurements: length = 52" (135 cm), width = 37" (94 cm), approx.

Yardage: 1060- 1070 yards (970- 980 meters) approx.

Gauge: 22 sts and 35 rows = 4" x 4" (10 cm x 10 cm) in stockinette stitch and US 5 (3.75 mm) needles (blocked).


Knitting Terms 
  • st: stitch.
  • sts: stitches.
  • sl st: slip stitch purl-wise.
  • k: knit.
  • p: purl.
  • yo: yarn over.
  • yot: yarn over twice.
  • k2tog: knit two stitches together.
  • ssk: slip, slip, knit the two stitches together through back loops.
  • p2togtbl: purl two stitches together through back loops.


Instructions:

With US 5 (3.75 mm) circular knitting needles, cast on 9 sts.

Row 1: p to end.

Row 2: k 2, p to end.

Row 3: sl st, k 1, yot, k 5, yo, k 2.

Row 4: k 2, p 1, yo, p 3, p2togtbl, (k 1, p 1) into the yot, sl st, p 1.

Row 5: sl st, k 1, yo, p 2, ssk, k 2, yo, k 4.

Row 6: k 2, p 3, yo, p 1, p2togtbl, k 2, p 1, sl st, p 1.

Row 7: sl st, k 1, yo, k 1, p 2, ssk, yo, k 6.

Row 8: k 2, p 6, k 2, p 2, sl st, p 1.

Row 9: sl st, k 1, yo, k 2, p 2, ssk, k 4, yo, k 2.

Row 10: k 2, p 1, yo, p 3, p2togtbl, k 2, p 3, sl st, p 1.

Row 11: sl st, k 1, yo, k 3, p 2, ssk, k 2, yo, k 4.

Row 12: k 2, p 3, yo, p 1, p2togtbl, k 2, p 4, sl st, p 1.

Row 13: sl st, k 1, yo, k 4, p 2, ssk, yo, k 6.

Row 14: k 2, p 6, k 2, p 5, sl st, p 1.

Row 15: sl st, k 1, yot, k 5, yo, p 2, ssk, k 4, yo, k 2.

Row 16: (k 2, p 1, yo, p 3, p2togtbl) twice(k 1, p 1) into the yot, sl st, p 1.

Row 17: sl st, k 1, yo, (p 2, ssk, k 2, yo, k 2) twice, k 2.

Row 18: k 2, (p 3, yo, p 1, p2togtbl, k 2) twice, p 1, sl st, p 1.

Row 19: sl st, k 1, yo, k 1, (p 2, ssk, yo, k 4) twice, k 2.

Row 20: k 2, (p 6, k 2) twice, p 2, sl st, p 1.

Row 21: sl st, k 1, yo, k 2, (p 2, ssk, k 4, yo) twice, k 2.

Row 22: k 2, (p 1, yo, p 3, p2togtbl, k 2) twice, p 3, sl st, p 1.

Row 23: sl st, k 1, yo, k 3, (p 2, ssk, k 2, yo, k 2) twice, k 2.

Row 24: k 2, (p 3, yo, p 1, p2togtbl, k 2) twice, p 4, sl st, p 1.

Row 25: sl st, k 1, yo, k 4, (p 2, ssk, yo, k 4) twice, k 2.

Row 26: k 2, (p 6, k 2) twice, p 5, sl st, p 1.

General pattern:

Row 27: sl st, k 1, yot, k 5, yo, *p 2, ssk, k 4, yo, repeat from * to last 2 sts, k 2.

Row 28: k 2, *p 1, yo, p 3, p2togtbl, k 2, repeat from * to last 6 sts before the yot, p 1, yo, p 3, p2togtbl, (k 1, p 1) into the yot, sl st, p 1.

Row 29: sl st, k 1, yo, *p 2, ssk, k 2, yo, k 2, repeat from * to last 2 sts, k 2.

Row 30: k 2, *p 3, yo, p 1, p2togtbl, k 2, repeat from * to last 3 sts, p 1, sl st, p 1.

Row 31: sl st, k 1, yo, k 1, *p 2, ssk, yo, k 4, repeat from * to last 2 sts, k 2.

Row 32: k 2, *p 6, k 2, repeat from * to last 4 sts, p 2, sl st, p 1.

Row 33: sl st, k 1, yo, k 2, *p 2, ssk, k 4, yo, repeat from * to last 2 sts, k 2.

Row 34: k 2, *p 1, yo, p 3, p2togtbl, k 2, repeat from * to last 5 sts, p 3, sl st, p 1.

Row 35: sl st, k 1, yo, k 3, *p 2, ssk, k 2, yo, k 2, repeat from * to last 2 sts, k 2.

Row 36: k 2, *p 3, yo, p 1, p2togtbl, k 2, repeat from * to last 6 sts, p 4, sl st, p 1.

Row 37: sl st, k 1, yo, k 4, *p 2, ssk, yo, k 4, repeat to last 2 sts, k 2.

Row 38: k 2, *p 6, k 2, repeat from * to last 7 sts, p 5, sl st, p 1.

Repeat the general pattern (rows 27-38) thirty-one more times, then repeat rows 27-32 once. Work the last rows as follows:

Last Rows:

Row 1 and 3: sl st, k 1, yo, p to last 2 sts, k 2.

Row 2 and 4: k 2, p to last 2 sts, sl st, p 1.

Row 5: sl st, k 1, yo, *k2tog, yo, repeat from * to last 2 sts, k 2.

Row 6 and 8: k to last 3 sts, p 1, sl st, p 1.

Row 7 and 9: sl st, k 1, yo, k to end.

Bind off all sts in a stretchy method. You can watch my tutorial video for the stretchy bind off method here: 

Weave in loose ends and block well. 


Lastly, feel free to leave a comment if you have any questions or find something confusing in the pattern.

Happy crocheting/knitting! follow me on Instagram @wiams_crafts and Twitter @wiamscrafts to see my upcoming projects.

Azure Shoreline Shawlette


Hello my fellow knitters! Each time I say "Enough! this is the last time I use ombre yarn", I find myself buying a new skein on my next visit to the store. But I have to give to ombre yarn; when used in the right way, a color gradient does give your knitted piece a unique and eye-catching look. In addition, you don't have to choose an intricate pattern, you can just pair a few skeins of ombre yarn with a simple pattern and it would still turn out stunning. With all that in mind I designed this shawlette, it is very simple, with an eight-row general pattern that repeats over and over. You can even turn it into a full-sized shawl by repeating the general pattern as many times as you want until you achieve the desired size. Just keep in mind that you might need a larger skein of ombre yarn to get there. So, give this one a go and let me know how it turns out for you, I am sure it will be the perfect handmade present for the upcoming holidays this winter. I wish you the happiest times knitting and preparing nice gifts for your family and friends! 

Skill level: Easy

GET printable PDF for this pattern here.


Materials:

  • Yarn: Alize Superlana Midi Ombre Batik, 25% wool, 75% acrylic, 10.58 oz (300 g), 557 yards (510 m), in the color 7275: 1 skein.
  • Circular knitting needles, 32" (80 cm) long, size US 10 (6 mm). 
  • Ring stitch markers.
  • Tapestry needle.


Measurements: width = 29" (74 cm), length = 58.25" (148 cm), approx.

Yardage: 552 - 557 yards (505 - 510 m), approx.

Gauge: 14 sts and 21 rows = 4"x 4" (10 cm x 10 cm) in stockinette stitch.


Knitting Terms 

  • st: stitch.
  • sts: stitches.
  • k: knit.
  • p: purl.
  • yo: yarn over.
  • k2tog: knit 2 sts together.
  • ssk: slip, slip, knit the 2 sts together through back loops.
  • s2s1ktog: slip two sts as if to knit them together, slip the third one knit-wise, knit the three sts together through back loops (centered double decrease). You can watch my tutorial video below to learn how to knit this stitch:


Instructions:

Cast on 3 sts, knit 7 rows, turn work 90 degrees clockwise, pick up 1 st out of each purl row side (3 sts in total), turn work 90 degrees clockwise again, pick up 3 sts from bottom. (9 sts)

You can also watch this video tutorial to learn how to do this type of cast on:

Row 1 (wrong side): k 3, p 3, k 3. Put a ring stitch marker before and after the middle stitch, this is the center stitch.

Row 2: k 3, (yo, k 1) three times, yo, k 3. (13 sts)

Row 3: k 3, p to last 3 sts, k 3. 

Row 4: k 3, (k 1, yo, k 1, yo, k 1), k the center st, repeat between () once, k 3. 

Row 5: repeat row 3.

Row 6: k 3, (k 1, yo, k 3, yo, k 1), k the center st, repeat between () once, k 3.

Row 7: repeat row 3.

Row 8: k 3, (yo, k 7, yo), k the center st, repeat between () once, k3.

Row 9: repeat row 3.

Row 10: k 3, (yo, p 1, k 1, k2tog, yo, k 1, yo, ssk, k 1, p 1, yo), k the center st, repeat between () once, k3.

Row 11: k 3, p 1, k 1, p to 2 sts before center st, k 1, p 1, p the center st, p 1, k 1, p to last 5 sts, k 1, p 1, k 3.

Row 12: k 3, [(k 1, yo) twice, ssk, k 1, p 1, k 1, k2tog, (yo, k 1) twice], k the center st, repeat between [ ] once, k 3. 

Row 13 and every odd numbered row: k 3, k the k sts and p the purl and yo sts to last 3 sts, k 3.

Row 14: k 3, [k 1, yo, k 3, yo, ssk, p 1, k2tog, yo, k 3, yo, k 1], k the center st, repeat between [ ] once, k 3. 

Row 16: k 3, (yo, k 7, p 1, k 7, yo), k the center st, repeat between () once, k3.


General pattern:

Note: after center st of each general pattern row, change the 'before center st' to 'before last 3 sts'.

Row 18: k 3, [yo, *p 1, k 1, k2tog, yo, k 1, yo, ssk, k 1, repeat from * to 1 st before center st, p 1, yo], k the center st, repeat between [ ] once, k3.

Row 20: k 3, [k 1, *yo, k 1, yo, ssk, k 1, p 1, k 1, k2tog, repeat from * to 2 sts before center st, (yo, k 1) twice], k the center st, repeat between [ ] once, k 3. 

Row 22: k 3, [k 1, *yo, k 3, yo, ssk, p 1, k2tog, repeat from * to 4 sts before center st, yo, k 3, yo, k 1], k the center st, repeat between [ ] once, k 3. 

Row 24: k 3, [yo, *k 7, p 1, repeat from * to 7 sts before center st, k 7, yo], k the center st, repeat between [ ] once, k3.

Row 25: repeat row 13.

Repeat rows 18 -25 of the general pattern eleven times, then repeat rows 18 - 23 once.

Work last rows as follows:

Row 1: k 3, yo, k to center st, yo, k the center st, yo, k to last 3 sts, yo, k 3.

Row 2: k 3, p to last 3 sts, k 3.

Row 3: k 3, [yo, k 2, *k 2, yo, k 1, yo, k 2, s2s1ktog, repeat from * to 7 sts before center st, k 2, yo, k 1, yo, k 4, yo], k the center st, k 1, repeat between [ ] once, k 3.

Row 4: repeat row 2.

Row 5: k 3, [yo, k 4, *k 2, yo, k 1, yo, k 2, s2s1ktog, repeat from * to 9 sts before center st, k 2, yo, k 1, yo, k 6, yo], k the center st, repeat between [ ] once, k 3.

Row 6: repeat row 2.

Row 7: k 3, [yo, k 6, *k 2, yo, k 1, yo, k 2, s2s1ktog, repeat from * to 11 sts before center st, k 2, yo, k 1, yo, k 8, yo], k the center st, repeat between [ ] once, k 3.

Row 8: bind off all sts knitwise.

Weave in loose ends. Block well. Enjoy wearing it.


Lastly, feel free to leave a comment if you have any questions or find something confusing in the pattern.

Happy crocheting/knitting! follow me on Instagram @wiams_crafts and Twitter @wiamscrafts to see my upcoming projects.

Labels