Showing posts with label Cowl. Show all posts

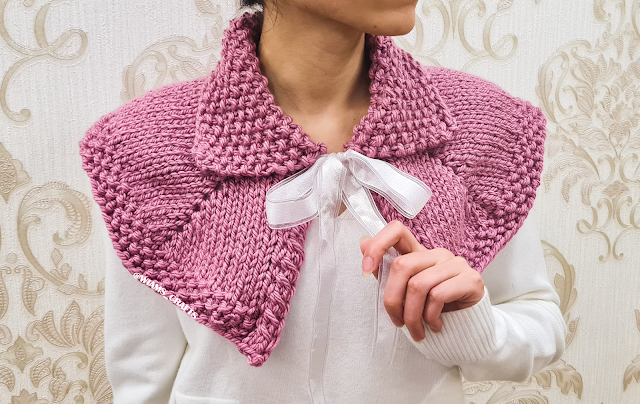
Rhombus Chunky Cowl

Hello my fellow knitters! This week’s design is super quick, super easy and super chic cowl. Knitting a piece with bulky yarn is a really nice way to uplift your mood and motivate yourself as a knitter, because you can make swift progress in no time, and the chunky thread will make any simple pattern stand out. I was able to get this diamond shape effect by making a one stitch increase (with the direction alternating to the left and to the right) to a simple square knit-and-purl pattern. If you are not feeling comfortable with the cowl size and wish to make it wider, you only need to cast on an extra twelve stitches when you start knitting it, and that will increase the circumference measurement 5.5” (14 cm). I hope you give this cowl a try, and I can’t wait to hear your feedback. Wish you all the best in the upcoming winter and holiday season.

Overview:

  • Skill level: Intermediate.
  • Instructions style: written pattern + chart + video tutorials.
  • Yarn weight: #6/ Super Bulky.
  • Available sizes: one size (see detailed measurements below).
  • Size customization: the circumference can be increased by 5.5” (14 cm) by casting on an additional 12 stitches.

Get the ad-free, printable PDF of this pattern from my store:

Or click here to jump to the instructions.

Want to pin this project for later? Just hover or click on any of the images in this post then click the red "save" button.


Materials:

  • Yarn: Alize Superlana Megafil, 25% wool, 75% acrylic, 3.53 oz (100 g), 60 yards (55 m), in the color "161" (2 skeins).
  • Circular knitting needles, 24" (60 cm) long, size US 15 (10 mm).
  • Tapestry needle.
  • Ring stitch marker.


Measurements: 
  • Circumference: 32" (76 cm), approx.
  • Height: 8" (20 cm), approx.

Yardage: 96 - 98 yards (88 - 90 meters) approx.

Gauge: 9 sts and 13 rounds = 4" x 4" (10 cm x 10 cm) in stockinette pattern.


Knitting Terms:

  • st: stitch.
  • sts: stitches.
  • k: knit.
  • p: purl.
  • k2tog: knit two sts together.
  • ssk: slip, slip, knit the two slipped sts together through back loops.
  • m1R: make one stitch increase right-wise.
  • m1L: make one stitch increase left-wise.
Watch my tutorial video on how to knit M1L and M1R: 


Instructions:

Cast on 72 sts. Join in the round. Don't know how to join in the round? here is a short tutorial on how to do it (from 0:26 - 1:15 min): 


Put a ring stitch marker at the beginning of the round. Purl one round, then knit one round. Work as follows:

General pattern:

Rounds 1, 3, 5, 7: (k 5, m1R, p 5, k2tog), repeat to end.

Round 2 and every even numbered round: k all sts, unless mentioned otherwise.

Round 8: k to last st, slip the stitch marker back one st, and start next 9-16 rounds from this st.

Rounds 9, 11, 13, 15: (ssk, p 5, m1L, k 5), repeat to end.

Round 16: k all sts, slip the st marker one st forward (back to its place in round one), and k the st.

Repeat rounds 1-8 of the general pattern once. Then, without changing the st marker position, purl one round. Bind off all sts. Weave in loose ends.


 Lastly, feel free to leave a comment if you have any questions or find something confusing in the pattern.


Happy crocheting/knitting! follow me on Instagram @wiams_crafts and Twitter @wiamscrafts to see my upcoming projects.

Claire Inspired Cowl


Hi everyone! I've been fond of the knitted garments that Outlander characters wear for quite a while now and have been told by multiple people to just go for it and make something inspired by them. I know how popular the series is, and after the release of every season my timeline gets flooded with knitters making their beautiful yet simple shawls and scarves. But this time, when I saw Claire wearing this specific cowl, I wanted to make one myself after I instantly fell in love with it. Adding one or two of my touches, such as porthole eyelet as a method of increasing stitches, may seem to have made it slightly difficult to knit, but you can watch my tutorial video and see how easy it is once you get the into the rhythm of it. If you’re waiting for the next episode of Outlander, you might want to use your time making this quick one skein project. Have a nice knitting day guys!

Skill level: Intermediate

Get printable PDF for this pattern:  or 


 Materials:

  • Suggested yarn: Red Heart Super Saver, 100% acrylic, 7 oz. (198 g), 264 yards (333 m), in the color "Light Raspberry": 1 skein.
  • Circular knitting needles 24" (60 cm) long, size US 10 (6 mm). 
  • Tapestry needle.
  • Ribbon, 1" (2.5 cm) wide and 53" (135 cm) long.


Measurements: Back yoke height = 6.5" (17 cm), edge circumference = 45" (115 cm), approx.

Yardage: 273- 275 yards (248- 250 m), approx.

Gauge: 11 sts and 14 rows = 4" x 4" (10 cm x 10 cm) in stockinette stitch.


Knitting terms:

  • st: stitch.
  • sts: stitches.
  • k: knit.
  • p: purl.
  • sl st: slip stitch.
  • k2tog: knit 2 sts together.
  • ssk: slip, slip, then knit the 2 slipped sts together through back loops.
  • kyokrb (porthole eyelet): (k 1, yarn over, k 1) into the stitch one row below. For more on how to Knit this, you can watch this tutorial video I made: 


Instructions:

Cast on 43 sts using Stretchy method. Follow the instructions in my tutorial video to learn how:

Now work as follows:

Collar:

Seed Pattern Row: k 1, p 1, repeat to last st, k 1.

Repeat seed pattern row sixteen more times. 

Yoke:

Note: to get a neat side edge, always slip first st purl-wise.

Row 1 (dividing row): p 1, yo, k2tog, p 1, k 2, kyokrb, k 8, kyokrb, k 11, kyokrb, k 8, kyokrb, k 2, p 1, ssk, yo, p 1.

Row 2: k 1, p 2, k 1, p to last 4 sts, k 1, p 2, k 1.

Row 3: p 1, switch the next 2 sts, placing the second one in front, and k them, p 1, *k to middle st of next porthole eyelet, kyokrb, repeat from * three more times, k to last 4 sts, p 1, switch the next 2 sts, placing the second one to the back, and k them, p 1.

Row 4: repeat row 2.

Repeat rows 3 and 4 nine more times, then work the last rows as follows:

Edge band:

Row 1: p 1, switch the next 2 sts placing the second in front and k them, *p 1, k 1, repeat from * to last 4 sts, p 1, switch the next 2 sts placing the second to back and k them, p 1.

Row 2: k 1, p 2, k 1, *k 1, p 1, repeat from * to last 5 sts, k 2, p 2, k 1. 

Repeat rows 1 and 2 once more. Bind off all sts. Weave in loose ends. Insert the ribbon through (yo, eyelets and yo) of the first row under the collar. Trim the ribbon's edges to get a neat look.


Lastly, feel free to leave a comment if you have any questions or find something confusing in the pattern.

Happy crocheting/knitting! follow me on Instagram @wiams_crafts and Twitter @wiamscrafts to see my upcoming projects.

Wheat Ears Cowl

Hi everyone! It seems that winter this is going to be very cold this year, so we’re all in need of something to keep our heads and necks warm and cozy. This cowl is so cute and very easy to make, I even made a tutorial video that you can follow to knit this pattern. It is a four-round pattern with few repetitions, and that is all you'll need to knit it. I wish you all to be healthy, and happy knitting!

Skill level: Intermediate

GET printable PDF for this pattern here or on Ravelry: 


Materials:

  • Suggested yarn: Alize Burcum Klasik, 100% acrylic, 3.5 oz. (100 g), 230 yards (210 m), in the color (287): 1 skein.
  • Circular knitting needles 16" (40 cm) long, size US 10 (6 mm). 
  • Tapestry needle.
  • Stitch holder. 


Measurements: height = 6.3" (16 cm), circumference (narrow/upper edge) = 21.25" (45 cm), circumference (wide/lower edge) = 26" (66 cm), approx.

Gauge: 14 sts and 22 rounds = 4" x 4" (10 cm x 10 cm) in garter stitch.

Yardage: 156- 158 yards (143- 145 m), approx.

Knitting terms:

  • st: stitch.
  • sts: stitches.
  • k: knit.
  • p: purl.
  • sl st: slip stitch.
  • k3tog: knit 3 sts together.
  • k3togtbl: knit 3 sts together through back loops.
  • sh: stitch holder.


Instructions:

Cast on 99 sts. Join in the round. Don't know how to join in the round? here is a short tutorial on how to do it (from 0:26 - 1:15 min): 


Put a ring stitch marker at the beginning of rounds, then work as follows:

Rib round: k 1, p 1, (k 3, p 1) twice, k 1, repeat to end.

Repeat the rib round 5 times, then work the pattern as follows:

Round 1: k to end.

Round 2: p 2, k 2, (k 1, yo, k 1) into st, sl st 1, (k 1, yo, k 1) into st, k 2, p 2, repeat to end.

Round 3: k 4, slip the (k 1, yo, k 1), k 1, slip the (k 1, yo, k 1), k 4, repeat to end.

Round 4: p 2, slip the next 2 sts into the sh and keep them to the back, k3tog, slip the 2 sts back to needle and knit them, k 1, slip the (k 1, yo, k 1) into the sh and keep them in the front, k 2, slip the (k 1, yo, k 1) back to the needle and k3togtbl, p 2, repeat to end. 

Repeat the pattern 7 times, k one round, repeat the rib round 4 times. Bind off all stitches. Weave in loose ends.

Check out this tutorial video I made for this cowl:


Lastly, feel free to leave a comment if you have any questions or find something confusing in the pattern.

Happy crocheting/knitting! follow me on Instagram @wiams_crafts and Twitter @wiamscrafts to see my upcoming projects.

Field at Dawn Cowl

Hello everyone! Cowls are fun to make, They can be made in many shapes to warm your neck and add a touch of elegance to your outfit. This cowl I made with cotton yarn knits up quick and has a lovely pattern design that resembles a field of barley spikes. It is simple and the size can be adjusted by adding 17 sts of one pattern. 

Skill level: Intermediate


Materials:

  • Yarn: Kartopu Baby Natural Cotton, 51% acrylic, 49% cotton, 3.53 oz (100 g), 219 yards (200 m), in the color K6259: 1 skein.
  • Circular knitting needles, 32" (80 cm) long, size US 7 (4.5 mm).
  • Ring stitch marker.
  • Tapestry needle.


Measurements: width = 6" (15 cm), circumference = 30" (76 cm), approx.

Yardage: 162 - 164 yards (148 - 150 m), approx.

Gauge: 18 sts and 28 rounds = 4"x 4" (10 cm x 10 cm) in stockinette stitch.


Knitting Terms:

  • st: stitch.
  • sts: stitches.
  • k: knit. 
  • yo: yarn over.
  • k3tog: knit 3 sts together.
  • sssk: slip, slip, slip, knit the 3 sts together through back loops.


Instructions:

Cast on 170 sts, Join in the round. Don't know how to join in the round? here is a short tutorial on how to do it (from 0:26 - 1:15 min): 


Put a ring stitch marker at the beginning of rounds, purl one round, then work as follows:

Round 1: (k 1, k3tog, k 4, yo, k 1, yo, k 8), repeat between () to end.

Round 2 and every even number round: k to end.

Round 3: (k 1, k3tog, k 3, yo, k 1, yo, k 9), repeat between () to end.

Round 5: (k 1, k3tog, k 2, yo, k 1, yo, k 10), repeat between () to end.

Round 7: (k 1, k3tog, k 1, yo, k 1, yo, k 3, yo, k 1, yo, k 4, sssk), repeat between () to end.

Round 9: (k 10, yo, k 1, yo, k 3, sssk), repeat between () to end.

Round 11: (k 11, yo, k 1, yo, k 2, sssk), repeat between () to end.

Round 13: (k 1, k3tog, k 4, yo, k 1, yo, k 3, yo, k 1, yo, k 1, sssk), repeat between () to end.

Round 14: k to end.

Repeat rounds (3- 14) once more, repeat rounds (3- 12) once, then work as follows:

Round 15: (k 12, yo, k 1, yo, k 1, sssk), 

Round 16: repeat round 2.

Bind off all sts purlwise in a stretchy method. You can watch my tutorial video for the stretchy bind off method here: 

Weave in loose ends and block well.


Lastly, feel free to leave a comment if you have any questions or find something confusing in the pattern.

Happy crocheting/knitting! follow me on Instagram @wiams_crafts and Twitter @wiamscrafts to see my upcoming projects.

Honey Chocolate Cowl

Hello everyone! It's very fun making a simple and quick-to-knit project using leftover yarn from previous projects. The challenge is creating a design that uses just what's left without having to go and purchase more of it -because you overshot- which beats the purpose (I'm obviously speaking from experience, haha!). Sometimes though, you have just enough material left to come up with a beautiful piece that complements the main one. For example, one of my favorite works, the Hashtag Jacket, the leftovers of which I turned into a Slouchy and Mittens matching set. Now, I've made many cowls from bulky yarn in the past, because I think it keeps the neck especially cozy during really cold days. This Nako Spaghetti Effect yarn (left unused from my Scalloped Chocolate Shawlette and Hat) is so easy to knit using 8 mm to 10 mm needles, and looks so stunning even with a simple garter pattern. I found that garter stitch and lace pattern worked in stripes of two colors gave the cowl the wavy shape I was aiming for. I hope you like it and enjoy making it.

Skill level: Easy


Materials:

  • Yarn: Nako, Spaghetti Effect, 25% wool, 75% premium acrylic, 100 g/ 3.53 oz, 60 m/ 65.6 yards. Color: 75533: 1 skein, color: 7511: 1 skein.
  • Circular knitting needles 60 cm/ 24" long, size US 11 (8 mm).
  • Tapestry needle.
  • Ring stitch marker.


Measurements: 
  • Height: 8" (20 cm), approx.
  • Diameter: Upper: 25" (64 cm), lower: 33" (84 cm).

Yardage: 116-118 yards (106-108 m) approx.

Gauge: 10 sts x 17 rows = 4"x 4" (10 cm x 10 cm) in garter pattern.

Knitting Terms: 
  • st: stitch.
  • sts: stitches.
  • k: knit.
  • p: purl.
  • k2tog: knit 2 sts together.
  • ssk: slip, slip, knit the 2 sts together through back loops.


Instructions:

With dark brown, cast on 72 sts, join in the round. Don't know how to join in the round? here is a short tutorial on how to do it (from 0:26 - 1:15 min): 
  Put the ring stitch marker at the beginning of rounds. work as follows:

Round 1: k all sts.

Round 2: p all sts.

General Pattern:

Round 1: (k2tog, yo) three times, k 6, repeat to end.

Round 2: k 6, p 6, repeat to end.

Repeat rounds 1 and 2 three times.

Bind light brown yarn (don't cut dark brown yarn), work as follows;

Round 3: k 6, (yo, ssk) three times, repeat to end.

Round 4: p 6, k 6, repeat to end.

Repeat rounds 3 and 4 three times.

Repeat the general pattern once more, then repeat the first six rounds with the dark brown yarn, p one round.

Stretchy bind off row: k 2, slip the 2 sts back to left needle, k2tog, *k 1, slip the 2 sts back to left needle, k2tog, repeat from * to end. You can watch my tutorial video for the stretchy bind off method here: 


Weave in loose ends.


Lastly, feel free to leave a comment if you have any questions or find something confusing in the pattern.

Happy crocheting/knitting! follow me on Instagram @wiams_crafts and Twitter @wiamscrafts to see my upcoming projects.

Parachutes Cowl


A new post and a new Cowl design; the domain that I'm fond of and excel in (in my opinion). I love experimenting with new stitch patterns, and I have many boards in pinterest dedicated to collecting them. From time to time I try incorporating some of these ideas in my designs, for example my Lady Cool Shawl in knitting, and Little Lily Nap Blanket in crochet.

This Cowl is simple to make and warm to wear. It is made out of two skeins of worsted yarn. My only reason to rate it as "Intermediate" is the use of a stitch holder, which some of you may find a little hard to handle. Apart from that, it's easy, and can be finished in less than one day of work.


Skill level: Intermediate 


Materials:

  • Nako vison yarn, 100% premium acrylic, 100 g. / 3.53 oz., 195m / 213 yards: (color A) gray 23403, 1 skein and (color B) Red 251, 1 skein.
  • Circular needles, 7 mm, 60 cm/ 24” long.
  • Stitch marker ring.
  • Small stitch holder.
  • Tapestry needle.


Dimensions: height = 10.5” (27 cm), circumference = 31” (79 cm), approx.


Yardage: 305- 315 yards (
280- 290 m).


Gauge: 14 sts and 16 rounds = 4" x 4" (10 cm x 10 cm) in 
stockinette stitch


Knitting terms:

  • st: stitch
  • sts: stitches.
  • k: knit.
  • p: purl.
  • sstbl: slip stitch through back loop.


Instructions:

Notes:
  • Always insert a stitch marker ring at the end of each round and do not forget to slip it from left to right needle.
  • Pay attention to the change in colors every two rounds.

With (A) yarn, cast on 104 sts using long tail method, join in round, make sure that all stitches are straight and not twisted.

Don't know how to join in the round? here is a short tutorial on how to do it (from 0:26 - 1:15 min): 


Use both yarn and what is left of the tail to work first four stitches, to get a better and neater look.
Band round: k 2, p 2. Repeat this row 5 times, and then knit 2 rounds.

Parachutes stitch pattern:

Multiple of 8 sts. Join (B) yarn.
Rounds 1 and 2 (B): k 3, *sstbl 2, k 6, repeat from * to last 5 sts, sstbl 2, k 3. Round 3 (A): k 1, *put next 2 sts in st holder in back of work, k 1 (the slipped stitch), put the 2 sts back and k them.

Put next ss in the st holder in front of work, k 2, put the ss back and knit it, k 2, repeat from * to last 7 sts.

Put next 2 sts in st holder in back of work, k 1 (the slipped stitch), put the 2 sts back and k them, put next ss in the st holder in front of work, k 2, put the ss back and knit it, k 1.
Round 4 (A): k all sts. Round 5 and 6 (B): sstbl, *k 6, sstbl 2, repeat from * to last 7 sts, k 6, sstbl. Round 7 (A): *put ss in the st holder in front of work, k 2, put the ss back and knit it, k 2, put next 2 sts in st holder in back of work, k 1 (the slipped stitch), put the 2 sts back and k them, repeat from * to end. Round 8 (A): k all sts.

Repeat rounds 1- 8 five times, cut red yarn (B).


Work as follows:

Band Round: k 2, p 2 to end. Repeat five times. You can watch my tutorial video for the stretchy bind off method here: 


Bind off using stretchy method, Weave in loose ends.


Lastly, feel free to leave a comment if you have any questions or find something confusing in the pattern.

Happy crocheting/knitting! follow me on Instagram to see my upcoming projects @wiams_crafts.