Showing posts with label Stretchy cast on. Show all posts

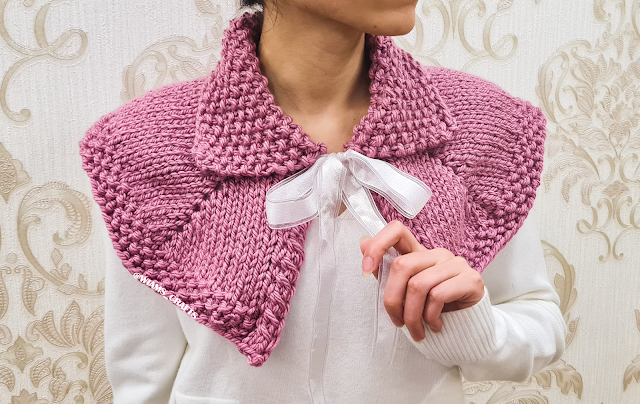
Claire Inspired Cowl


Hi everyone! I've been fond of the knitted garments that Outlander characters wear for quite a while now and have been told by multiple people to just go for it and make something inspired by them. I know how popular the series is, and after the release of every season my timeline gets flooded with knitters making their beautiful yet simple shawls and scarves. But this time, when I saw Claire wearing this specific cowl, I wanted to make one myself after I instantly fell in love with it. Adding one or two of my touches, such as porthole eyelet as a method of increasing stitches, may seem to have made it slightly difficult to knit, but you can watch my tutorial video and see how easy it is once you get the into the rhythm of it. If you’re waiting for the next episode of Outlander, you might want to use your time making this quick one skein project. Have a nice knitting day guys!

Skill level: Intermediate

Get printable PDF for this pattern:  or 


 Materials:

  • Suggested yarn: Red Heart Super Saver, 100% acrylic, 7 oz. (198 g), 264 yards (333 m), in the color "Light Raspberry": 1 skein.
  • Circular knitting needles 24" (60 cm) long, size US 10 (6 mm). 
  • Tapestry needle.
  • Ribbon, 1" (2.5 cm) wide and 53" (135 cm) long.


Measurements: Back yoke height = 6.5" (17 cm), edge circumference = 45" (115 cm), approx.

Yardage: 273- 275 yards (248- 250 m), approx.

Gauge: 11 sts and 14 rows = 4" x 4" (10 cm x 10 cm) in stockinette stitch.


Knitting terms:

  • st: stitch.
  • sts: stitches.
  • k: knit.
  • p: purl.
  • sl st: slip stitch.
  • k2tog: knit 2 sts together.
  • ssk: slip, slip, then knit the 2 slipped sts together through back loops.
  • kyokrb (porthole eyelet): (k 1, yarn over, k 1) into the stitch one row below. For more on how to Knit this, you can watch this tutorial video I made: 


Instructions:

Cast on 43 sts using Stretchy method. Follow the instructions in my tutorial video to learn how:

Now work as follows:

Collar:

Seed Pattern Row: k 1, p 1, repeat to last st, k 1.

Repeat seed pattern row sixteen more times. 

Yoke:

Note: to get a neat side edge, always slip first st purl-wise.

Row 1 (dividing row): p 1, yo, k2tog, p 1, k 2, kyokrb, k 8, kyokrb, k 11, kyokrb, k 8, kyokrb, k 2, p 1, ssk, yo, p 1.

Row 2: k 1, p 2, k 1, p to last 4 sts, k 1, p 2, k 1.

Row 3: p 1, switch the next 2 sts, placing the second one in front, and k them, p 1, *k to middle st of next porthole eyelet, kyokrb, repeat from * three more times, k to last 4 sts, p 1, switch the next 2 sts, placing the second one to the back, and k them, p 1.

Row 4: repeat row 2.

Repeat rows 3 and 4 nine more times, then work the last rows as follows:

Edge band:

Row 1: p 1, switch the next 2 sts placing the second in front and k them, *p 1, k 1, repeat from * to last 4 sts, p 1, switch the next 2 sts placing the second to back and k them, p 1.

Row 2: k 1, p 2, k 1, *k 1, p 1, repeat from * to last 5 sts, k 2, p 2, k 1. 

Repeat rows 1 and 2 once more. Bind off all sts. Weave in loose ends. Insert the ribbon through (yo, eyelets and yo) of the first row under the collar. Trim the ribbon's edges to get a neat look.


Lastly, feel free to leave a comment if you have any questions or find something confusing in the pattern.

Happy crocheting/knitting! follow me on Instagram @wiams_crafts and Twitter @wiamscrafts to see my upcoming projects.

Pastel Stripes Sweater


Hello knitters! I immediately fell in love with this yarn the moment I saw it in the store I frequent. It's my first time buying an alpaca yarn, and the feel of it is so warm and cozy, plus, it comes in this lovely pastel colors palette, which made it all the more easier to grab it off the shelf. I decided that the best design for this yarn is a simple sweater that will highlight the flow of its colors. Making this piece has also given me the chance to try my hand at knitting this particular scalloped neckline that I had in my mind for a while. It's a comfortable, oversized fit for you all to wear cozily, and it comes in a wide range of sizes that should hopefully fit most body shapes. I hope you all have a lovely time making it!

Overview:

  • Skill level: Intermediate.
  • Instructions style: written pattern + chart.
  • This sweater is worked top down in one piece.
  • Yarn weight: #2/ fine/ sport.
  • Available sizes: this sweater is available in three sizes for adults: XS/S, M/L and XL/2XL (see detailed measurements below).

Get the ad-free, printable PDF of this pattern from my store:

Or click here to jump to the instructions.

Want to pin this project for later? Just hover or click on any of the images in this post then click the red "save" button.


Materials:

  • Yarn: Nako Peru Color (25% alpaca, 25% wool, 50% premium acrylic), 3.35 oz (100 g), 339 yards (310 m), in the color 32185: 3 (3, 4) skeins.
  • Double pointed needles (DPNs) set, size US 7 (4.5 mm).
  • Circular needles, size US 7 (4.5 mm), 16" (40 cm) long.
  • Circular needles, size US 7 (4.5 mm), 32"(80 cm) long.
  • Straight knitting needles, size US 7 (4.5 mm).
  • Ring stitch markers.
  • Regular stitch marker.
  • Tapestry needle.

Sizes and measurements:

Size Chest measurements Sweater's Chest Sweater's back length
XS/S 33.6 - 35.6" (85 - 90 cm) 38.6" (98 cm) 24" (61 cm)
M/L 37.6 - 39.6" (95 - 100 cm) 44" (112 cm) 27.5" (70 cm)
XL/2XL 41.6 - 43.6" (105 - 110 cm) 47.25" (120 cm) 29" (74 cm)


Yardage: 

  • Size XS/S: 820 - 830 yards (750 - 760 m).
  • Size M/L:  930 - 940  yards (850 - 860 m).
  • Size XL/2XL: 1100 -1110  yards (1000 - 1010 m).

Gauge: 23 sts and 26 rounds = 4"x 4" (10 cm x 10 cm) in stockinette stitch.


Knitting terms:

  • ststitch.
  • sts: stitches.
  • k: knit.
  • p: purl.
  • m1: make one st increase.
  • k2tog: knit 2 sts together.
  • ssk: slip, slip, knit the 2 sts together through back loops.
  • stm(s): stitch marker(s).


Instructions: 

Note: when knitting even number rounds of the collar pattern, knit the ssk sts through back loops.

Neck:

With short circular needles, cast on 136 (153170) sts using a stretchy method. You can watch my tutorial video for the stretchy cast on method here: 

Join in round. Don't know how to join in the round? here is a short tutorial on how to do it (from 0:26 - 1:15 min): 


Put a ring stm at the beginning of rounds. Purl one round, then knit 2 rounds. Work as follows:

Note: always knit the ssk st through back loop.

Scalloped collar pattern:

Round 1: [k2tog 3 times, (yo, k 1) 5 times, yo, ssk 3 times], repeat to end,

Round 2: k to end.

Rounds 3, 5, 7: repeat round 1.

Rounds 4, 6, 8: repeat round 2.

Round 9: [k 3, k2tog, yo, k 7, yo, ssk, k 3], repeat to end.

Round 10: repeat round 2.

Round 11: [k 2, k2tog, yo, k 9, yo, ssk, k 2], repeat to end.

Round 12: repeat round 2.

Round 13: [k 1, k2tog, yo, k 11, yo, ssk, k 1], repeat to end.

Round 14: repeat round 2. 

Round 15: [k2tog, yo, k 13,yo, ssk], repeat to end.


Yoke:

First increasing round: [k 1, yo, k 7, yo, k 1, yo, k 7, yo, k 1], repeat to end. 168 (189, 210) sts

Knit 10 (10, 13) rounds.

Change to the long circular needles.

Second increasing round: [k 1, yo, k 9, yo, k 1, yo, k 9, yo, k 1] repeat to end. 200 (225, 250) sts

Knit 10 (10, 13) rounds.

Third increasing round: [k 1, yo, k 11, yo, k 1, yo, k 11, yo, k 1], repeat to end. 232 (261, 290) sts

Knit 10 (10, 13) rounds.

Fourth increasing round: [k 1, yo, k 13, yo, k 1, yo, k 13, yo, k 1] repeat to end. 264 (297, 330) sts

Knit 10 (10, 13) rounds.

Fifth increasing round: [k 1, yo, k 15, yo, k 1, yo, k 15, yo, k 1] repeat to end. 296 (333, 370) sts

For sizes M/L and XL/2XL:

Knit (1013) rounds.

Sixth increasing round: [k 1, yo, k 17, yo, k 1, yo, k 17, yo, k 1] repeat to end. (369, 410 sts)

Knit 2 (4, 4) rounds. The yoke is now measured 19 (25, 30) cm approximately and 296 (369, 410) sts. 

Body and sleeves dividing round: k 44 (55, 62) sts (half back sts), slip the next 60 (74, 80) sts into a thread for the sleeve, cast on 8 (10, 12) sts for the under sleeve, k 88 (111, 126) sts (front sts), slip the next 60 (74, 80) sts into a thread for the second sleeve, cast on 8 (10, 12) sts for the under sleeve, then k the last 44 (55, 62) sts (half back sts), put a stm at the middle of the under sleeve sts for measuring and for defining the splitting line between the back [96 (120136) sts] and the front [96 (121138) sts]. This will be useful later when working on the last rows (bottom rib bands).

Keep working stockinette stitch pattern until body measures 20 (22, 24) cm. 192 (241, 274) sts

Pass the 96 (120136) sts of the back (located between the stms) into a straight knitting needles set, then work as follows:

Back piece:

Back increasing row: k one row, increasing 15 (21, 25) sts evenly. 111 (141, 161) sts

Rib row 1: p 1, k 1, repeat to last st, p 1.

Rib row 2: k 1, p 1, repeat to last st, k 1.

Repeat rib rows thirteen (fifteenseventeen) more times. Bind off all sts.

Front piece:

Pass the remaining 96 (121138) sts of the front into a straight knitting needles set, then work as follows:

Front increasing row: k one row, increasing 15 (2023) sts evenly. 111 (141161) sts. Repeat rib rows five (sixseven) times. Bind off all sts. 


Sleeves: 

Slip the 60 (74, 80) sts of the sleeve from the thread to the short circular needles, pick up 1 st from each of the 8 (10, 12) sts of the under arm, place a stm in the middle of the under arm sts. 68 (84, 92) sts

*Knit 10 (6, 4) rounds.

Decreasing round: k to last 2 sts before stm, ssk, k2tog.

Repeat from * seven (eleven, fifteen) more times, change to double pointed needles when needed. 52 (60, 60) sts

When sleeve measures 32 (30, 28) cm work as follows:

Rib round: k 1, p 1, to end.

Repeat rib round 24 times, bind off all sts. Repeat the steps to make the second sleeve.

Weave in loose ends. Block if needed.


Lastly, feel free to leave a comment if you have any questions or find something confusing in the pattern.

Happy crocheting/knitting! follow me on Instagram @wiams_crafts and Twitter @wiamscrafts to see my upcoming projects.