Showing posts with label yoke. Show all posts

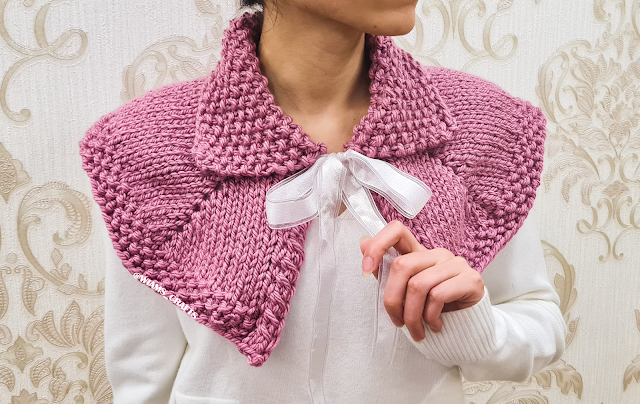
Claire Inspired Cowl


Hi everyone! I've been fond of the knitted garments that Outlander characters wear for quite a while now and have been told by multiple people to just go for it and make something inspired by them. I know how popular the series is, and after the release of every season my timeline gets flooded with knitters making their beautiful yet simple shawls and scarves. But this time, when I saw Claire wearing this specific cowl, I wanted to make one myself after I instantly fell in love with it. Adding one or two of my touches, such as porthole eyelet as a method of increasing stitches, may seem to have made it slightly difficult to knit, but you can watch my tutorial video and see how easy it is once you get the into the rhythm of it. If you’re waiting for the next episode of Outlander, you might want to use your time making this quick one skein project. Have a nice knitting day guys!

Skill level: Intermediate

Get printable PDF for this pattern:  or 


 Materials:

  • Suggested yarn: Red Heart Super Saver, 100% acrylic, 7 oz. (198 g), 264 yards (333 m), in the color "Light Raspberry": 1 skein.
  • Circular knitting needles 24" (60 cm) long, size US 10 (6 mm). 
  • Tapestry needle.
  • Ribbon, 1" (2.5 cm) wide and 53" (135 cm) long.


Measurements: Back yoke height = 6.5" (17 cm), edge circumference = 45" (115 cm), approx.

Yardage: 273- 275 yards (248- 250 m), approx.

Gauge: 11 sts and 14 rows = 4" x 4" (10 cm x 10 cm) in stockinette stitch.


Knitting terms:

  • st: stitch.
  • sts: stitches.
  • k: knit.
  • p: purl.
  • sl st: slip stitch.
  • k2tog: knit 2 sts together.
  • ssk: slip, slip, then knit the 2 slipped sts together through back loops.
  • kyokrb (porthole eyelet): (k 1, yarn over, k 1) into the stitch one row below. For more on how to Knit this, you can watch this tutorial video I made: 


Instructions:

Cast on 43 sts using Stretchy method. Follow the instructions in my tutorial video to learn how:

Now work as follows:

Collar:

Seed Pattern Row: k 1, p 1, repeat to last st, k 1.

Repeat seed pattern row sixteen more times. 

Yoke:

Note: to get a neat side edge, always slip first st purl-wise.

Row 1 (dividing row): p 1, yo, k2tog, p 1, k 2, kyokrb, k 8, kyokrb, k 11, kyokrb, k 8, kyokrb, k 2, p 1, ssk, yo, p 1.

Row 2: k 1, p 2, k 1, p to last 4 sts, k 1, p 2, k 1.

Row 3: p 1, switch the next 2 sts, placing the second one in front, and k them, p 1, *k to middle st of next porthole eyelet, kyokrb, repeat from * three more times, k to last 4 sts, p 1, switch the next 2 sts, placing the second one to the back, and k them, p 1.

Row 4: repeat row 2.

Repeat rows 3 and 4 nine more times, then work the last rows as follows:

Edge band:

Row 1: p 1, switch the next 2 sts placing the second in front and k them, *p 1, k 1, repeat from * to last 4 sts, p 1, switch the next 2 sts placing the second to back and k them, p 1.

Row 2: k 1, p 2, k 1, *k 1, p 1, repeat from * to last 5 sts, k 2, p 2, k 1. 

Repeat rows 1 and 2 once more. Bind off all sts. Weave in loose ends. Insert the ribbon through (yo, eyelets and yo) of the first row under the collar. Trim the ribbon's edges to get a neat look.


Lastly, feel free to leave a comment if you have any questions or find something confusing in the pattern.

Happy crocheting/knitting! follow me on Instagram @wiams_crafts and Twitter @wiamscrafts to see my upcoming projects.

Candy Corn Sweater (Adult Size)


UPDATE 28-Aug-2021: I forgot to upload the chart for the candy corn pattern when I posted this yesterday. You can find it now at the end of the post. I apologize for the confusion.

Hi everyone! Since summer season is technically over in a few days, I can’t wait to start working on new project for fall and winter. My contributions for Halloween this year have been mainly wearable items: starting with my two Halloween hats (Here and Here), and now this sweater. This is actually the adult version of my "Candy Corn Sweater" that I've designed back in 2019. It has been sitting in my to-do-list for a while since it was requested by a kind person, and I thought there is no better time than now to get this done. Unlike the child-size one, this sweater is worked up-down, because I found that knitting it this way is much easier. Also, I've separated the increasing rounds from the candy corn pattern in my instructions, to simplify the steps and so that you can concentrate on one task at a time. The sweater can be made to (hopefully) fit a wide range of sizes, and I have tried my best to give all the necessary measurements below. Have a great day as always, and I hope you enjoy making this sweater!

Skill level: Intermediate

GET printable PDF for this pattern here.

Jack-o'-lantern Halloween Hat

Candy Corn Sweater


Materials:

  • Yarn: Alize Baby Best, (90% acrylic, 10% bamboo), 3.35 oz (100 g), 262 yards (240 m), in the following colors and quantities: yellow 250 (3, 4, 4 skeins), gray 119 (2, 2, 3 skeins), orange 336 (1 skein), and white 55 (1 skein).
  • Double pointed needles (DPNs) sets, sizes US 6 (4 mm) and US 7 (4.5 mm).
  • Circular needles, sizes US 6 (4 mm) and US 7 (4.5 mm), 16" (40 cm) long.
  • Circular needles, sizes US 6 (4 mm) and US 7 (4.5 mm), 32"(80 cm) long.
  • Ring stitch marker.
  • Regular stitch marker.
  • Tapestry needle.


Sizes and measurements:
SizeChest
S/M33.5 - 40" (85 - 100 cm)
L/XL 42 - 48" (105 - 120 cm)
2XL/3XL 50 - 56" (125 - 140 cm)
 
Gauge: 21 sts and 24 rounds = 4"x 4" (10 cm x 10 cm) in stockinette stitch.

Yardage: 
  • Size S/M: 1025 - 1030 yards (935 - 940 m).
  • Size L/XL: 1130 - 1135 yards (1035 - 1040 m).
  • Size 2XL/3XL: 1240 - 1245 yards (1135 - 1140 m).


Knitting terms:

  • st: stitch.
  • sts: stitches.
  • k: knit.
  • p: purl.
  • k2tog: knit 2 sts together.
  • ssk: slip, slip, knit the 2 sts together through back loops.
  • stm: stitch marker.


Instructions: 

Neck:

With gray color and 4 mm short circular needles, cast on 90 (96, 108) sts, join in round. Don't know how to join in the round? here is a short tutorial on how to do it (from 0:26 - 1:15 min): 


Put a ring stm at the beginning of rounds. Work as follows:

Rib round: k 3, p 3 to end.

Work rib round 7 times. Change to 4.5 mm short circular needles, then purl one round. 
 
Yoke:

Note: put a regular stm at the beginning of purl round. The yoke is measured from this stm. 

First increase round: knit all sts, increasing 30 (34, 38) sts evenly spaced. 120 (130, 146) sts
Knit 5 (8, 11) rounds, change to 4.5 mm long circular needles. 

Second increase round: knit all sts, increasing 30 (36, 40) sts evenly spaced. 150 (166, 186) sts

Knit 5 (8, 11) rounds. 

Third increase round: knit all sts, increasing 30 (38, 42) sts evenly spaced. 180 (204, 228) sts

Work the candy corn chart 1 right to left using the gray, yellow, white and orange yarns. Cut white and orange yarns.

With gray yarn knit one round. 

Forth increase round: knit all sts, increasing 30 (36, 42) sts evenly spaced. 210 (240, 270) sts
With gray yarn, knit one round. With yellow yarn, knit 3 rounds. With gray yarn, knit one round. 

Fifth increase round: knit all sts, increasing 30 (36, 42) sts evenly spaced. 240 (276, 312) sts
With gray yarn, knit one round.

Work the candy corn chart 2 right to left using the gray, yellow, white and orange yarns. Cut gray, white and orange yarns.

With yellow yarn, knit one round. Keep on knitting with yellow yarn.

Sixth increase round: knit all sts, increasing 30 (42, 54) sts evenly spaced. 270 (318, 366) sts

Knit 5 (8, 11) rounds.

Seventh increase round: knit all sts, increasing 30 (42, 54) sts evenly spaced. 300 (360, 420) sts

Knit 1 (4, 7) rounds, or until the yoke measures 23 (27, 31) cm. 


Dividing round

From the ring stitch marker, k 45 (56, 64) sts for half back, *place the next 60 (68, 82) sts on piece of yarn or slip them into spare 4.5 mm short circular needles for the sleeve. 

Cast on 6 (8, 10) sts for the under arm*, knit 90 (112, 128) sts for front and repeat between ** one more time. knit the last 45 (56, 64) sts to the end of round. 192 (240, 276) sts


Body:

With yellow yarn, keep on knitting in rounds until the body measures 24 (25, 26) cm from the dividing round.

Work the candy corn chart 3 right to left using the gray, yellow, white and orange yarns. Cut yellow, white and orange yarn.

With gray yarn knit 3 rounds, change to 4 mm long circular needles. Repeat rib round 9 times. Bind off all sts.


Sleeve: 

Slip the 60 (68, 82) sts into 4.5 mm set of double pointed needles, or 4.5 mm short circular needles (as you prefer). Join yellow yarn and pick up one st out of each of the body under arm 6 (8, 10) sts. 66 (76, 92) sts


Put a ring stitch marker in the middle of the picked up 6 (8, 10) sts to start knitting the sleeve.

Sleeve shaping: *Knit 7 (5, 3) rounds.

Decreasing round: knit one round to 2 sts before stm, ssk before ring stm, k2tog after ring stm. 

Repeat from * 9 (14, 16) times. 48 (48, 60) sts

Knit until sleeve measures 30 (27, 25) cm from the dividing round.

Work the candy corn chart 3 right to left using the gray, yellow, white and orange yarn. Cut yellow, white and orange yarn.

With gray yarn knit 3 rounds, change to 4 mm set of double pointed needles, or short circular needles. repeat rib round 9 times. Bind off all sts. Weave in loose ends. Block and enjoy wearing.


Lastly, feel free to leave a comment if you have any questions or find something confusing in the pattern.

Happy crocheting/knitting! follow me on Instagram @wiams_crafts and Twitter @wiamscrafts to see my upcoming projects.

Dragonfly Toddler Dress


For me, one of the most beautiful articles of clothing you can make is the toddler dress; they always fascinate me whenever I browse different boards on Pinterest. I make one for fun every once in a while, though I am a bit hesitant to share them. That is because the dresses I like to make have two parts; a crocheted yoke, and a sewn skirt made out of cloth. Most people I have interacted with on the internet can crochet (or knit), but don’t necessarily have the skills for sewing.
Therefore, my design for a toddler dress in this post is a fully crocheted one. Nevertheless, in my next post I will share with you the original version I made, the one with the sewn skirt, for all of you out there who enjoy both crochet and sewing.


Level: intermediate

Labels