Showing posts with label tutorial. Show all posts

Marigold Shawl

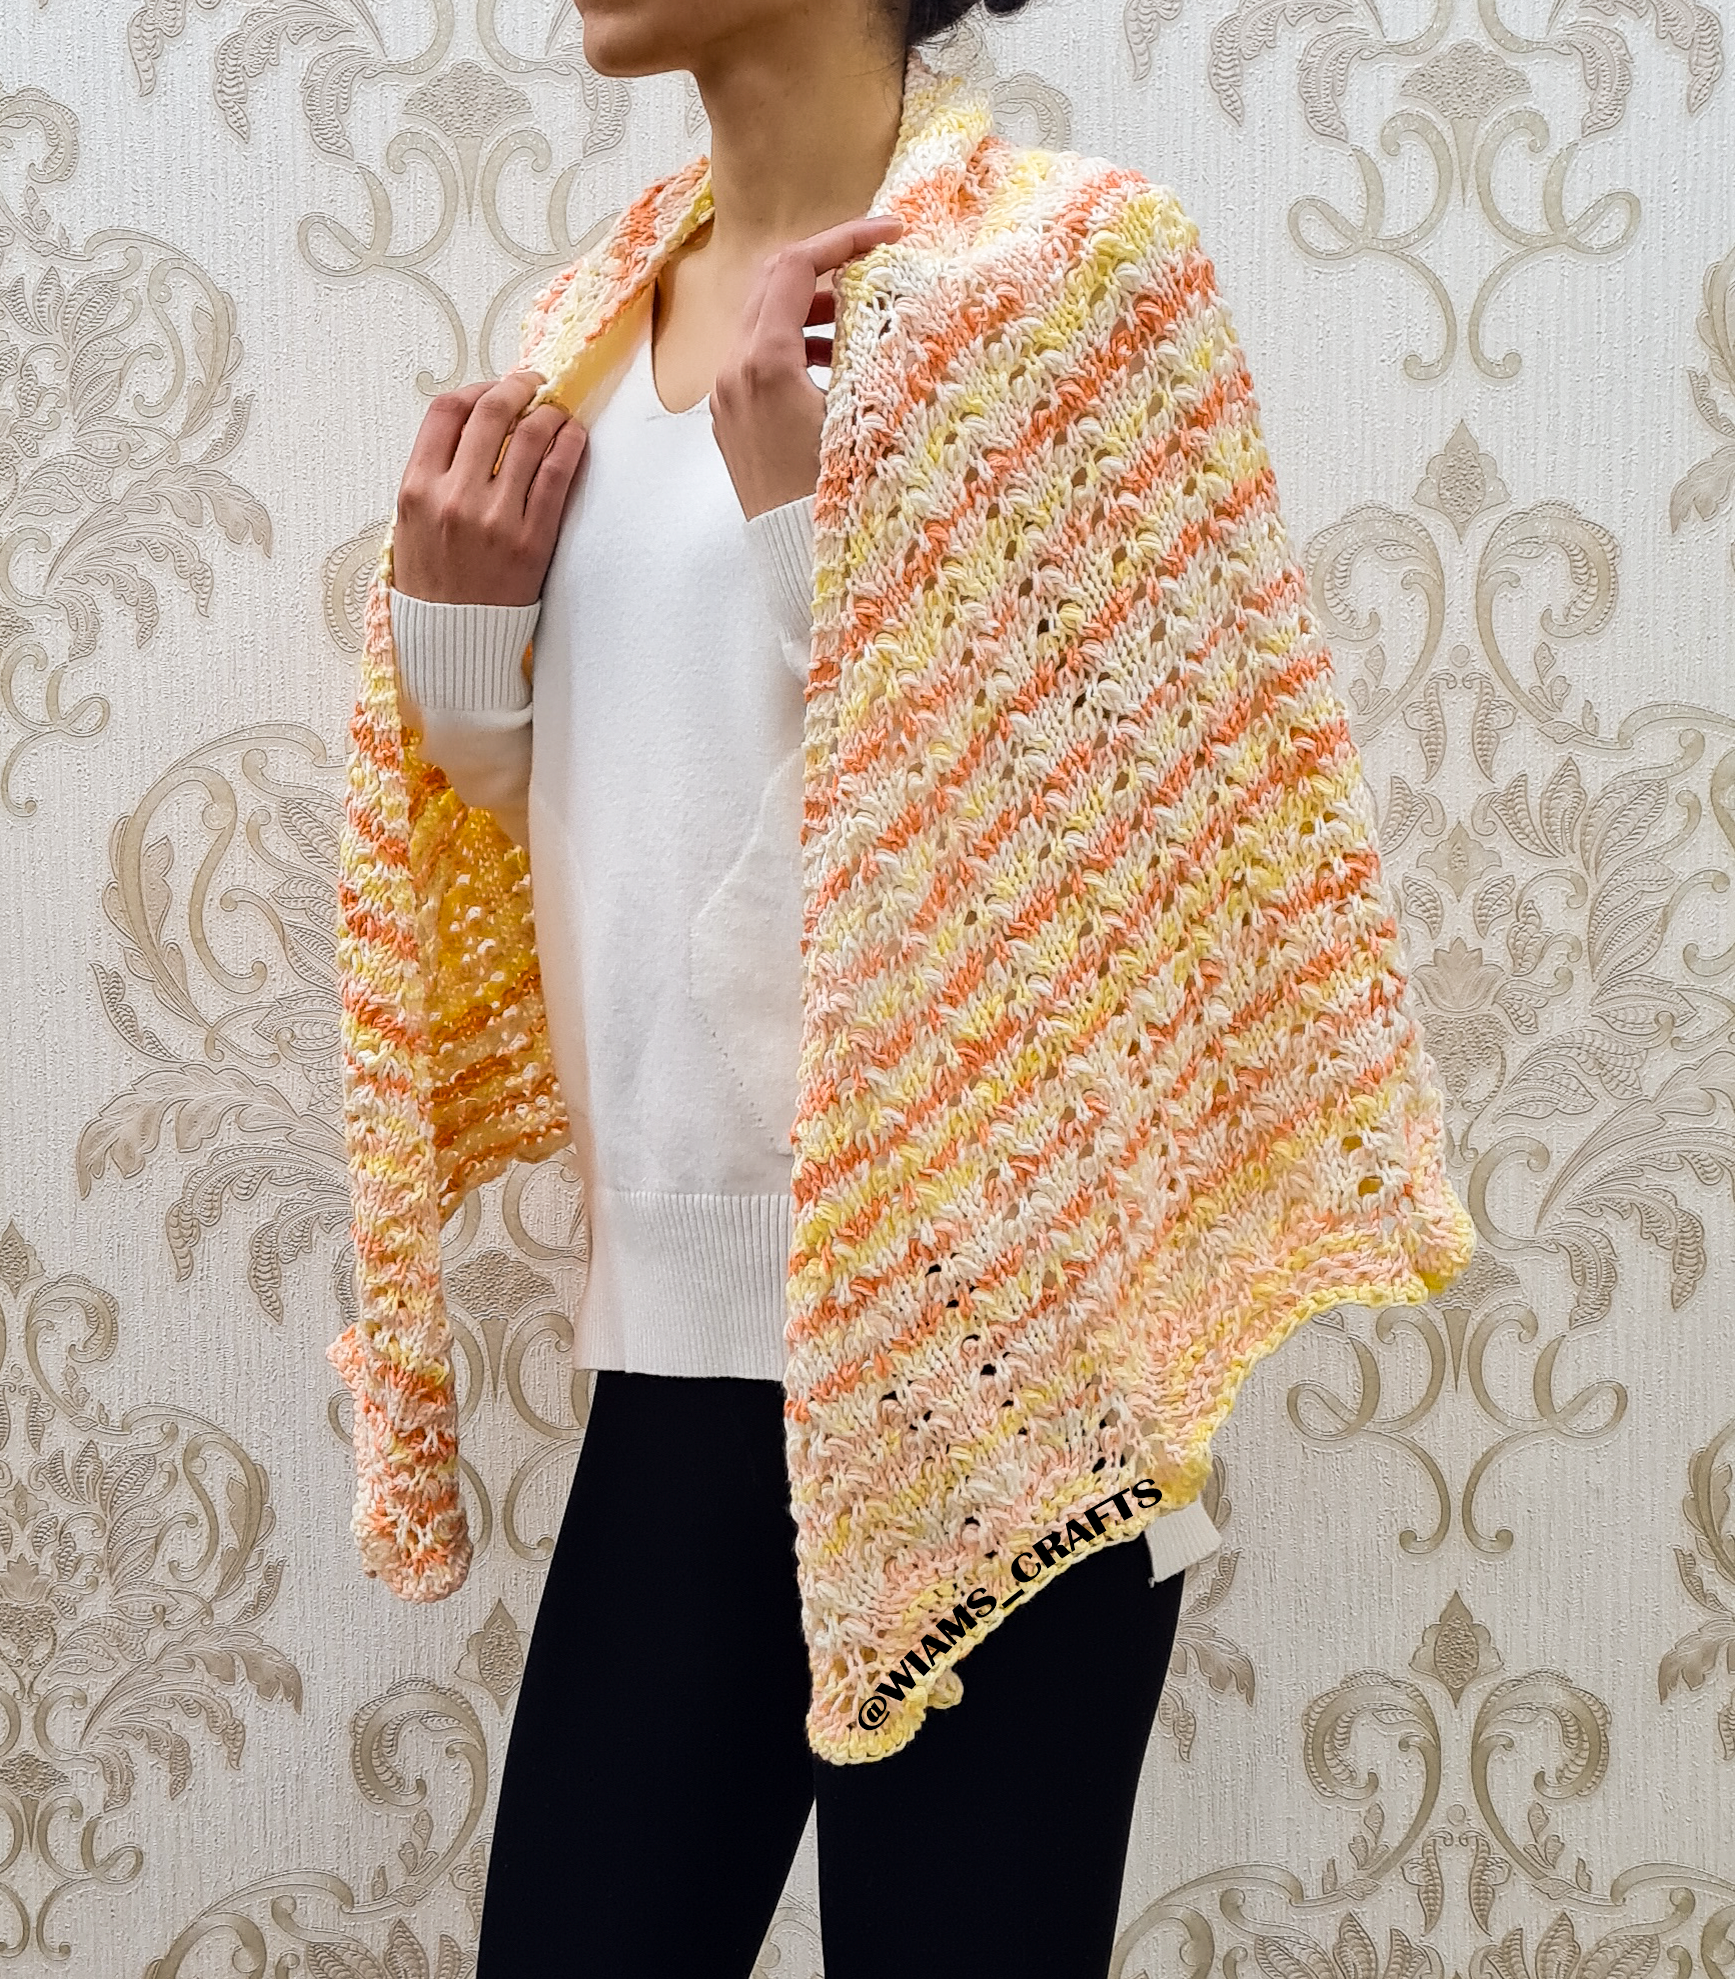
Hi everyone! It's been a while since my last post, as I've been busy with family matters. But clearly, I still haven’t ran out of this Nako Elit Baby yarn, and this is the third design after the Dusky Sky Hat and Powder Stripes Shawl that I made using it. It's so soft and easy to work with and has a very pretty color scheme that I just love to work with it. Now this shawl, with its classic triangular shape, has a four rows pattern that is repeated three times within the general pattern. It has one specific new trick, which is to make five stitches out of one in a row, then knit them together in the next row. To me, the pattern looks like twigs with little leaves on both sides, or like wheat ears, though you are free to imagine whatever you like. The lacy waves edging rows will give you a very beautiful and cozy shawl that’s perfect for these unusually chilly spring days. Hope you have an enjoyable time making it! 

Skill level: Intermediate

Get printable PDF for this pattern:   or  


Materials:

  • Yarn: NAKO Elit Baby Mini Batik, 100% premium anti-pill acrylic, 3.5 oz. (100 g), 273 yards (250 m), color: 32430 (4 skeins).
  • Circular knitting needles, 32" (80 cm) long, size US 8 (5 mm). 
  • Ring stitch markers.
  • Tapestry needle.


Measurements: width = 29" (74 cm), length = 55" (140 cm), approx.

Yardage: 935- 940 yards (855- 860 m), approx.

Gauge: 20 sts and 24 rows = 4" x 4" (10 cm x 10 cm) in stockinette stitch.


Knitting Terms 

  • st: stitch.
  • sts: stitches.
  • k: knit.
  • p: purl.
  • yo: yarn over.
  • k2tog: knit 2 sts together.
  • ssk: slip, slip, knit the 2 sts together through back loops.
  • k5tog: knit 5 sts together.
  • k5togtbl: knit 5 sts together through back loops. 


Instructions:

Note 1: Work [(p 1, yo, p 1, yo p 1) into yo] loosely so you can knit them together easily in the next row.

Cast on 3 sts, knit 7 rows, turn work 90 degrees clockwise, pick up 1 st out of each purl row side (3 sts in total), turn work 90 degrees clockwise again, pick up 3 sts from bottom. (9 sts)

You can also watch this video tutorial to learn how to do this type of cast on:

Row 1 (wrong side): k 3, p 3, k 3. Put a ring stitch marker before and after the middle stitch, this is the center stitch.

Row 2: k 3, (yo, k 1) three times, yo, k 3. (13 sts)

Row 3: k 3, p to last 3 sts, k 3. 

Row 4: k 3, *yo, k 3, yo*, k the center st, repeat between ** once, k 3. 

Row 5: repeat row 3.

Row 6: k 3, *yo, k2tog, yo, k 1, yo, ssk, yo*, k the center st, repeat between ** once, k 3.

Row 7: k 3, p 2, *(p 1, yo, p 1, yo, p 1) into yo, p 1*, repeat between ** once, p 1, p the center st, p 2, repeat between ** twice, p 1, k 3.

Row 8: k 3, *yo, k 2, k5tog, k 1, k5togtbl, k 2, yo*, k the center st, repeat between ** once, k3.

Row 9: repeat row 3.

Row 10: k 3, *yo, k2, k2tog, yo, k 1, yo, ssk, k 2, yo*, k the center st, repeat between ** once, k 3.

Row 11: k 3, p 4, *(p 1, yo, p 1, yo, p 1) into yo, p 1*, repeat between ** once, p 3, p the center st, p 4, repeat between ** twice, p 3, k 3.

Row 12: k 3, *yo, k 4, k5tog, k 1, k5togtbl, k 4, yo*, k the center st, repeat between ** once, k3.

Row 13: repeat row 3.


General pattern:

Row 14: k 3, yo, (k 1, yo, ssk, k1, k2tog, yo) repeat between () to 1 st before center st, k 1, yo, k the center st, yo, (k 1, yo, ssk, k1, k2tog, yo) repeat between () to last 4 sts, k 1, yo, k 3.

Row 15: k 3, p 1, *p 1, (p 1, yo, p 1, yo, p 1) into yo, p 3, (p 1, yo, p 1, yo, p 1) into yo*, repeat between ** to 2 sts before center st, p 2, p the center st, p 1, repeat between ** to last 5 sts, p 2, k 3.

Row 16: k 3, yo, k 1, *k 1, k5togtbl, k 3, k5tog*, repeat between ** to 2 sts before center st, k 2, yo, k the center st, yo, k 1, repeat between ** to last 5 sts, k 2, yo, k3.

Row 17: repeat row 3.

Row 18: k 3, yo, *k2tog, yo, k 1, yo, ssk, k1*, repeat between ** to 5 sts before center st, k2tog, yo, k 1, yo, ssk, yo, k the center st, yo, repeat between ** to last 8 sts, k2tog, yo, k 1, yo, ssk, yo, k 3.

Row 19: k 3, p 1, *[p 1, (p 1, yo, p 1, yo, p 1) into yo] twice, p 2*, repeat between ** to center st, p the center st, p 1, repeat between ** to last 3 sts, k 3.

Row 20: k 3, yo, k 1, *k 1, k5tog, k 1, k5togtbl, k 2*, repeat between ** to center st, yo, k the center st, yo, k 1, repeat between ** to last 3 sts, yo, k3.

Row 21: repeat row 3.

Row 22: k 3, yo, k1, *k 1, k2tog, yo, k 1, yo, ssk*, repeat between ** to 2 sts before center st, k 2, yo, k the center st, yo, k 1, repeat between ** to 5 sts, k 2, yo, k 3.

Row 23: k 3, p 1, *p 3, (p 1, yo, p 1, yo, p 1) into yo, p 1, (p 1, yo, p 1, yo, p 1) into yo*, repeat between ** to 4 sts before center st, p 4, p the center st, p 1, repeat between ** to last 7 sts, p 4, k 3.

Row 24: k 3, yo, k 3, *k 1, k5tog, k 1, k5togtbl, k 2*, repeat between ** to 2 sts before center st, k 2, yo, k the center st, yo, k 3, repeat between ** to last 5 sts, k 2, yo, k 3.

Row 25: repeat row 3.

Repeat the general pattern ten more times.

Tutorial video for how to knit this shawl: 


Edging lace rows:

Row 1: k 3, yo, *k 1, yo, ssk, p2tog three times, (k 1, yo) six times, k 1, p2tog three times, k2tog, yo*, repeat between ** to 1 st before center st, k 1, yo, k the center st, yo, repeat between ** to last 4 sts, k 1, yo, k 3.

Row 2: k 3, p 1, *p 1, (p 1, yo, p 1, yo, p 1) into yo, p 21, (p 1, yo, p 1, yo, p 1) into yo*, repeat between ** to 2 sts before center st, p 2, p the center st, p 1, repeat between ** to last 5 sts, p 2, k 3. 

Row 3: k 3, yo, k 1, *k 1, k5togtbl, k 1, p2tog three times, (k 1, yo) six times, k 1, p2tog three times, k 1, k5tog*, repeat between ** to 2 sts before center st, k 2, yo, k the center st, yo, k 1, repeat between ** to last 5 sts, k 2, yo, k3.

Row 4: k 3, p to last 3 sts, k 3. 

Row 5: k 3, yo, *k2tog, yo, k 1, yo, ssk, p2tog three times, (k 1, yo) six times, k 1, p2tog three times*, repeat between ** to 5 sts before center st, k2tog, yo, k 1, yo, ssk, yo, k the center st, yo, repeat between ** to last 8 sts, k2tog, yo, k 1, yo, ssk, yo, k 3.

Row 6: k 3, p 1, *[p 1, (p 1, yo, p 1, yo, p 1) into yo] twice, p 21*, repeat between ** to 5 sts before center st, [(p 1, yo, p 1, yo, p 1) into yo, p 1] twice, p 1, p the center st, p 1, repeat between ** to last 8 sts, [(p 1, yo, p 1, yo, p 1) into yo, p 1] twice, p 1, k 3.

Row 7: k 3, yo, k 1, *k 1, k5tog, k 1, k5togtbl, k 1, p2tog three times, (k 1, yo) six times, k 1, p2tog three times*, repeat between ** to 14 sts before center st, k 1, k5tog, k 1, k5togtbl, k 2, yo, k the center st, yo, k 1, repeat between ** to last 17 sts, k 1, k5tog, k 1, k5togtbl, k 2, yo, k3.

Stretchy bind off:

Bind off row: k 2, *slip the two knitted stitches back to left needle, knit them together, k 1, repeat from * to end of stitches. You can watch my tutorial video for the stretchy bind off method here: 

Weave in loose yarn ends, block well, and it's ready to wear! 


Lastly, feel free to leave a comment if you have any questions or find something confusing in the pattern.

Happy crocheting/knitting! follow me on Instagram @wiams_crafts and Twitter @wiamscrafts to see my upcoming projects.

Wheat Ears Cowl

Hi everyone! It seems that winter this is going to be very cold this year, so we’re all in need of something to keep our heads and necks warm and cozy. This cowl is so cute and very easy to make, I even made a tutorial video that you can follow to knit this pattern. It is a four-round pattern with few repetitions, and that is all you'll need to knit it. I wish you all to be healthy, and happy knitting!

Skill level: Intermediate

GET printable PDF for this pattern here or on Ravelry: 


Materials:

  • Suggested yarn: Alize Burcum Klasik, 100% acrylic, 3.5 oz. (100 g), 230 yards (210 m), in the color (287): 1 skein.
  • Circular knitting needles 16" (40 cm) long, size US 10 (6 mm). 
  • Tapestry needle.
  • Stitch holder. 


Measurements: height = 6.3" (16 cm), circumference (narrow/upper edge) = 21.25" (45 cm), circumference (wide/lower edge) = 26" (66 cm), approx.

Gauge: 14 sts and 22 rounds = 4" x 4" (10 cm x 10 cm) in garter stitch.

Yardage: 156- 158 yards (143- 145 m), approx.

Knitting terms:

  • st: stitch.
  • sts: stitches.
  • k: knit.
  • p: purl.
  • sl st: slip stitch.
  • k3tog: knit 3 sts together.
  • k3togtbl: knit 3 sts together through back loops.
  • sh: stitch holder.


Instructions:

Cast on 99 sts. Join in the round. Don't know how to join in the round? here is a short tutorial on how to do it (from 0:26 - 1:15 min): 


Put a ring stitch marker at the beginning of rounds, then work as follows:

Rib round: k 1, p 1, (k 3, p 1) twice, k 1, repeat to end.

Repeat the rib round 5 times, then work the pattern as follows:

Round 1: k to end.

Round 2: p 2, k 2, (k 1, yo, k 1) into st, sl st 1, (k 1, yo, k 1) into st, k 2, p 2, repeat to end.

Round 3: k 4, slip the (k 1, yo, k 1), k 1, slip the (k 1, yo, k 1), k 4, repeat to end.

Round 4: p 2, slip the next 2 sts into the sh and keep them to the back, k3tog, slip the 2 sts back to needle and knit them, k 1, slip the (k 1, yo, k 1) into the sh and keep them in the front, k 2, slip the (k 1, yo, k 1) back to the needle and k3togtbl, p 2, repeat to end. 

Repeat the pattern 7 times, k one round, repeat the rib round 4 times. Bind off all stitches. Weave in loose ends.

Check out this tutorial video I made for this cowl:


Lastly, feel free to leave a comment if you have any questions or find something confusing in the pattern.

Happy crocheting/knitting! follow me on Instagram @wiams_crafts and Twitter @wiamscrafts to see my upcoming projects.

Frogy Granny Square


Hello Friends! Another post for my Animal Granny Square Collection. This time it's a froggy face. Have fun making this cute granny square, and don't forget to come back for my next post.

Skill level: Intermediate

Check out the entire Animal Granny Square collection: 

Puppy | Koala | Chick Kitty | Chicken | Mouse | Bunny | Ox | Tiger | Duckling

Get printable PDF for this pattern: or


Materials: 

  • Yarn: any cotton yarn in the following colors and quantities: one green skein, one yellow skein, a few yards (meters) of white and black yarn. Suggested yarn: D.M.C Happy Cotton, 0.7 oz (20 g), 47 yards (43 m).
  • Crochet hooks, sizes D/3 (3 mm).
  • Tapestry needle.


Measurements of the square: 6" x 6" (15 cm x 15 cm) approx.

Gauge: 22 sts and 12 round = 4" x 4" (10 cm x 10 cm) in double crochet.

Yardage: 60- 62 yards (55- 58 m) approx.


Crochet terms (US):

  • ch: chain
  • st: stitch
  • sl st: slip stitch
  • sc: single crochet
  • hdc: half double crochet
  • dc: double crochet
  • tr: treble crochet 


Instructions:

Granny square base:

Note: ch 1 and ch 3 at the beginning of rounds count as sc and dc respectively.

With the green yarn, make a magic circle, work as follows:

Round 1: ch 1 into the magic circle, sc 7, sl st into the first ch. (8 sts).

Round 2: ch 1 and sc in the first st, sc 2 in each st, sl st into the first ch. (16 sts).

Round 3: ch 3 and dc in the first st, dc in st, *dc 2 in st, dc in st, repeat from * to end, sl st into the third ch of the first ch 3. (24 sts).

Round 4: repeat row 3. (36 sts).

Round 5: ch 3 and dc in the first st, dc in st twice, *dc 2 in st, dc in st twice, repeat from * to end, sl st into the third ch of the first ch 3. (48 sts).

Round 6: ch 3 and dc in the first st, dc in st three times, *dc 2 in st, dc in st three times, repeat from * to end, sl st into the third ch of the first ch 3. (60 sts). 

Cut off green yarn and weave in loose ends. With yellow yarn make a knot and at the eighth st after the end of last round, work as follows:

Round 7: (ch 4, tr, ch 2, tr 2) in the first st, *tr in st, dc in st twice, hdc in st 3 times, sc in st twice, hdc in st 3 times, dc in st twice, tr in st, (tr 2, ch 2, tr 2) in st, repeat from * 3 times, tr in st, dc in st twice, hdc in st 3 times, sc in st twice, hdc in st 3 times, dc in st twice, tr in st, sl st into the fourth ch of the first ch4.

Round 8:ch 3 in the first st, dc in st, *(dc, tr, ch 2, tr, dc) in ch 2 space, dc in each st to next ch 2 space, repeat from * 3 times, (dc, tr, ch 2, tr, dc) in ch 2 space, dc in each st to last st, sl st into the third ch of the first ch 3.

Rounds 9 and 10: ch 3 in the first st, dc in each st to the first ch 2 space, *(dc 2, ch 2, dc 2) in ch 2 space, dc in each st to next ch 2 space, repeat from * 3 times, (dc 2, ch 2, dc 2) in ch 2 space, dc in each st to last st, sl st into the third ch of the first ch 3.

Cut yellow yarn and weave in loose ends. 


Eyes (make 2):

With black yarn, make a magic ring, work as follows:

Round 1: ch 3 into the magic ring, dc 9, cut black yarn. with white yarn dc 2 into the magic ring, sl st into third ch of first ch 3. (12 sts)

Round 2: ch 1 and sc in first st, *sc 2 in st, sc 2 in st, repeat from * to last st, sc in st st, sl st into first ch of first ch 3. (18 sts)

Cut white yarn and weave in loose ends. with green yarn work next round (through back loops only):

Round 3: ch 1 and sc in first st, *sc in st, sc 2 in st, repeat from * to last sc, sc in st sl st into the first ch. (27 sts)

Cut yarn leaving 15 cm/ 6" long for sewing. Weave in loose ends.

Sew eyes in place as shown in the picture above. Embroider nostrils and mouth with black yarn.


Lastly, feel free to leave a comment if you have any questions or find something confusing in the pattern.

Happy crocheting/knitting! follow me on Instagram @wiams_crafts and Twitter @wiamscrafts to see my upcoming projects.

Kitty Granny Square


Hello Friends! Another post and another animal granny square to add to my collection. This time it's a kitty face. I've included pictures in the instructions to make the steps clearer so I hope it makes it easier to make. Have fun making this cute granny square, and keep an eye for my next post.

Skill level: Intermediate

Check out the entire Animal Granny Square collection: 

Puppy | Frog | Koala | Chick Chicken | Mouse | Bunny | Ox | Tiger | Duckling


Materials: 
  • Yarn: schachenmayr catania 100 % cotton (50 g / 125 m), one skein of colors: pearl white, green, and yellow, few meters of black.
  • Crochet hook, size US D 11/ 3 mm.
  • Embroider thread in black color for the mustache.
  • Stitch marker.

Measurements of the square: 5.25" x 5.25" (13 cm x 13 cm), approx.

Yardage: 55- 60 yards (50- 55 m), approx.

Gauge: 29 sts x 12 round = 4" x 4" (10 cm x 10 cm) in double crochet.


Crochet terms (US):

  • ch: chain.
  • st: stitch.
  • sl st: slip stitch.
  • sc: single crochet.
  • hdc: half double crochet.
  • dc: double crochet.
  • tc: treble crochet. 
  • picot: ch 3, sl st to first ch.


Pattern:

With the pearl white yarn, make a magic ring, work as follows:


Round 1: ch 1 into the magic ring (counts as sc), sc 5, sl st into the first ch. (6 sts).


Round 2: ch 1(counts as sc) and sc in first st, sc 2 in each st, sl st into the first ch. (12 sts).


Rounds 3: ch 1(counts as sc) in first st, sc in each st, sl st into the first ch. (12 sts).


Round 4: ch 3 and dc in the first st, dc 2 in each st to end, sl st into the third ch of first ch 3. (24 sts).


Round 5: ch 3 and dc in the first st, *dc in dc, dc 2 in dc, repeat from * to last dcdc in dc, sl st into the third ch of first ch 3. (36 dcs).


Round 6: ch 3 and dc in the first st, *dc in dc twice, dc 2 in dc, repeat from * to last  2 stsdc in dc twice, sl st in the third ch of first ch 3. (48 dcs).


Round 7: ch 3 and dc in the first dc, {dc in dc three times, dc 2 in dc}, repeat between {} three times, dc in dc three times, (dc, ch 1, dc) in dc, repeat between {} twice, 
dc in dc three times, (dc, ch 1, dc) in dc, repeat between {} three times, dc in dc three times, sl st in the third ch of first ch 3. (60 dcs). 


Cut off the yarn and weave in the loose ends. 


Bind on the green yarn and work as follows:

Round 8: ch 1 in the first st (you can make a standing sc instead), hdc in st twice, dc in st twice, tc in st, ch 2, tr in st, dc in st twice, hdc in st twice, sc in st five times. 
To create the Ear base, Work the next set of sts through back loops only: {hdc in st twice, dc in st twice, tc in st,ch 2, tr in st, dc in st twice, hdc in st twice}. sc in st five times, repeat between {} through back loops only for the other Ear base, sc in st five times, hdc in st twice, dc in st twice, tc in st, ch 2, tr in st, dc in st twice, hdc in st twice, sc in st four times, sl st to first sc.


Rounds 10-12: ch 3 (counts as dc), *dc in dc to ch 2 space, *(dc, tr, ch 2, tr, dc) in ch 2 space, repeat from * four times, dc in dc to end, sl st to third ch of first ch 3.

Cut off the yarn and weave in the loose ends.


Ears:

Work one ear into each (front loops sts group) in round 7 as follows:

Row 1: bind on yellow yarn In the 3rd st of right side of any ch 1, sc in the same st, skip 2 sts, (dc 4, ch 1, dc 4) in ch 1 space, skip 2 sts, sc in the front loop of next st, cut yarn.

Row 2: bind on pearl white yarn in the first st of the group, ch 1 and sc in the same st, sc in each dc of row 1, sc in ch 1 space, make 1 picot, sc in every dc, ch 1, sc in last st of the group, cut yarn, weave in loose ends.

Repeat rows (1-2) for the second ear.


Nose:

With yellow yarn, make a knot and ch 3, sc in second ch, dc in third ch, cut yarn leaving 10 cm/ 4" to sew the nose in the center of the cat's face.
Embroider the mustache using the black thread.


Lastly, feel free to leave a comment if you have any questions or find something confusing in the pattern.

Happy crocheting/knitting! follow me on Instagram @wiams_crafts and Twitter @wiamscrafts to see my upcoming projects.

Follow My Lines Shawl


Hi Everyone! So, A little backstory about this shawl: I had this yarn for more than a year and a half, tried some ideas using it, But none of them were any good, and the yarn went back on my shelf. This month, I am into knitting lines, ribs and stripes, and got inspired by them, so here we are. Just follow my lines to get this shawl. I hope you try it, it is really easy to make if you follow the instructions with patience. Good luck!

Update: I have finished knitting a matching hat for this shawl! Click the link to see the pattern → Follow My Lines Hat

Skill level: Intermediate

GET printable PDF for this pattern here.


Materials:
  • Yarn: Alize Happy Baby Soft, 65% acrylic, 35% polyamide, 3.53 oz (100 g), 361 yards (330 m): in the color "Orange" 483: 3 skeins.
  • Knitting needles, US 7 (size 4.5 mm).
  • Tapestry needle.


Measurements: 
  • Width: 73" (184 cm), approx.
  • Height: 18" (45 cm), approx.
Gauge: 16 sts and 24 rows = 4"x 4" (10 cm x 10 cm) in stockinette stitch.

Yardage: 810- 820 yards (740- 750 m).


Knitting Terms:
  • k: knit.
  • p: purl.
  • p1tbl: purl st through back loop.
  • k2tog: knit 2 stitches together.
  • ssk: slip, slip, knit the 2 sts together through back loops.
  • p2togtbl: purl 2 sts together through back loops.


Instructions:

Cast on 3 sts, knit 7 rows, pick up 2 sts from one side of rows, and 3 sts from bottom. (8 sts). 


Work next (wrong side row):

Right Diagonal Stitch pattern and increasing rows:


Row 1: k 3, p 2, k 3.

Row 2: k 3, yo, (k2tog but do not drop stitches from left-hand needle, k the first st, slip both together from the needle), k 3.

Row 3: k 3, p to last 3 sts, k 3.

Row 4: k 3, yo, (k2tog but do not drop stitches from left-hand needle, k the first st, slip both together from the needle), k 4.

Row 5: repeat row 3.

Row 6: k 3, yo, *(k2tog but do not drop stitches from left-hand needle, k the first st, slip both together from the needle), repeat from * to last 3 sts, k 3.

Row 7: repeat row 3.

Row 8: k 3, yo, *(k2tog but do not drop stitches from left-hand needle, k the first st, slip both together from the needle), repeat from * to last 4 sts, k 4.

Row 9: repeat row 3.


Repeat these for rows (6 to 9) until work measures 92 cm/ 36.5", or as long as you prefer, and ending with row 7.


Work next as follows (right side row):

Row 1: k 3, bring yarn to front (as to purl), ss 1, return yarn to back, turn the work and work these 4 sts as follows:

Row 2: ss 1 while yarn in front of work, bring yarn to back, k 3.

Repeat these 2 rows three times.


Left Diagonal stitch and Decreasing rows:

Row 1: k 3, yo, k 1, *switch the next 2 sts on left needle by any method you prefer putting the first st over the second, k these 2 switched sts, repeat from * to last 4 sts, k 4.

Row 2: k 3, *p 1, p1tbl, repeat from * to last 6 sts, p2togtbl, p 1, k 3.

Row 3: k 3, yo, ssk, *switch the next 2 sts on left needle by any method you prefer putting the first st over the second, k these 2 switched sts, repeat from * to last 3 sts, k 3.

Row 4: k 3, *p1tbl, p 1, repeat from * to last 6 sts, p2togtbl, p 1, k 3.

Row 5: k 3, yo, ssk, *switch the next 2 sts on left needle by any method you prefer putting the first st over the second, k these 2 switched sts, repeat from * to last 4 sts, k 4.

Row 6: repeat row 2.


Repeat rows (3 to 6) until 9 sts left and finishing row 4. work as follows:

Row 1: k 3, yo, ssk, k 4.

Row 2: k 3, p2togtbl, k 3.

Row 3: k 3, ssk, k 3.

Row 4: k 3, k2tog, k 2.


Work next as follows (right side row):

Row 1: k 3, bring yarn to front (as to purl), ss 1, return yarn to back, turn the work and work these 4 sts as follows:

Row 2: ss 1 while yarn in front of work, bring yarn to back, k 3.

Repeat these 2 rows 3 times more.


Now you can either cast off these 6 sts and sew first 3 with last 3 sts, or you can use the Kitchener method to join them. Weave in loose ends. Block if needed.


Lastly, feel free to leave a comment if you have any questions or find something confusing in the pattern.


Happy crocheting/knitting! follow me on Instagram @wiams_crafts and Twitter @wiamscrafts to see my upcoming projects.