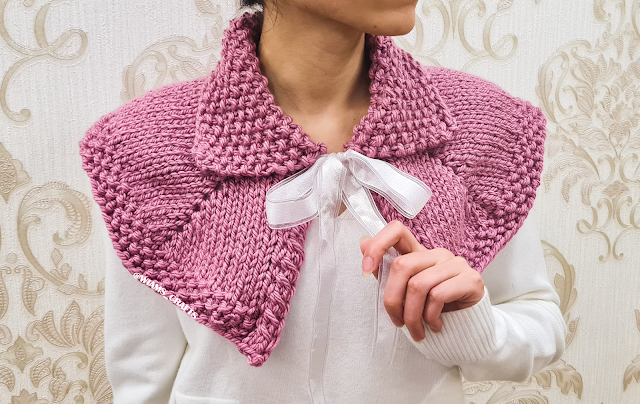
Hi everyone! I've been fond of the knitted garments that Outlander characters wear for quite a while now and have been told by multiple people to just go for it and make something inspired by them. I know how popular the series is, and after the release of every season my timeline gets flooded with knitters making their beautiful yet simple shawls and scarves. But this time, when I saw Claire wearing this specific cowl, I wanted to make one myself after I instantly fell in love with it. Adding one or two of my touches, such as porthole eyelet as a method of increasing stitches, may seem to have made it slightly difficult to knit, but you can watch my tutorial video and see how easy it is once you get the into the rhythm of it. If you’re waiting for the next episode of Outlander, you might want to use your time making this quick one skein project. Have a nice knitting day guys!
Skill level: Intermediate
Get printable PDF for this pattern: or
Materials:
- Suggested yarn: Red Heart Super Saver, 100% acrylic, 7 oz. (198 g), 264 yards (333 m), in the color "Light Raspberry": 1 skein.
- Circular knitting needles 24" (60 cm) long, size US 10 (6 mm).
- Tapestry needle.
- Ribbon, 1" (2.5 cm) wide and 53" (135 cm) long.
Measurements: Back yoke height = 6.5" (17 cm), edge circumference = 45" (115 cm), approx.
Yardage: 273- 275 yards (248- 250 m), approx.
Gauge: 11 sts and 14 rows = 4" x 4" (10 cm x 10 cm) in stockinette stitch.
Knitting terms:
- st: stitch.
- sts: stitches.
- k: knit.
- p: purl.
- sl st: slip stitch.
- k2tog: knit 2 sts together.
- ssk: slip, slip, then knit the 2 slipped sts together through back loops.
- kyokrb (porthole eyelet): (k 1, yarn over, k 1) into the stitch one row below. For more on how to Knit this, you can watch this tutorial video I made:
Instructions:
Cast on 43 sts using Stretchy method. Follow the instructions in my tutorial video to learn how:
Now work as follows:
Collar:
Seed Pattern Row: k 1, p 1, repeat to last st, k 1.
Repeat seed pattern row sixteen more times.
Yoke:
Note: to get a neat side edge, always slip first st purl-wise.
Row 1 (dividing row): p 1, yo, k2tog, p 1, k 2, kyokrb, k 8, kyokrb, k 11, kyokrb, k 8, kyokrb, k 2, p 1, ssk, yo, p 1.
Row 2: k 1, p 2, k 1, p to last 4 sts, k 1, p 2, k 1.
Row 3: p 1, switch the next 2 sts, placing the second one in front, and k them, p 1, *k to middle st of next porthole eyelet, kyokrb, repeat from * three more times, k to last 4 sts, p 1, switch the next 2 sts, placing the second one to the back, and k them, p 1.
Row 4: repeat row 2.
Repeat rows 3 and 4 nine more times, then work the last rows as follows:
Edge band:
Row 1: p 1, switch the next 2 sts placing the second in front and k them, *p 1, k 1, repeat from * to last 4 sts, p 1, switch the next 2 sts placing the second to back and k them, p 1.
Row 2: k 1, p 2, k 1, *k 1, p 1, repeat from * to last 5 sts, k 2, p 2, k 1.
Repeat rows 1 and 2 once more. Bind off all sts. Weave in loose ends. Insert the ribbon through (yo, eyelets and yo) of the first row under the collar. Trim the ribbon's edges to get a neat look.
Lastly, feel free to leave a comment if you have any questions or find something confusing in the pattern.
Happy crocheting/knitting! follow me on Instagram @wiams_crafts and Twitter @wiamscrafts to see my upcoming projects.


Thanks a lot! it's a very beautiful pattern
ReplyDelete❤❤❤
DeleteMy 92 year old mother loves this pattern but the yarn is too thick. I tried using a thinner yarn but of course it wouldn’t go around her neck. Have you considered adapting this gorgeous pattern using an 8 ply yarn?
ReplyDeleteCheers Vivienne Lea
Hi there,
DeleteThank you for your comment! I'm really glad your mom likes this pattern. This cowl was a quick project designed with thick yarn, so I have been contemplating the possibility of adapting it the way you mentioned. Unfortunately it would mean a total redesign, and I can't dedicate the time that such a project deserves right now.
Thankyou for your reply and appreciate your comments ❤️ I asked, just in case 😀
DeleteIf you slip the first stitch purlwise for each row as suggested in the “Note”does Row 1, for example, begin with sl 1 purlwise and then p1, yo, p2tog? Do you s1 at the beginning of each Row and then begin the row as written?
ReplyDeleteHi there,
DeleteIn the note, I meant that you either do p 1/k 1 at the beginning of each row or you sl st purl-wise. For example:
Row 1: (p 1 OR sl st purl-wise), yo, k2tog, ..
This is only a suggestion, as I think it makes the edge look neater, especially because you are dealing with bulky yarn.