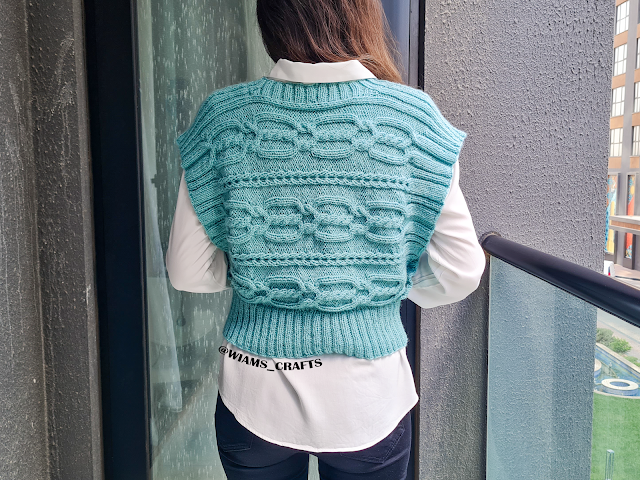
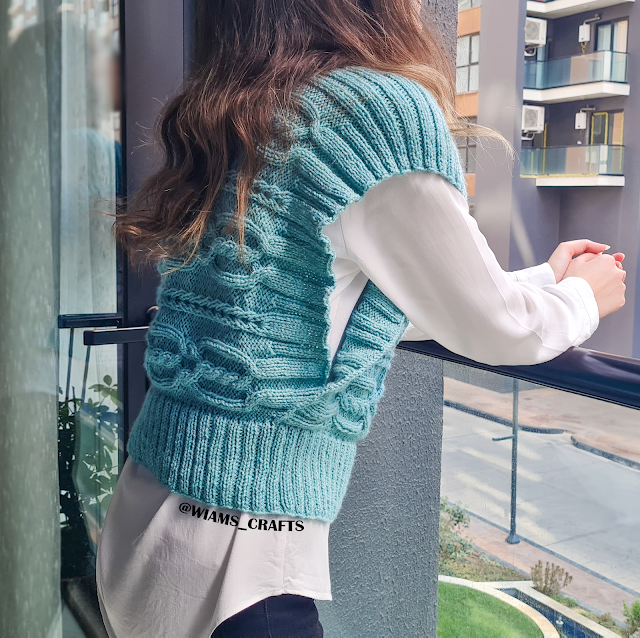
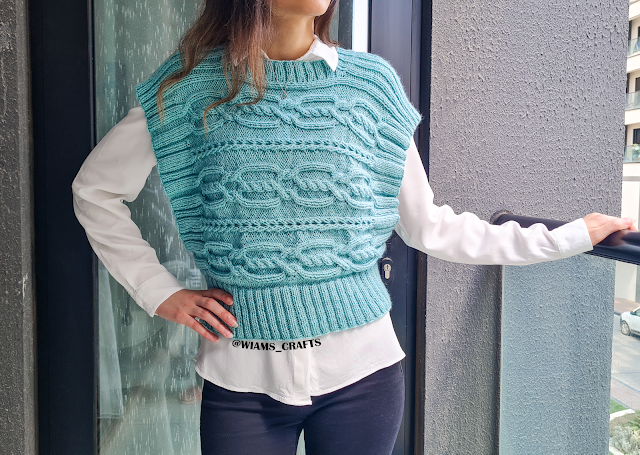
Hello my fellow Knitters! I am back again with a new design. Wrap yourself in cozy elegance with this stylish layering piece designed to keep you warm while adding a touch of handmade charm to your wardrobe. This vest features bold cable motifs and textured stitches that create a stunning, eye-catching pattern, balanced with a comfortable ribbed hem and shoulders for a perfect fit. This versatile design can be paired with a crisp shirt or a casual top. It is a fun project for knitters who love texture and a timeless style, so I hope you like this design and give it a try.
Overview:
- Skill level: Intermediate.
- Instructions style: written pattern + charts.
- Sizes: this vest is available in five sizes XS/S, M/L and XL/2XL (see detailed measurements below).
- Overview: this vest is knitted flat in one piece back and forth starting from left to right, using circular knitting needles for the ease of work. The lower rib band is worked in the round after picking up stitches using also circular knitting needles, the same method applies for neck band. Change the knitting needles length as required.
- Required skills: increasing and decreasing stitches, working in the round, working braid pattern that required switching stitches, picking up stitches.
Get the ad-free, printable PDF of this pattern from my store:
Or click here to jump to the instructions.
Want to pin this project for later? Just hover or click on any of the images in this post then click the red "save" button.
Materials:
- Suggested yarn: Tunc Star Maxi, 100% acrylic, 3.53 oz (100 g), 328 yards (300 m), in the color "3044", 2 (3, 3) skeins.
- Circular knitting needles, 16" (40 cm), 24" (60 cm) and 32" (80 cm) long, size US 6 (4 mm), and 32" (80 cm), sizes US 7 (4.5 mm).
- Tapestry needle.
- Large stitch holder.
- Small stitch holder.
- Ring stitch markers.
Sizes and measurements:
| Size | Chest-bust measurements | Waist measurements |
| XS/S | 34"- 36" (86- 92 cm) | 26"- 28" (66- 71cm) |
| M/L | 38"- 40" (97- 102 cm) | 30"- 33" (76- 84 cm) |
| XL/2XL | 42"- 44" (107- 112 cm) | 35"- 37" (89- 94cm) |
- Size XS/S: 650- 655 yards (595- 600 m), approx.
- Size M/L: 815- 820 yards (745- 750 m), approx.
- Size XL/2XL: 980- 985 yards (895- 900 m), approx.
Gauge: 20 sts and 27 rows = 4" x 4" (10 cm x 10 cm) in stockinette pattern and US 7 (4.5 mm) needles.
Knitting Terms:
- st: stitch.
- sts: stitches.
- k: knit.
- p: purl.
- k2tog: knit two sts together.
- ssk: slip st, slip st, knit the two slipped sts together through back loops.
- rsm: ring stitch marker.
Pattern 1 (22 sts):
Row 1: p 5, slip 2 sts into the st holder in front, k 2, slip the 2 sts back to left needle and knit them, p 4, slip 2 sts into the st holder to back, k 2, slip the 2 sts back to left needle and knit them, p 5.
Row 2 and every even number row: k the knit sts and p the purl sts.
Row 3: p 3, *slip 2 sts into the st holder to back, k 2, slip the 2 sts back to left needle and purl them, slip 2 sts into the st holder in front, p 2, slip the 2 sts back to left needle and knit them, repeat from * once, p 3.
Rows 5, 9, 13, 17: p 3, k 2, p 4, slip 2 sts into the st holder in front, k 2, slip the 2 sts back to left needle and knit them, p 4, k 2, p 3.
Rows 7, 11, 15: p 3, k 2, p 4, k 4, p 4, k 2, p 3.
Row 19: p 3, *slip 2 sts into the st holder in front, p 2, slip the 2 sts back to left needle and knit them, slip 2 sts into the st holder to back, k 2, slip the 2 sts back to left needle and purl them, repeat from * once, p 3.
Row 21: repeat row 1.
Row 23: p 5, k 4, p 4, k 4, p 5.
Row 24: k the knit sts and p the purl sts.
Pattern 2 (7 sts):
Row 1: p 1, k2tog, sl st and yo the sl st, ssk, p 1.
Row 2: k 1, p 1, sl st and pass the yo and make another yo the same way, p 1, k 1.
Row 3: p 1, k 1, sl st and pass the 2 yos and make another yo the same way, k 1, p 1.
Row 4: k 1, p 1, insert right needle into the sl st and 3 (yo)s and (p 1, yo, p 1) into them, p 1, k 1.
Instructions:
With 32" (80 cm), US 6 (4 mm) circular knitting needles, cast on 194 (202, 210) sts .
Left Rib Band:
Row 1 (right side):
Back: (p 2, k 2, p 2, k 4, p 4, k 4, p 2, k 2, p 2, k 5) twice, p 2, k 2, p 2, k 4, p 4, k 4, p 2, k 2, p 2.
Shoulder: (k 2, p 2) seven (nine, eleven) times, k 2.
Front: repeat back.
Row 2: k the knit sts and p the purl sts.
Repeat rib rows 1-2 seven more times.
Change to 32" (80 cm), US 7 (4.5 mm) circular knitting needles when working next row:
Note: start working the first row of pattern 1 as follows:
- For size XS/S: row 1.
- For Size M/L: row 19.
- For size XL/2XL: row 17.
General pattern:
Row 1 (right side):
Back: (pattern 1, pattern 2) twice, pattern 1.
Shoulder: (k 2, p 2) seven (eight, nine) times, k 2.
Front: repeat back.
Row 2:
Front: (pattern 1, pattern 2) twice, pattern 1.
Shoulder: k the knit sts and p the purl sts.
Back: repeat front.
Continue working the general pattern. After 28 (32, 36) rows, work the neck opening part.
Neck opening:
Back: (pattern 1, pattern 2) twice, pattern 1.
Neck opening: k 2, bind off 24 (32, 40) sts, k 2.
Front: repeat back.
The back and front are worked separately. Slip the back sts into 24" (60 cm), US 6 (4.5 mm) knitting needles.
Middle Back:
Row 1: (pattern 1, pattern 2) twice, pattern 1, k 2, p 1.
Row 2: k 1, p 2, (pattern 1, pattern 2) twice, pattern 1.
Repeat rows 1-2 twenty-two (twenty-six, thirty) times. Leave the back sts for now (slip them into thread or a large stitch holder).
Middle Front:
Slip the front sts into 24" (60 cm), US 6 (4.5 mm) knitting needles, and work as follows:
Row 1: p 1, k 2, (pattern 1, pattern 2) twice, pattern 1, k 2, p 1.
Row 2: (pattern 1, pattern 2) twice, pattern 1, p 2, k 1.
Repeat rows 1-2 twenty-two (twenty-six, thirty) times.
Joining Back, shoulder and Front:
Into a 32" (80 cm), US 7 (4.5 mm) knitting needles, slip the back and the front sts simultaneously.
Joining Right Side Row:
Back: (pattern 1, pattern 2) twice, pattern 1.
Shoulder: k 2, p 1, cast on 24 (32, 40) sts, p 1, k 2,
Front: (pattern 1, pattern 2) twice, pattern 1, k 2, p 1.
Wrong Side Row:
Front: (pattern 1, pattern 2) twice, pattern 1.
Shoulder: (p 2, k 2) seven (eight, nine) times, p 2.
Back: repeat front.
Continue working the General pattern. After 28 (32, 36) rows from joining row, change to US 6 (4 mm) and 32" (80 cm) circular knitting needles when working next row.
Right Rib Band: repeat 1-2 rows of (Left Rib Band) eight times. Bind off all sts.
Neck band:
With 16" (40 cm), US 6 (4 mm) circular knitting needles, and into the middle back neck line, pick up 22 (26, 30) sts along half back neck, (put a rsm), 24 (32, 36) sts along left shoulder (put a rsm), 46 (50, 54) sts along front neck line (put a rsm), 24 (32, 36) sts along right shoulder (put a rsm) and 22 (26, 30) sts along the second half of back neck (put a rsm). [138 (166, 186) sts]
Row 1: k 1, (p 2, k 2) to one st before rsm (back), p 1, (k 2, p 2) to next rsm (left shoulder), (k 2, p 2) to last two sts before next rsm (front), k 2, p 2, (k 2, p 2) to next rsm (right shoulder), k 2, p 1, ( k 2 p 2) to one st before the end, k 1.
Rows 2, 3, 4: (k the k sts and p the p sts to one st before next rsm, k2tog, k the k sts and p the p sts to one st before next rsm, ssk), repeat once, k the k sts and p the p sts to end.
Rows 5, 6, 7, 8: k 1, (p 2, k 2) to last st, k 1.
Bind off all sts.
Bottom Band:
With 32" (80 cm), US 6 (4 mm) circular knitting needles, and into the middle back, pick up 48 (60, 72) sts along the half of the back bottom edge to the right side band, put the front bottom edge over the back bottom edge of the band and pick up 14 sts through front and back edges together, pick up 96 (108, 120) sts along front bottom edge to the left side band, put the front piece bottom edge over the back bottom edge and pick up 14 sts through front and back edges together, and 48 (54, 60) sts along the second half back bottom edge. [220 (244, 268) sts]
Bottom Band Row: k 2, p 2 to end.
Repeat the row twenty-one more times, then bind off all sts. Weave in loose ends.
Lastly, feel free to leave a comment if you have any questions or find something confusing in the pattern.
Happy crocheting/knitting! follow me on Instagram @wiams_crafts and Twitter @wiamscrafts to see my upcoming projects.


