Showing posts with label Baby. Show all posts

Jack-o'-lantern Halloween Hat

Hello knitters! As promised, I bring you the second version of the hat that I designed for this year's Halloween, this time with a row of scary/cute Jack-o'-lanterns + the spider web from the previous hat. It comes in two sizes: for toddlers (2 to 4 years old) and for children under eight years old. I've knit it using baby soft yarn so that it won't bother the wearer. A baby sized hat can also be made from this pattern, but with some adjustments, and though I have not included that size here, I'd be happy to add it if some of you request it. Happy Halloween to you all, and stay safe!

Skill level: Intermediate


Materials:

  • Yarn: NAKO Elit Baby, 90% anti-piling acrylic, 10% bamboo, 3.53 oz. (100 g), 263 yards (240 m) approx, in the following colors: Black (60): 1 skein, Carrot (408): 1 skien, and Green (41): few yards(meters).
  • Circular knitting needles, 16" (40 cm) long, size US 7 (4.5 mm).
  • Double pointed needles (DPNs) set, size US 7 (4.5 mm).
  • Tapestry needle.
  • Stitch marker.


 Size and measurements:

  • Toddler (2- 4 years):  head circumference = 17"- 18" (43- 46 cm), height = 7" (18 cm).
  • Child (5- 8 years): head circumference = 19" - 20" (48- 51 cm), height = 8" (20 cm).
Gauge: 20 sts and 26 rounds = 4" x 4" (10 cm x 10 cm) in stockinette stitch.

Yardage: 
  • Toddler: 47- 49 yards (43- 45 m). 
  • Child: 65- 69 yards (60- 63 m) approx.


Knitting Terms:
  • st: stitch.
  • sts: stitches.
  • k: knit.
  • p: purl.
  • ssk: slip, slip, knit the two slipped stitches together through back loops.
  • s2s1ktog: slip two sts as if to knit them together, slip the third one knit-wise, knit the three sts together through back loops (centered double decrease). You can watch my tutorial video below to learn how to knit this stitch:


Instructions:

 
With black yarn, cast on 72 (80) sts. Join in the round. Don't know how to join in the round? here is a short tutorial on how to do it (from 0:26 - 1:15 min): 


Put a ring stitch marker at the beginning of rounds, knit one round, then work as follows:

Ribs round: k 3, p 1, repeat to end.

Repeat the ribs round (6) times. Purl one round.
 
Note: for the child size increase 1 st in the next round. (81) sts

Knit 3 (4) rounds.
 
Using black (B), carrot (C) and green (G) yarns, work the chart from right to left (go to the end of this post). Cut C and G yarns.
 
Knit 3 (4) rounds, purl 1 round. 
 
Note: for the child size, knit one round decreasing 1 st. (80) sts
 
Work as follows:
 
Round: k 11 (15), p 1, repeat to end.
 
Repeat the round 3 (4).


Decreasing rounds:
 
With C yarn, work the next round:
 
Round 1: k 4 (6) s2s1ktog, k 4 (6), p 1, repeat to end.
 
With B and C yarn, work the next two rounds:
 
Rounds 2 and 3: with B yarn k 4 (6), with C yarn k 1, with B yarn k 4 (6), p 1, repeat to end.

Change to DPNs needles. With C yarn, work the next round:
 
Round 4: k 3 (5) s2s1ktog, k 3 (5), p 1, repeat to end. 
 
Rounds 5 and 6: with B yarn k 3 (5), with C yarn k 1, with B yarn k 3 (5), p 1, repeat to end.
 
With C yarn, work the next round:
 
Round 7: k 2 (4) s2s1ktog, k 2 (4), p 1, repeat to end. 
 
Round 8: with B yarn k 2 (4), with C yarn k 1, with B yarn k 2 (4), p 1, repeat to end.
 
With C yarn, work the next round:
 
Round 9: k 1 (3) s2s1ktog, k 1 (3), p 1, repeat to end. 


Toddler Size:
 
Cut B yarn. With C yarn work last round:
 
Round 10: s2s1ktog, p 1, repeat to end. (12) sts 
 
Cut yarn leaving a 6" (15 cm) long yarn tail, pull it through all sts and tighten tog. Weave in loose ends. 


Child Size:
 
Round 11: with B yarn k 3, with C yarn k 1, with B yarn k 3, p 1, repeat to end, cut B yarn.
 
Round 12: k 2, s2s1ktog, k 2, p 1, repeat to end.
 
Round13: k 5, p 1, repeat to end.
 
Round 14: k 1, s2s1ktog, k 1, p 1, repeat to end. 
 
Round 15: s2s1ktog, p 1, repeat to end. (10) sts 
 
Cut yarn leaving a 6" (15 cm) long yarn tail, pull it through all sts and tighten tog. Weave in loose ends. 
 
Make a 2.5" (6 cm) diameter pompom using black yarn and fix it tight on top.


Lastly, feel free to leave a comment if you have any questions or find something confusing in the pattern.

Happy crocheting/knitting! follow me on Instagram @wiams_crafts and Twitter @wiamscrafts to see my upcoming projects.

Uniflower Baby Blanket


EDIT: The instructions for this pattern have been reviewed and updated on July 25th, 2020.

Hello friends! I've been fond of these 3D little crochet flowers featured on MyPicot.com ever since I discovered the site, but never had the guts to learn how to crochet and incorporate them in any design. Having a combination of baby yarn at hand, I decided that this is the time to put my own spin on this, and so I came up with this baby blanket project.
I had a blast crocheting this blanket, as I found that work flowed easily and smoothly once I got the hang of crocheting the flowers. You can also choose to make it in one color, pink or blue to make the blanket suit a baby's gender, or make it using any unisex color you fancy. Have fun making it! 

Level: Intermediate 


Materials
  • Yarn: Alize, Sekerim, Mini Colors, (100% Acrylic), 100 g/ 3.52 oz, 320 m/ 350 yards, color 6263: 2 skeins (A)Alize, Baby Best, (90% Acrylic, 10% Bamboo), 100 g/ 3.52 oz, 240 m/ 262 yds, color Blue 185: 2 skeins (B), color Pink 189: 2 skeins (C).
  • Crochet Hook: 4 mm/ US G-6.
  • Tapestry needle


Measurements: 77.5 x 77.5 cm/ 30.5" x 30.5" approx.

Gauge: 
  • Yarn (A): 20 sts and 13 rows = 4"x 4" (10 cm x 10 cm) in double crochet stitch. 
  • Yarn (B) and (C): 20 sts and 10 rows = 4"x 4" (10 cm x 10 cm) in double crochet stitch.
Yardage: 1250- 1300 m/ 1500-1550 yds.


Crochet Terms (US):
  • ch: chain.
  • ss: slip stitch.
  • sc: single stitch.
  • dc: double crochet.
  • cps: crochet puff stitch.
  • dc2tog: double crochet 2 together.


Notes
  • Ch 3 at the beginning of rows counts as tr.
  • Don't cut yarn (A) when working with yarn (B) or (C), you can hide it later when crocheting the edge rounds.
  • Yarn (B) and (C) are used alternately.
  • The pattern of crochet puff stitch and flower tutorials are at the bottom of the post.


Instructions:

With yarn (A), make a knot and work as follows:

Row 1: Ch 4, dc 3, tr in first ch, turn. (5 sts)

Row 2: (ch 3, dc 2) in first st, dc in dc to last st, (dc, tr) in last st, turn. (8 sts)

Row 3 and 4: repeat row 2. (14 sts)

Flower stripe rows:

Join yarn (B) and work next two rows:

Row 5: (ch 3, dc 2) in first st, dc in dc 5 times, skip st, ch 1, dc in dc 6 times, (dc, tr) in last st, turn.

Row 6: (ch 3, dc 2) in first st, dc in dc 5 times, skip 2 sts, ch 2, dc 2 in ch 1 space, make the flower pattern, skip 2 sts, ch 2, dc in dc 5 times, (dc, tr) in last st, cut yarn, turn.

With yarn (A) work next four rows:


Row 7: (ch 3, dc 2) in first st, dc in dc 6 times, dc 3 in ch 2 space, skip flower sts, dc 2 in next ch 2 space, dc in dc 7 times, (dc, tr) in last st, turn. (23 sts)

Rows 8 to 10: repeat row 2. (32 sts)


Join yarn (C) and work next two rows:

Row 11: (ch 3, dc 2) in first st, dc in dc 5 times, skip st, ch 1, dc in dc 17 times, skip st, ch 1, dc in dc 6 times, (dc, tr) in last st, turn.

Row 12: (ch 3, dc 2) in first st, dc in dc 5 times, skip 2 sts, ch 2, dc 2 in ch 1 space, make the flower pattern, skip 2 sts, ch 2, dc in dc 13 times, skip 2 sts, ch 2, dc 2 in ch 1 space, make the flower pattern, skip 2 sts, ch 2, dc in dc 5 times, (dc, tr) in last st, cut yarn, turn.

With yarn (A) work next four rows:

Row 13: (ch 3, dc 2) in first st, dc in dc 6 times, dc 3 in ch 2 space, skip flower sts, dc 2 in next ch 2 space, dc in dc 13 times, dc 3 in ch 2 space, skip flower sts, dc 2 in next ch 2 space, dc in dc 7 times, (dc, tr)  in last st, turn. (41 sts)

Rows 14 to 16 : repeat row 2. (50 sts)


General pattern (increase rows):

Join yarn (B) and work next two rows:

Row 1: (ch 3, dc 2) in first st, dc in dc 5 times, skip st, ch 1, *dc in dc 17 times, skip st, ch 1, repeat from * to last 7 sts, dc in dc 6 times, (dc, tr) in last st, turn.

Row 2: (ch 3, dc 2) in first st, dc in dc 5 times, skip 2 sts, ch 2, dc 2 in ch 1 space, make the flower pattern, skip 2 sts, ch 2, *dc in dc 13 times, skip 2 sts, ch 2, dc 2 in ch 1 space, make the flower pattern, skip 2 sts, ch 2, repeat from * to last 6 sts, dc in dc 5 times, (dc, tr) in last st, cut yarn, turn.


With yarn (A) work next four rows:

Row 3: (ch 3, dc 2) in first st, dc in dc 6 times, dc 3 in ch 2 space, skip flower sts, dc 2 in next ch 2 space, *dc in dc 13 times, dc 3 in ch 2 space, skip flower sts, dc 2 in next ch 2 space, repeat from * to last 8 st, dc in dc 7 times, (dc, tr)  in last st, turn. 

Rows 4 to 6 : (ch 3, dc 2) in first st, dc in dc to last st, (dc, tr)  in last st, turn. 

Repeat these 6 rows pattern 8 times, or as many as you prefer. Note: don't forget to change the flower rows yarn (B) and (C) alternately .

Join yarn (B) and work next two rows (blanket diagonal):

Row 1: (ch 3, dc 2) in first st, dc in dc 5 times, skip st, ch 1, *dc in dc 17 times, skip st, ch 1, repeat from * to last 7 sts, , dc in dc 6 times, (dc, tr) in last st, turn.

Row 2: (ch 3, 2 dc) together, dc in dc 3 times, skip 2 sts, ch 2, dc 2 in ch 1 space, make the flower pattern, skip 2 sts, ch 2, *dc in dc 13 times, skip 2 sts, ch 2, dc 2 in ch 1 space, make the flower pattern, skip 2 sts, ch 2, repeat from * to last  6 sts, dc in dc 4 times, dc2tog, cut yarn, turn.


General pattern (decrease rows):

With yarn (A) work next four rows:

Row 1: (ch 3, dc 2) together, dc in dc twice, dc 3 in ch 2 space, skip flower sts, dc 2 in next ch 2 space, *dc in dc 13 times, dc 3 in ch 2 space, skip flower sts, dc 2 in next ch 2 space, repeat from * to last 4 sts, dc in dc twice, dc2tog, turn.

Rows 2 to 4: (ch 3, dc 2) together, dc in dc to last 2 sts, dc2tog, turn.

Join yarn (C) and work next two rows:

Row 5: (ch 3, dc 2) together, dc in dc 7 times, skip st, ch 1, *dc in dc 17 times, skip st, ch 1, repeat from * to last 9 sts, dc in dc to 7 times, dc2tog, turn.

Row 6: (ch 3, dc 2) together, dc in dc 3 times, skip 2 sts, ch 2, dc 2 in ch 1 space, make the flower pattern, skip 2 sts, ch 2, *dc in dc 13 times, skip 2 sts, ch 2, dc 2 in ch 1 space, make the flower pattern, skip 2 sts, ch 2, repeat from * to last  6 sts, dc in dc 4 times, dc2tog, cut yarn, turn.

Repeat this (6 rows pattern) 9 times, or until 14 sts are left.


Last decrease rows:

With yarn (A) work last four rows:

Row 1: (ch 3, dc 2) together, dc in dc twice, dc 3 in ch 2 space, skip flower sts, dc 2 in next ch 2 space, dc in dc twice, dc2tog, turn. (11 sts)

Rows 2 and 3: (ch 3, dc 2) together, dc in dc to last 2 sts, dc2tog, turn. (5 sts)

Row 4: (ch 3, dc 4) together, cut yarn.

Weave in loose ends.


Edging:

join yarn (C) at any corner, into the ch 3 post:

Round 1: ch 1, *sc 3 into ch 3 space, sc 3 in tr post, repeat to next corner, ch 1, repeat from * around the blanket, ss to first sc.

Round 2: ch 1, reverse sc into sc, skip sc, repeat around the blanket. (Note: skip the ch 1 at corners instead of sc). ss to first reverse sc, cut yarn. Weave in loose ends and block if needed. (See photo below)


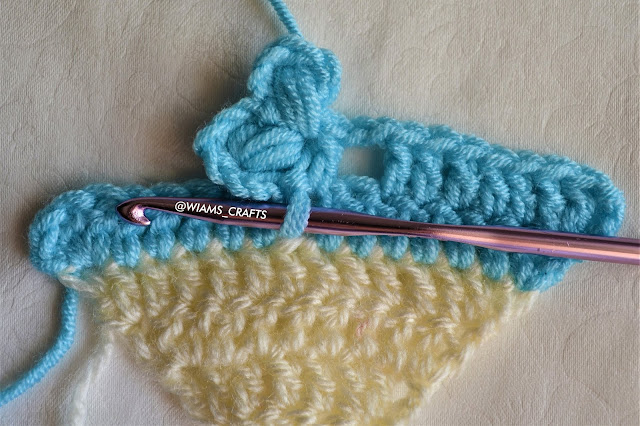
Crochet Puff Stitch (cps):

  1. Yarn over, insert hook around the dc post (or where it is placed in the pattern), yarn over again and draw through. (3 loops on the hook)
  2. Repeat step 1 two more times.(7 loops on the hook)
  3. Yarn over and pull through 6 loops.
  4. Yarn over and pull through the remaining 3 loops on the hook.

Flower pattern:

Flower pattern is worked in yarn (B) and (C) stripes only. The place of the flower is mentioned in the general pattern (check please):


1. ch 3, make 1 cps around the the second dc post, ch 3, ss around the same dc.


2. Repeat step 1.


3. ch 3, (make 1 cps, ch 3 and ss) through ch 1 of previous row and dc of the row below.


 4. ch 3, make 1 cps around the first dc post, ch 3, ss around the same dc.


5. Repeat step 4.


6. Bring the ch on hook to back through the flower center.


7. Follow the rest of instructions.


Lastly, feel free to leave a comment if you have any questions or find something confusing in the pattern.


Happy crocheting/knitting! follow me on Instagram @wiams_crafts and Twitter @wiamscrafts to see my upcoming projects.

Summer Granny Square part 2 - Baby Blanket Edition


As promised, here is part two of my Summer Granny Square project, where I show you how to make a baby blanket using the granny square posted in a previous post. this is the perfect gift for a baby born in the coming fall and winter. I hope you have fun making it, Happy crocheting!


Level: intermediate 


Summer Granny Square


This month, I took a little break from my main knitting projects, and tried small crochet Ideas, such as this granny square. Having some left over sport cotton and acrylic sport yarn, that I am not willing to throw away, I pushed my hands to hold a hook and start a granny square this time around.

Though I don't fancy making baby blankets out of granny squares that much, because they require loads of work to assemble, on top of having to make their many parts. But, a summer should not pass by without making one, no matter what the method used in the making. 

So in this post I present my humble granny square to you. Tune in for my upcoming post, where I will show you how to make a baby blanket that has this granny square as its base.

Level: intermediate 

Little Lily Nap Blanket


Hello friends! Baby blankets are always fun to work with, for it's a medium size project. It is a blanket, though it is done in a relatively short time, especially when I choose a straight forward pattern, and not granny squares type that needs many phases to finish. 

My new post is a baby blanket, which I crocheted using a multicoloured baby yarn that I found in a popular bazaar in Erbil (which is, by the way, a very beautiful city). It's easy to make, as I wrote the chosen pattern and designed a matching simple edging.

Level: Intermediate


Tiny Royal Baby Blanket


Few months ago, I was browsing Pinterest, and I came across this new crochet technique called the Element CAL. what does it mean? I didn't know then, but I liked it so much that I started crocheting immediately. I followed the tutorial videos posted by itsallinanutshell.com, which I thank so much for the gorgeous Element CAL design and clear instructions. This technique needs a lot of concentration if its your first time trying it, nevertheless, with time your work will go smoothly.


I had a small bag full of cotton yarn (catania and alize), so I started working on this project inspired by the Element CAL pattern, and now I proudly present to you my Tiny Royal Baby Blanket.


Level: Advanced


Materials:
  • Yarn: Schachenmayer, Catania, 100% cotton, yarn weight: sport. 50 g/ 1.75 oz. 125 m/ 137 yds. one skein of each: Anthrazit 429, Denim 421, Jade 253 and Gold 249. Alize, cotton baby, 50% cotton, 50% acrylic. Classical unbrushed, 100 g/ 3.53 oz. 270 m/295 yds. color 01, 2 skeins. 
  • Crochet Hook: US: E-4, 3.5 mm.
  • Tapestry needle


Yardage: 800-850 m/ 875-930 yard.


Measures: 25 inch/ 64 cm long, 20.5 inch/ 53 cm wide.

Crochet Terms (US)
  • ch: chain
  • ss: slip stitch
  • sc: single crochet
  • dc: double crochet
  • tr: treble crochet
  • bpsc: back post single stitch
  • fptr: front post treble crochet


Before you start:

Note 1: All treble crochet stitches are worked into second round below, in front of the previous round and skipping it (please watch www.itsallinanutshell.com's element CAL project tutorial videos)

cc1: Corner cluster one; (ch 3, tr in the center of ch 2 space of previous round, dc).

cc2: Corner cluster two; (dc, tr in the center of ch 2 space of previous round, dc).

Note 2: cc1 and cc2 terms will be used from round 4 and on.

Note 3: To make your work easier, always weave in ends when changing yarn.

Note 4: You can make the color combinations you like for 1-6 rounds. 7-8 rounds must be worked in alize yarn.


Instructions:


The granny square (make 30):

With any catania yarn, work the next four rounds:

Round 1: make a magic ring, or chain five, ss to first ch.

Round 2: ch 3, dc, ch 2, *dc 2, ch 2, repeat from * three times, ss to third ch of first ch 3.


Round 3: ss to first ch 2 space, (ch 3, tr into round 1 (magic ring, or ch 5), dc, ch 2, dc, tr into round 1, dc) in ch 2 space.

*(dc, tr into round 1, dc, ch 2, dc, tr into round 1, dc), in next ch 2 space, repeat from * three times, ss to the third ch of first ch 3.


Round 4: ss to first ch 2 space, (cc1, ch 2, cc2) in ch 2 space, (dc, tr in between dc 2 of round 2, dc) in between the two clusters of previous round, *(cc2, ch 2, cc2) in next ch 2 space, (dc, tr in between dc 2 of round 2, dc) in between the two clusters of previous round, repeat from * three times, ss to the third ch of first ch 3.


Edging

Note: in each granny square of the border, ignore the corner sc 2 of round 8.


Round 1 


With alize yarn, in any corner of the blanket, work as follows:

1. Blanket first corner: (cc1, ch 2, cc2) in the ch 2 space.

2. Granny square side: ch 1, sc in each bpsc sts 18 times, ch 1.

3. Between two granny squares: (dc, fptr in the last fptr of round 7 vertically, dc) in ch 2 space of wright side granny square, ch 2, (dc in ch 2 space, fptr in first fptr of round 7 vertically, dc) in ch 2 space of left side granny square.

Repeat 2 and 3 alternately as many as needed, until the second corner.

4. Blanket second corner: (cc2, ch 2, cc2) in the ch 2 space,

work 2, 3 and 4 all along the rest of blanket sides and corners as many as needed, sc to third ch of first ch 3, cut alize yarn.


Round 2


Bind on gold catania yarn in last ch 1 space of edging round 1.

1. Blanket first corner: (ch 3, tr in ch 2 space of round 7, dc)in ch 1 space, (cc1, ch 2, cc2) in the ch 2 space, (dc, tr in ch 2 space of round 7, dc) in next ch 1 space.

2. Granny square side: ch 1, skip sc, sc in each sc 16 times, skip sc, ch 1.

3. Between two granny squares:
- Wright side granny square: (dc, tr in ch 2 space of round 7, dc) in ch 1 space, (dc, tr in bpsc of round 8 vertically, dc) in ch 2 space, ch 2.

- Left side granny square: (dc, tr in bpsc of round 8, dc) in ch 2 space, (dc, tr in ch 2 space of round 7, dc) in ch 1 space.

Repeat 2 and 3 alternately as many as needed, until the second corner.

4. Blanket second corner: (dc, tr in ch 2 space of round 7, dc) in ch 1 space, (cc2, ch 2, cc2) in the ch 2 space, (dc, tr in ch 2 space of round 7, dc) in next ch 1 space.

Work 2, 3 and 4 all along the rest of blanket sides and corners as many as needed, sc to third ch of first ch 3.


Round 3:

1. Blanket first corner: in between the first two clusters, (ch 3, fptr into fptr of edging round 1, dc), (cc2, ch 2, cc2) in the ch 2 space, (dc, fptr into fptr of edging round 1, dc) in between next two clusters, ch1.

2. Granny square side: ch 1, skip sc, sc in each sc 14 times, skip sc, ch 1.

3. Between two granny squares: (dc, fptr into fptr of edging round 1, dc) in between the first two clusters, (cc2, ch 2, cc2) in the ch 2 space, (dc, fptr into fptr of edging round 1, dc) in between next two clusters.

Repeat 2 and 3 alternately as many as needed, until the second corner.

4. Blanket second corner: ch 1, (dc, fptr into fptr of edging round 1, dc) in between the first two clusters, (cc2, ch 2, cc2) in the ch 2 space, (dc, fptr into fptr of edging round 1, dc) in between next two clusters, ch 1.

work 2, 3 and 4 all along the rest of blanket sides and corners as many as needed, ch 1, sc to third ch of first ch 3, cut gold yarn.


Round 4:

Bind on alize yarn in the first ch 2 space of any corner.

1. Blanket first corner: (ch 3, fptr into fptr of edging round 2, dc) in ch 2 space, (dc, fptr into fptr of edging round 2, dc) in between the next two clusters, (cc2, ch 2, cc2) in the ch 2 space, (dc, fptr into fptr of edging round 2, dc) in between next two clusters, (dc, fptr into fptr of edging round 2, dc) in ch 2 space.

2. Granny square side: skip sc, sc in each sc 12 times, skip sc.

3. Between two granny squares: (dc, fptr into fptr of edging round 2, dc) in ch 1 space, (dc, fptr into fptr of edging round 2, dc) in between the next two clusters, (cc2, ch 2, cc2) in the ch 2 space, (dc, fptr into fptr of edging round 2, dc) in between next two clusters, (dc, fptr into fptr of edging round 2, dc) in ch 1 space.

Repeat 2 and 3 alternately as many as needed, until the second corner.

4. Blanket second corner: (dc, fptr into fptr of edging round 2, dc) in ch 2 space, (dc, fptr into fptr of edging round 2, dc) in between the next two clusters, (cc2, ch 2, cc2) in the ch 2 space, (dc, fptr into fptr of edging round 2, dc) in between next two clusters, (dc, fptr into fptr of edging round 2, dc) in ch 2 space.

Work 2, 3 and 4 all along the rest of blanket sides and corners as many as needed, ch 1, sc to third ch of first ch 3.


Round 5:

1. Blanket first corner: (ch 3, fptr into fptr of edging round 3, dc) in between first two clusters, (dc, fptr into fptr of edging round 3, dc) in between the next two clusters, (cc2, ch 2, cc2) in the ch 2 space, (dc, fptr into fptr of edging round 3, dc) in between next two clusters twice, ch 1.

2. Granny square side: 
ch 1, skip sc, sc in each sc 10 times, skip sc, ch 1. 

3. Between two granny squares: 
(dc, fptr into fptr of edging round 3, dc) in between two clusters tiwce, (cc2, ch 2, cc2) in the ch 2 space, (dc, fptr into fptr of edging round 3, dc) in between next two clusters twice,

Repeat 2 and 3 alternately as many as needed, until the second corner.

4. Blanket second corner: ch 1, (dc, fptr into fptr of edging round 3, dc) in between two clusters tiwce, (cc2, ch 2, cc2) in the ch 2 space, (dc, fptr into fptr of edging round 3, dc) in between next two clusters twice, ch 1.

work 2, 3 and 4 all along the rest of blanket sides and corners as many as needed, ch 1, sc to third ch of first ch 3, cut yarn, weave in loose ends.


Lastly, feel free to leave a comment if you have any questions or find something confusing in the pattern.

Happy crocheting/knitting! follow me on Instagram @wiams_crafts and Twitter @wiamscrafts to see my upcoming projects.

Labels