Showing posts with label Porthole eyelet. Show all posts

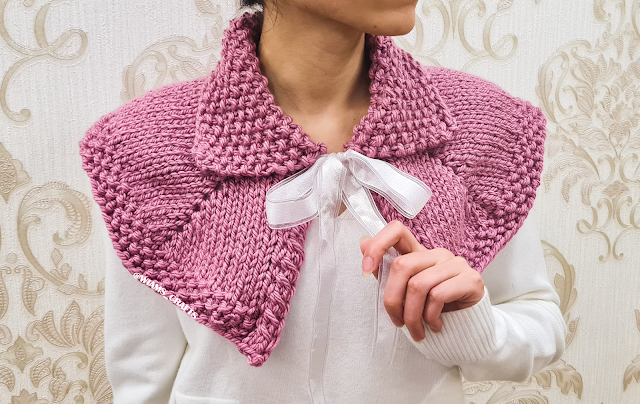
Claire Inspired Cowl


Hi everyone! I've been fond of the knitted garments that Outlander characters wear for quite a while now and have been told by multiple people to just go for it and make something inspired by them. I know how popular the series is, and after the release of every season my timeline gets flooded with knitters making their beautiful yet simple shawls and scarves. But this time, when I saw Claire wearing this specific cowl, I wanted to make one myself after I instantly fell in love with it. Adding one or two of my touches, such as porthole eyelet as a method of increasing stitches, may seem to have made it slightly difficult to knit, but you can watch my tutorial video and see how easy it is once you get the into the rhythm of it. If you’re waiting for the next episode of Outlander, you might want to use your time making this quick one skein project. Have a nice knitting day guys!

Skill level: Intermediate

Get printable PDF for this pattern:  or 


 Materials:

  • Suggested yarn: Red Heart Super Saver, 100% acrylic, 7 oz. (198 g), 264 yards (333 m), in the color "Light Raspberry": 1 skein.
  • Circular knitting needles 24" (60 cm) long, size US 10 (6 mm). 
  • Tapestry needle.
  • Ribbon, 1" (2.5 cm) wide and 53" (135 cm) long.


Measurements: Back yoke height = 6.5" (17 cm), edge circumference = 45" (115 cm), approx.

Yardage: 273- 275 yards (248- 250 m), approx.

Gauge: 11 sts and 14 rows = 4" x 4" (10 cm x 10 cm) in stockinette stitch.


Knitting terms:

  • st: stitch.
  • sts: stitches.
  • k: knit.
  • p: purl.
  • sl st: slip stitch.
  • k2tog: knit 2 sts together.
  • ssk: slip, slip, then knit the 2 slipped sts together through back loops.
  • kyokrb (porthole eyelet): (k 1, yarn over, k 1) into the stitch one row below. For more on how to Knit this, you can watch this tutorial video I made: 


Instructions:

Cast on 43 sts using Stretchy method. Follow the instructions in my tutorial video to learn how:

Now work as follows:

Collar:

Seed Pattern Row: k 1, p 1, repeat to last st, k 1.

Repeat seed pattern row sixteen more times. 

Yoke:

Note: to get a neat side edge, always slip first st purl-wise.

Row 1 (dividing row): p 1, yo, k2tog, p 1, k 2, kyokrb, k 8, kyokrb, k 11, kyokrb, k 8, kyokrb, k 2, p 1, ssk, yo, p 1.

Row 2: k 1, p 2, k 1, p to last 4 sts, k 1, p 2, k 1.

Row 3: p 1, switch the next 2 sts, placing the second one in front, and k them, p 1, *k to middle st of next porthole eyelet, kyokrb, repeat from * three more times, k to last 4 sts, p 1, switch the next 2 sts, placing the second one to the back, and k them, p 1.

Row 4: repeat row 2.

Repeat rows 3 and 4 nine more times, then work the last rows as follows:

Edge band:

Row 1: p 1, switch the next 2 sts placing the second in front and k them, *p 1, k 1, repeat from * to last 4 sts, p 1, switch the next 2 sts placing the second to back and k them, p 1.

Row 2: k 1, p 2, k 1, *k 1, p 1, repeat from * to last 5 sts, k 2, p 2, k 1. 

Repeat rows 1 and 2 once more. Bind off all sts. Weave in loose ends. Insert the ribbon through (yo, eyelets and yo) of the first row under the collar. Trim the ribbon's edges to get a neat look.


Lastly, feel free to leave a comment if you have any questions or find something confusing in the pattern.

Happy crocheting/knitting! follow me on Instagram @wiams_crafts and Twitter @wiamscrafts to see my upcoming projects.

Rhombus Weave Shawl

Important notice: This written pattern has been reviewed and updated on August 7th, 2021.

Hello knitters! It's getting warmer these days, and summer is knocking at the door, even so, I'm not abandoning my knitting projects any time soon. In fact, I think I can keep myself occupied with knitting all year long as I keep up with my plan to catch up with all the holidays. I am really impressed with Caron's Simply Soft yarn, because it's simply...really soft! Since this is my first design using it, I've chosen a simple (k and p) pattern to get the best look out of its shiny rich color. The final product has a very nice wrinkle to it which I love, so I decided not to block this one. This shawl is easy to make, but be sure not to get lost while counting the right number of stitches to knit or purl, that was the reason for most of my mistakes while making it. Other than that, I hope you enjoy yourselves while you make it!

Skill level: Intermediate

GET printable PDF for this pattern here.

Update: I made a matching hat! Click here to check it out.


Materials:

  • Yarn: Caron, Simply Soft, 100% acrylic, 6 oz (170.1 g), 315 yards (288 m), in the color "Kelly Green" 9769: 3 skeins.
  • Circular knitting needles, 40" (100 cm) long, Size US 8 (5 mm).
  • Tapestry needle.
  • Stitch marker.


Yardage: 960 - 970 yards (880 - 890 m), approx.

Measurements: Width = 67" (170 cm), Height = 33.5" (85 cm) approx.

Gauge:14 sts and 23 rows = 4"x 4" (10 cm x 10 cm) in stockinette stitch.


Knitting Terms: 
  • st = stitch.
  • sts = stitches.
  • = knit.
  • = purl.
  • yo = yarn over.
  • m1 = make one stitch increase.
  • kyokrb (porthole eyelet): (k 1, yarn over, k 1) into the same stitch in the row below. For more on how to Knit this, you can watch this tutorial video I made: 


Instructions:

Cast on 3 sts, knit 7 rows, turn work 90 degrees clockwise, pick up 1 st out of each purl row side (3 sts in total), turn work 90 degrees clockwise again, pick up 3 sts from bottom. (9 sts)

You can also watch this video tutorial to learn how to do this type of cast on:


Row 1 (wrong side): k 3, p 3, k 3. Mark the center stitch using a ring stitch marker.

Row 2: k 3, m1, k 1, kyokrb, k 1, m1, k 3. (13 sts)

Row 3: k 3, p to last 3 sts, k 3. 

Row 4: k 3, m1, k 3,  kyokrb, k 3, m1, k 3. (17 sts)

Row 5: repeat row 3.

Row 6: k 3, m1, k 5, kyokrb, k 5, m1, k 3. (21 sts)

Row 7: repeat row 3.

Row 8: k 3, m1, k 5, p 2, kyokrb, p 2, k 5, yo, k 3. (25 sts) 

Note: work all odd-numbered rows as follows: k 3, purl the purl and m1 sts, and knit the knit sts to last 3 sts, k 3.

Row 10: k 3, m1, k 5, p 4, kyokrb, p 4, k 5, m1, k 3. 

Row 12: k 3, m1, k 5, p 6, kyokrb, p 6, k 5, m1, k 3.

Row 14: k 3, m1, k 5, p 1, k 1, p 5, k 1, kyokrb, k 1, p 5, k 1, p 1, k 5, m1, k 3.

Row 16: k 3, m1, k 5, p 1, k 3, p 3, k 3, kyokrb, k 3, p 3, k 3, p 1, k 5, m1, k 3.

Row 18: k 3, m1, (k 5, p 1) twice, k 5, kyokrb, (k 5, p 1) twice, k 5, m1, k 3.

Row 20: k 3, m1, k 1, p 1, k 3, p 3, k 5, p 1, k 3, p 2, kyokrb, p 2, k 3, p 1, k 5, p 3, k 3, p 1, k 1, m1, k 3.

Row 22: k 3, m1, k 3, p 1, k 1, p 5, k 5, p 1, k 1, p 4, kyokrb, p 4, k 1, p 1, k 5, p 5, k 1, p 1, k 3, m1, k 3.

Row 24: k 3, m1, k 5, p 7, k 5, p 6, kyokrb, p 6, k 5, p 7, k 5, m1, k 3.

General Pattern:

Row 26: k 3, m1, k 1, *p 1, k 5, p 5, k 1, repeat from * to center st, kyokrb, k 1, *p 5, k 5, p 1, k 1, repeat from * to last 3 sts, m1, k 3.

Row 28: k 3, m1, * k 3, p 1, k 5, p 3, k3, repeat from * to center st, kyokrb, k 3, *p 3, k 5, p 1, k 3, repeat from * to last 3 sts, m1, k 3.

Row 30: k 3, m1, k 5, *p 1, k 5, repeat from * to center st, kyokrb, k 5, * p 1, k 5, repeat from * to last 3 sts, m1, k 3.

Row 32: k 3, m1, k 5, p 2, *p 1, k 3, p 1, k 5, p 2, repeat from * to center st, kyokrb, p 2, k 5, *p 1, k 3, p 3, k 5, repeat from * to last 3 sts, m1, k 3.

Row 34: k 3, m1, k 5, p 4, * p 1, k 1, p 1, k 5, p 4, repeat from * to center st, kyokrb, p 4, k 5, *p 1, k 1, p 5, k 5, repeat from * to last 3 sts, m1, k 3.

Row 36: k 3, m1, k 5, p 6, *p 1, k 5, p 6, repeat from * to center st, kyokrb, p 6, k 5, *p 7, k 5, repeat from * to last 3 sts, m1, k 3.

Row 38: k 3, m1, k 1, *k 4, p 1, k 1, p 5, k 1, repeat from * to center st, kyokrb, k 1, *p 5, k 1, p 1, k 5, repeat from * to last 3 sts, m1, k 3.

Row 40: k 3, m1, k 3, *k 2, p 1, k 3, p 3, k 3, repeat from * to center st, kyokrb, k 3, *p 3, k 3, p 1, k 5, repeat from * to last 3 sts, m1, k 3.

Row 42: k 3, m1, k 5, *p 1, k 5, repeat from * to center st, kyokrb, k 5, *p 1, k 5, repeat from * to last 3 sts, m1, k 3.

Row 44: k 3, m1, k 1, p 1, k 3, p 2, *p 1, k 5, p 1, k 3, p 2, repeat from * to center st, kyokrb, p 2, k 3, p 1, k 1, *k 4, p 3, k 3, p 1, k 1, repeat from * to last 3 sts, m1, k 3.

Row 46: k 3, m1, k 3, p 1, k 1, p 4, *p 1, k 5, p 1, k 1, p 4, repeat from * to center st, kyokrb, p 4, k 1, p 1, k 3, *k 2, p 5, k 1, p 1, k 3, repeat from * to last 3 sts, m1, k 3.

Row 48: k 3, m1, k 5, p 6, *p 1, k 5, p 6, repeat from * to center st, kyokrb, p 5, *p 1, k 5, p 6, repeat from * to last 3 sts, m1, k 3.

Row 49: k 3, purl the purl and m1 sts, and knit the knit sts to last 3 sts, k 3.
Repeat rows 26-49 six times, Repeat rows 26-37 once.

Stretchy bind off row: k 2, slip the 2 sts back to left needle, k2tog, *k 1, slip the 2 sts back to left needle, k2tog, repeat from * to end. You can watch my tutorial video for the stretchy bind off method here: 

Weave in loose ends. Block if you like. Personally, I prefer the look without blocking. Enjoy. 


Lastly, feel free to leave a comment if you have any questions or find something confusing in the pattern.

Happy crocheting/knitting! follow me on Instagram @wiams_crafts and Twitter @wiamscrafts to see my upcoming projects.


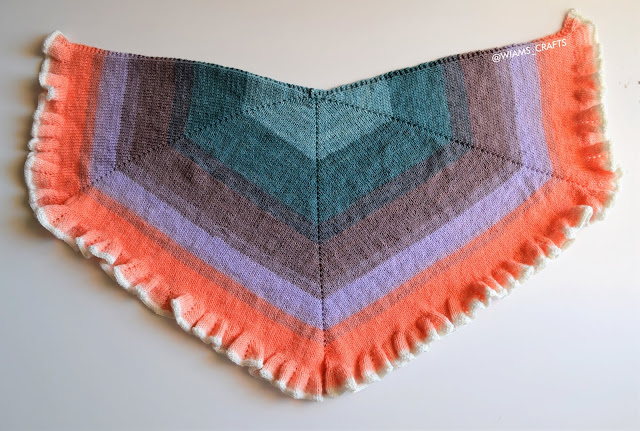
Ruffled Shawlette

Small shawls are nice and easy to wear, whether during day or at night. as the star of your look, or as an accessory and warm piece that doesn't dominate your overall appearance, that is why I like them. hence, I present to you this piece; simple, elegant with gorgeous ruffled edging.

This is my second knitting trial using Lionbrand Mandala, and it really went well. This yarn is soft and easy to knit. Working with this multi-colored yarn, I found that deciding the best sequence of colors is vital to the final look; as you can see, this shawl begins with the darkest color, and ends with the lightest one (white), to give the ruffled edge a soft and light finish.

Have fun knitting and wearing this piece in the upcoming fall.

Skill level: intermediate 


Materials:
  • Lion brand Mandala, 100% acrylic, 5.3 oz (150 g), 590 yards (450 m), in the color “Pegasus” 210: 1 skein.
  • Circular knitting needles, size US 7 (4.5 mm), 40" (100 cm) long.
  • Tapestry needle.
  • Stitch marker.


Measurements: width = 50" (127 cm), height = 29" (74 cm), approx. 

Gauge: 16 sts and 27 rows = 4"x 4" (10 cm x 10 cm) in stockinette stitch.

Yardage: 585 - 590 yards (535 - 540 m), approx.


Knitting Terms: 
  • st: stitch
  • sts: stitches
  • k: knit
  • p: purl
  • kyokrb (porthole eyelet): (k 1, yarn over, k 1) into the same stitch in the row below. For more on how to Knit this, you can watch this tutorial video I made: 


Instructions

Note 1: Working with multi-colored yarn, the skein might not start with the color you want to begin working with. in this case, I cut the yarn and reattach it, so that I get the desired color sequence. 

Note 2: always mark the center st of the porthole eyelets.

Cast on 3 sts, knit 7 rows, turn work 90 degrees clockwise, pick up 1 st out of each purl row side (3 sts in total), turn work 90 degrees clockwise again, pick up 3 sts from bottom. (9 sts)

You can also watch this video tutorial to learn how to do this type of cast on:


Row 1 (wrong side): k 3, p 3, k 3. (9 sts)

Row 2: k 3, kyokrb 3 times, k 3. (15 sts)

Row 3: k 3, p to last 3 sts, k 3.

Row 4: *k to porthole eyelet st, kyokrb, repeat from * to last 3 sts, k 3. (21 sts)

Row 5: repeat row 3.

Repeat rows (4 and 5) fifty more times, (318 sts), then work as follows:

Row 1: (k 3, kyokrb) repeat 13 times, *k 4, kyokrb, (k 3, kyokrb) repeat 24 times, k 4, kyokrb, repeat from * once more, (k 3, kyokrb) repeat 13 times, k 3.

Row 2: k 3, p to last 3 sts, k 3.

Row 3: *k to porthole eyelet st, kyokrb, repeat from * to last 3 sts, k 3.

Row 4: k 3, p to last 3 sts, k 3.

Row 5: repeat row 3.

Row 6: repeat row 4.

Row 7: repeat row 3.

Row 8: repeat row 4.

Row 9 and 10: k all sts.

Cast off all sts. Weave in loose ends. Block if needed.


 Lastly, feel free to leave a comment if you have any questions or find something confusing in the pattern.

Happy crocheting/knitting! follow me on Instagram @wiams_crafts and Twitter @wiamscrafts to see my upcoming projects.

Ombre Poncho

Hello and welcome to my first post of the new year! This project has been a long time coming, I started working on this poncho back in fall, but, as usual, I got busy with other stuff, fall turned into winter, and now spring is at the door. Nevertheless, here it is, a poncho the color of autumn leaves. If you choose to, you can work it using any ombre color gradient, or even any other bulky color combo yarn you like. I hope you enjoy making it. Have cozy knitting days!

Skill level: Intermediate

GET printable PDF for this pattern here.


This post was featured in Favecrafts' list of the top 100 crochet patterns of 2019. Click the image below to view the full list:


Materials:

  • Yarn: Alize Superlana Maxi Long Batik, %75 acrylic, %25 wool, 8.82 oz (250 g), 273 yards (250 m), in the color 6771: 2 skeins. 
  • Circular knitting needles, size US 15 (10 mm), 40" (100 cm) long. 
  • Tapestry needle 
  • Stitch marker 
  • Stitches holders 


Yardage: 490 - 520 yards (450 - 475 m).

Gauge: 9.5 sts and 13 rows = 4"x 4" (10 cm x 10 cm) in stockinette stitch.

Measurements: center back down: 25.5" (65 cm), side shoulder to end: 20.5" (52 cm). See image below:


knitting terms:

  • k: knit.
  • p: purl.
  • yo: yarn over.
  • k2tog: knit 2 stitches together.
  • k2togtbl: knit 2 stitches together through back loops.
  • m1: make one stitch increase.
  • kyokrb (porthole eyelet): (k 1, yarn over, k 1) into the same stitch in the row below. For more on how to Knit this, you can watch this tutorial video I made: 


Instructions:

Note 1: the two balls of yarn I've used have the same color gradient, so the back and front pieces are almost identical.

Note 2: when reaching last row in the back and front pieces, you can either cast off all stitches and sew the shoulders together, or if you are familiar with the Kitchener stitch, use it to attach the back and front at the shoulders' last rows.

Poncho Back Part:

Cast on 3 sts:

Row 1: k

Row 2: k 1, m 1, k 1, m 1, k 1. (5 sts)

Row 3: k

Row 4: k 1, m 1, k 3, m 1, k 1. (7 sts)

Row 5: k.

Row 6: k 1, m1, k 5, m1, k 1. (9 sts)

Row 7: k 4, p 1, k 4.

Row 8: k 4, kyokrb, k 4.

Row 9: k 4, p to last 4 sts, k 4.

Row 10: k to center st, kyokrb, k to end.

Repeat rows 9 and 10 until the sts count 53.


Middle Triangle:

With wrong side work as follows, (from now always mark center stitch):

Row 1: k 4, p 22, k 1, p 22, k 4.

Row 2: k 26, yo, k 1, yo, k 26.

Row 3: k 4, p 22, k 3, p 22, k 4.

Row 4: k 26, yo, k 3, yo, k 26.

Row 5: k 4, p 22, k 5, p 22, k 4.

Row 6: k 26, yo, k 5, yo, k 26.

Side Increases:

Row 7: k 4, p 22, k 7, p 22, k 4, cast on 20 sts at the end of row.

Row 8: k 46, yo, k 7, yo, k 26, cast on 20 sts at the end of this row.

Row 9: k 24, p 22, k 9, p 22, k 24.

Row 10: k 46, yo, k 9, yo, k 46.

Row 11: k 24, p 22, k 11, p 22, k 24.

Row 12: k 46, yo, k 11, yo, k 46.

Row 13: k 24, p 22, k 13, p 22, k 24

Row 14: k 46, yo, k 13, yo, k 46.

Row 15: k 4, p 42, k 15, p 42, k 4.

Row 16: k 46, yo, k 15, yo, k 46.

Work on these two increasing rows until the triangle in the middle stitches count 41 and ending a wrong side row.


Neck Edge Right Shoulder Side:

Row 1: k 46, yo, k 20, cast off 17 sts, k 4, yo, k 46.

Row 2: k 4, p 42, k 5.

Cast off all stitches leaving ( or keep sts in a st holder, cut yarn leave 3 yrd tail yarn).

Left Shoulder Seam:

Insert yarn in the center back stitch (that has been decreased when working the left side) to retain the stitch:

Row 1: cast off 17 sts, k 4, yo, p 42, k 4.

Row 2: k 46, k 5.

Cast off all stitches leaving 1 yard of yarn for sewing ( or keep stitches in stitches holder, and cut yarn leaving 3 yard tail).


Poncho Front Part:

Work like back until you finish row 14 after side increases.

Now work to shape the V neck opening: 

V Neck Opening:

Work on as follows starting with the wrong side row:

Row 1: k 4, p 42, k 15, p 42, k 4.(row 15 in back instructions)

Note: Mark the center st, in the middle of the center k 15.

Row 2: k 46, yo, k2tog, k 5 (front right side), cast off next 3 sts (the first one is the center middle st), k 3, k2togtbl, yo, k 46 (front left side).

Front Left Side:

With wrong side row, work as follows:

Row 3: k 4, p 42, k 5.

Row 4: k 3, k2togtbl, yo, k 46.

Row 5: repeat row 3.

Repeat rows 4 and 5 fourteen times, cast off all stitches ( or, put stitches in a stitch holder).


Front Right Side:

Insert the knitting needle in the center front stitch (that has been cast off when working the left side) to retain the stitch:

Row 1: cast off 3 sts, k 5, p 42, k 4.

Row 2: k 46, yo, k2tog, k 3, turn.

Row 3: k 5, p 42, k 4.

Repeat rows 2 and 3 fourteen times, cast off all stitches (or put stitches in a stitch holder).

Attaching shoulder seams:

Sew left and back shoulder seams of back and front parts together using any sewing method you prefer, weave in loose ends.

Or, if you are familiar with Kitchener stitch, attach left and right shoulders of back and front parts together using this method, weave in loose ends.


Lastly, feel free to leave a comment if you have any questions or find something confusing in the pattern.

Happy crocheting/knitting! follow me on Instagram @wiams_crafts and Twitter @wiamscrafts to see my upcoming projects.