Bunny Granny Square


Important notice: This written pattern has been reviewed and updated on June 1st, 2021.

Hi everyone! I think it's obvious by now how much I love crocheting animal-themed granny squares, as It has become something of a tradition for me to make one inspired by the Chinese zodiac every year. I have also made other animals before, and will keep on designing as many of these as I can. I will try to keep them as simple and minimal as possible, and I will maintain the same measurements, so that -if wanted- they can be used together in one bigger project, like a blanket, for example.
This time, I wanted to design an Easter Bunny granny square. I looked up a lot of bunny references online; real, drawn, embroidered, or crocheted, in order to make the best facial features and ear shape that can both fit inside the square, and still look like a bunny. I went through more trials than you can imagine, and in the end, I decided to let the ears be long and go outside the square -for maximum cuteness haha-. If you intend to make this as a blanket unit, it will still looks nice, just make sure not to position it at the boarders.
I hope you all have fun making this one, and happy Easter.

Skill level: Easy

Get printable PDF for this pattern:   or  

Check out the entire Animal Granny Square collection: 

Puppy | Frog | Koala | Chick Kitty | Chicken | Mouse | Ox | Tiger | Duckling


Materials: 
  • Yarn: any cotton yarn in the following colors and quantities: one white skein, one light green skein, a few yards (meters) of pink and yellow yarn, one yard (meter) of peach and black yarns, and one yard (meter) of black embroidery thread. Suggested yarn: D.M.C Happy Cotton, 0.7 oz (20 g), 47 yards (43 m).
  • Crochet hooks, sizes D/3 (3 mm) and E/4 (3.5 mm).
  • Tapestry needle.
  • Embroidery needle.


Measurements of the square: 6" x 6" (15 cm x 15 cm) approx.

Gauge22 sts and 12 round = 4"x 4" (10 cm x 10 cm) in double crochet.

Yardage: 64-66 yards (58-60 m).


Crochet terms (US):

  • ch: chain.
  • st: stitch.
  • sts: stitches.
  • sl st: slip stitch.
  • sc: single crochet.
  • hdc: half double crochet.
  • dc: double crochet.
  • tr: treble crochet.
  • sc2tog: single crochet 2 together.
  • sc3tog: single crochet 3 together.


Are you a beginner in Crocheting? Check out AllFreeCrochet's Ultimate Beginner Guide of Tutorials and Patterns: 

Instructions:

Granny square base:

Note: ch 1 and ch 3 at the beginning of rounds count as sc and dc respectively.

With the white yarn, make a magic circle, work as follows:

Round 1: ch 1 into the magic circle, sc 7, sl st into the first ch. (8 sts).


Round 2: ch 1 and sc in the first st, sc 2 in each st, sl st into the first ch. (16 sts).


Round 3: ch 3 and dc in the first st, dc in st, *dc 2 in st, dc in st, repeat from * to end, sl st into the third ch of the first ch 3. (24 sts).

Round 4: repeat row 3. (36 sts).


Round 5: ch 3 and dc in the first st, dc in st twice, *dc 2 in st, 
dc in st twice, repeat from * to end, sl st into the third ch of the first ch 3. (48 sts).

Round 6: 
ch 3 and dc in the first st, dc in st three times, *dc 2 in st, dc in st three times, repeat from * to end, sl st into the third ch of the first ch 3. (60 sts). 

Cut off white yarn and weave in loose ends. With light green yarn make a knot and at the eighth st after the end of last round, work as follows:

Round 7: (ch 4, tr, ch 2, tr 2) in the first st, *tr in st, dc in st twice, hdc in st 3 times, sc in st twice, hdc in st 3 times, dc in st twice, tr in st, (tr 2, ch 2, tr 2) in st, repeat from * 3 times, tr in st, dc in st twice, hdc in st 3 times, sc in st twice, hdc in st 3 times, dc in st twice, tr in st, sl st into the fourth ch of the first ch4.

Round 8: ch 3 in the first st, dc in st, *(dc, tr, ch 2, tr, dc) in ch 2 space, dc in each st to next ch 2 space, repeat from * 3 times, (dc, tr, ch 2, tr, dc) in ch 2 space, dc in each st to last st, sl st into the third ch of the first ch 3.

Rounds 9 and 10:  ch 3 in the first st, dc in each st to the first ch 2 space, *(dc 2, ch 2, dc 2) in ch 2 space, dc in each st to next ch 2 space, repeat from * 3 times, (dc 2, ch 2, dc 2) in ch 2 space, dc in each st to last st, sl st into the third ch of the first ch 3.
 
Cut off light green yarn and weave in loose ends.


Ear (make 2):

Outer ear:

With white yarn and 3.5 mm hook make 3 ch [leave 4" (10 cm) for sewing ears in place], then work as follows:

Row 1: ch 1, sc in each ch to end.

Row 2: ch 1, sc in each st to end. (3 sts)

Rows 3-6: ch 1, sc 2 in the first st, sc in each st to end. (7 sts)

Rows 7-9: repeat row 2.

Rows 10-13: ch 1, sc2tog, sc in each st to end. (3 sts)

Row 14: sc3tog, cut yarn, weave in loose end.


Inner ear:

with pink yarn and 3.5 mm hook chain 2 sts, [leave 4" (10 cm) for sewing ears in place], work as follows:

Row 1: sc 2 in the second chain from hook. 

Row 2: ch 1, sc 2 in the first st, sc in the second st. (3 sts)

Rows 3-4: ch 1, sc in each st to end. 

Rows 5-6: ch 1, sc 2 in the first st, sc in each st to end. (5 sts)

Rows 7-8: repeat row 3.

Rows 9-10: ch 1, sc2tog, sc in each st to end. (3 sts)

Row 11: sc3tog, cut yarn, weave in loose end.

Eye (make 2): 

With black yarn, make a magic circle, ch 1 and sc 5 into it, sl st in the first ch, cut yarn, leaving enough yarn to sew eye in place.


Flower:


With yellow yarn and 3 mm hook, make a magic circle (or ch 5 and sl st to the first ch),

work as follows: 

Round 1: ch 1, sc 9 into the circle, sl st to the first ch.

Round 2: sl st to next st, *ch 2, (dc 3, ch 2, sl st into the same st), sl st 2, repeat from * to end, sl st to ch 1 of previous round, cut yarn, leaving enough yarn to sew flower in place.

Flower center:

With peach yarn and 3 mm hook, ch 3, make a popcorn st and cut yarn, leaving enough yarn to sew in place.


Assembly:
  • With black thread embroider nose and mouth.
  • Sew outer ears on the outer line of the bunny head as shown in picture. Sew inner ears on the base of outer ears line, sew the top point of inner ears to outer ears.
  • Sew flower and flower center on the base of right ear.
  • Weave in loose ends.


Lastly, feel free to leave a comment if you have any questions or find something confusing in the pattern.

Happy crocheting/knitting! follow me on Instagram @wiams_crafts and Twitter @wiamscrafts to see my upcoming projects.

Flower Power Mom Beanie


Hi spring lovers and knitters! March is a very special month for women, it celebrates them as the caring, the strong, the inventive, the pioneer, and above all, the mother. I salute them, and present this gift to all mothers who have dedicated a big part of their lives and selves to raising their children. They deserve love and respect, especially in these hard times. I want to start by wishing all mothers safety, health, and happiness. May this year bring an ending to the nightmare we've been going through. So, keep on knitting, crocheting, or doing any other crafts and hobbies safely, and don’t let this quarantine kill your creativity.

I immediately fell in love with these yarn powder colors when I laid my eyes on them. So -as usual haha- I bought them with no Idea what to make with them. I was already planning on making a hat for Mother’s Day, though the original plan was to use white and red yarn, but upon seeing these, I changed my mind completely. Multicolored yarn projects intrigue me, although I haven’t mastered working the Fair Isle technique as much as I wanted to. But I’m okay working on a project using it from time to time.

So here it is, my Flower Power Mom Beanie after many -many- trials. I hope you like it, and make it as a gift this year, and the coming years. Wish you all the best, and Happy Mother’s Day! 

Skill level: Intermediate

GET printable PDF for this pattern here. 

Materials:
  • Yarn: NAKO Elit Baby, 100% premium anti-pilling acrylic, 3.5 oz. (100 g), 273 yards (250 m): one skein of the following colors: Almond (11451), Skin Tone (6792) and Salmon Peach (1469).
  • Circular knitting needles, 16" (40 cm) long, sizes US 5 (3.75 mm) and US 7 (4.5 mm). 
  • Double Pointed Needles (DPNs) set, size US 7 (4.5 mm).
  • Tapestry needle.
  • Stitch marker.


Sizes and measurements: One size, fits an adult. Head circumference = 20 - 22" (51 - 56 cm). Height = 9.5" (24 cm), approx.

Gauge:
20 sts and 26 rounds = 4"x 4" (10 cm x 10 cm) in stockinette stitch and US 8 (5 mm) needles.

Yardage: 230 - 240 yards (210 - 220 m) approx.

Knitting Terms:
  • st = stitch.
  • sts = stitches.
  • k = knit.
  • p = purl.
  • k2tog = k 2 stitches together.


Instructions:
With US 5 (3.75 mm) circular needles and almond color yarn, cast on 112 sts. Join in the round. Don't know how to join in the round? here is a short tutorial on how to do it (from 0:26 - 1:15 min): 


Put the ring stitch marker at the beginning of rounds.

Ribs round: k 2, p 2, repeat to end.

Repeat the ribs round 12 times. change to US 7 (4.5 mm) circular needles and work following the chart below using stockinette stitch:


Decreasing rounds:

Round 1: k2tog, k 12, repeat to end. (104 sts)

Round 2: k to end.

Round 3: k2tog, k 11, repeat to end. (96 sts)

Round 4: k to end.

Round 5: k2tog, k 10 repeat to end. (88 sts)

Round 6: k to end.

Round 7: k2tog, k 9, repeat to end. (80 sts)

Round 8: k to end.

Round 9: k2tog, k 8, repeat to end. (72 sts)

Round 10: k to end.

Round 11: k2tog, k 7, repeat to end. (64 sts)


Change to DPNs, work as follows:

Round 12: k2tog, k 6, repeat to end. (56 sts)

Round 13: k2tog, k 5, repeat to end. (48 sts)

Round 14: k2tog, k 4, repeat to end. (40 sts)

Round 15: k2tog, k 3, repeat to end. (32 sts)

Round 16: k2tog, k 2, repeat to end. (24 sts)

Round 17: k2tog, k 1, repeat to end. (16 sts)

Round 18: k2tog, repeat to end. (8 sts)

Cut yarn, leaving a 6" (
15 cm) long strand, pull it through all sts and tighten tog. Weave in loose ends. Make a pompom using the three yarn colors and fix it on top.


Lastly, feel free to leave a comment if you have any questions or find something confusing in the pattern.

Happy crocheting/knitting! follow me on Instagram @wiams_crafts and Twitter @wiamscrafts to see my upcoming projects.

Hyacinth Shawlette


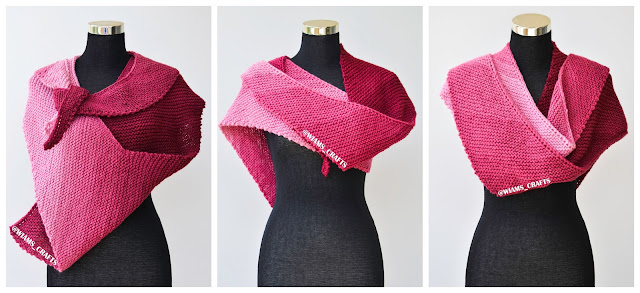
Hi knitters! It is finally March and I love this month with all the blooming flowers it brings, and the many happy events we celebrate during it; woman's day, mother's day, and in my home country, teacher's day, tree's day and the new year. I will try to celebrate and commemorate as many events this month as possible. This ombre shawlette is dedicated to mothers; its magical design and lovely colors make it very suitable as a gift, and it can be knitted using any other type of yarn. Enjoy spring, stay safe for the time being, and I hope that everything will go back to normal soon. Happy spring month to you all!

Skill level: Easy


Materials:
  • RED HEART, super saver, ombre: 10 oz/ 283 g, 482 yds/ 440 m. approx., 100% acrylic, color: anemone, 3965: 1 skein.
  • Size U.S. 9 (5.5 mm) circular knitting needles 40" (100 cm) long.
  • Tapestry needle.


Measurements: width = 19 inch (48 cm), A= 46 inch (117 cm), B= 47 inch (119 cm), approx.

Gauge: 16 sts and 28 rows = 4"x 4" (10 cm x 10 cm) in garter stitch.

Yardage: 470 - 475 yards (430 - 435 m) approx.


 Knitting Terms

  • k: knit.
  • p: purl.
  • sl st: slip stitch.
  • yo: yarn over.
  • k2tog: knit 2 stitches together.
  • ssk: slip, slip, knit the 2 sts together through back loops.


Instructions:
Cast on 4 sts:
Row 1: k 2, p 2.
Row 2: sl st, k 1,yo, k 2.(5 sts)
Row 3: k 3, bring yarn to front, sl st, p 1.(5 sts)
Row 4: sl st, k 1, yo, k 3.(6 sts)
Row 5: k 4bring yarn to front, sl st, p 1.(6 sts)
Row 6: sl st, k 1, yo, k 2, k2tog.(6 sts)
Row 7: k 4, bring yarn to front, sl st, p 1.(6 sts)
Row 8: sl st, k 1, yo, k 4.(7 sts)
Row 9: k 5, bring yarn to front, sl st, p 1.(7 sts)
Row 10: sl st, k 1, yo, k 3, k2tog.(7 sts)
 
General Increasing Pattern
Row 1: k to last 2 sts, bring yarn to front, sl st, p 1.
Row 2: sl st, k 1, yo, k to end.
Row 3: repeat row 1.
Row 4: sl st, k 1, yo, k to last 2 sts, k2tog.
Repeat the general increasing pattern until 68 sts are in the needle and ending row 4. knit 3 rows.
 
General Decreasing Pattern
Row 1: sskk to last 2 sts, bring yarn to front, sl st, p 1. 
Row 2: sl st, k 1, yo, k to last 2 sts, k2tog.
Row 3: k to last 2 sts, bring yarn to front, sl st, p 1.
Row 4: sl st, k 1, yo, k to last 2 sts, k2tog.
Repeat the general decreasing pattern until 4 sts remain and ending row 1, cast them off. weave in loose ends and enjoy.


Lastly, feel free to leave a comment if you have any questions or find something confusing in the pattern.

Happy crocheting/knitting! follow me on Instagram @wiams_crafts and Twitter @wiamscrafts to see my upcoming projects.

Slithering Shawl

Hi everyone! I was fascinated with the reversible stitch pattern ever since a friend asked me to make a scarf she saw on Pinterest many years ago, way before I started my own blog. At the time, I thought that it was a hard stitch to learn and, so I declined to make it and apologized to her. Then when I started my individual career, I thought to myself why not give this pattern a second shot. It turned out to be very simple and fun to knit, I even incorporated it in a previous designs, my Carrot Cake Beanie.

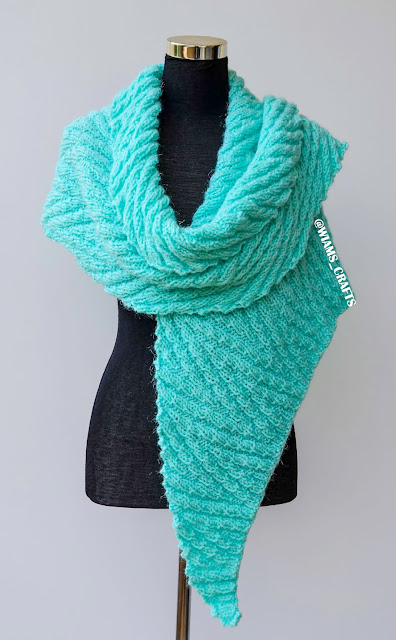
The challenge I faced while designing this shawl was trying to fit a pattern with a strict 
geometrical shape into an asymmetrical shawl. After a thorough study and many trials, I present to you this snake like scarf/shawl, which I will privately name the Slithering Scawl. All you have to do to get this lovely wrap is follow the instructions patiently, and make sure the cast on and bind off of the stitches are as neat as possible. You will get this beautiful and cozy knit piece that you can throw on during these cold days. By the way, you can make a matching Carrot Cake Beanie and get the perfect set. Stay safe and healthy, and keep up the good work.   

Skill level: Intermediate


Materials:

  • Suggested yarn: Alize Burcum Klasik, 100% acrylic, 3.5 oz. (100 g), 230 yards (210 m), in the color (287): 4 skeins.
  • Circular knitting needles 32" (80 cm) long, size US 10 (6 mm). 
  • Tapestry needle.


Measurements: height = 20" (50 cm), length = 92.5" (235 cm), approx.
Gauge: 18 sts and 18 rows = 4"x 4" (10 cm x 10 cm) in reversible stitch.
Yardage: 940 - 946 yards (860 - 865 m) approx.


Knitting terms:

  • st: stitch.
  • sts: stitches.
  • k: knit.
  • p: purl.


Instructions:

Cast on 161 sts, knit 1 row, then work as follows:

Row 1:  (k 2, p 2) twice, k 1, (p 2, k 2) twice, p 1, repeat to last 17sts, (k 2, p 2) twice, k 1, (p 2, k 2) twice .

Row 2: bind off 2 sts, k 2, p 2, k 2, p 1, *(k 2, p 2) twice, k 1, (p 2, k 2) twice, p 1, repeat from * to last 8 sts, (k 2, p 2) twice.

Row 3: (k 2, p 2) twice, k 1, (p 2, k 2) twice, p 1, repeat to last 15 sts, (k 2, p 2) twice, k 1, p 2, k 2, p 2.

Row 4: bind of 2 sts, p 2, k 2, p 1, *(k 2, p 2) twice, k 1, (p 2, k 2) twice, p 1, repeat from * to last 8 sts, (k 2, p 2) twice, cast on 2 sts.

Row 5: p 3, k 2, p 2, k 2, repeat to last 6 sts, p 3. k 2, p 1.

Row 6: bind off 3 sts k 3, *p 2, k 2, p 2, k 3, repeat from * to end. 

Row 7: p 3, *k 2, p 2, k 2, p 3, repeat from to end.

Row 8: bind off 2 sts, k 1, *p 2, k 2, p 2, k 3, repeat from * to end, cast on 3 sts.

Row 9: k 2, p 2, k 1, *(p 2, k 2) twice, p 1, (k 2, p 2) twice, k 1, repeat from * to last 8 sts, (p 2, k 2) twice.

Row 10:  bind off 2 sts, k 2, p 2, k 2, p 1, *(k 2, p 2) twice, k 1, (p 2, k 2) twice, p 1, repeat from * to last 4 sts, k 2, p 2.

Row 11: k 2, p 2, k 1, *(p 2, k 2) twice, p 1, (k 2, p 2) twice, k 1, repeat from * to last 6 sts, p 2, k 2, p 2.

Row 12: bind off 2 sts, p 2, k 2, p 1, *(k 2, p 2) twice, k 1, (p 2, k 2) twice, p 1, repeat from * to last 4 sts, k 2, p 2, cast on 2 sts.

Row 13: p 1, k 2, p 2, *k 3, p 2, k 2, p 2, repeat from * to last 6 sts, k 3. p 2, k 1.

Row 14: bind off 3 sts, *p 3, k 2, p 2, k 2, repeat from * to last 8 sts, p 3, k 2, p 2, k 1.

Row 15: p 1, k 2, p 2, k 3, *p 2, k 2, p 2, k 3, repeat from * to end.

Row 16: bind off 2 sts, p 1, k 2, p 2, k 2, *p 3, k 2, p 2, k 2, repeat from * to last 8 sts, p 3, k 2, p 2, k 1, cast on 2 sts.

Row 17: (p 2, k 2) twice, p 1, (k 2, p 2) twice, k 1, repeat to last 8 sts, (p 2, k 2) twice.

Row 18: bind off 2 sts, k 2, p 2, k 2, p 1, (k 2, p 2) twice, k 1, *(p 2, k 2) twice, p 1, (k 2, p 2) twice, k 1, repeat from * to last 8 sts, (p 2, k 2) twice .

Row 19: (p 2, k 2) twice, p 1, (k 2, p 2) twice, k 1, repeat to last 6 sts, p 2, k 2, p 2.

Row 20: bind of 2 sts, p 2, k 2, *p 1, (k 2, p 2) twice, k 1, (p 2, k 2) twice, repeat from * to endcast on 2 sts.

Row 21: Repeat row 5.

Row 22: repeat row 6.

Row 23: repeat row 7.

Row 24: repeat row 8.

Row 25: p 2, k 2, *p 1, (k 2, p 2) twice, k 1, (p 2, k 2) twice, repeat from * to end.

Row 26:  bind off 2 sts, k 2, p 2, k 2, p 1, *(k 2, p 2) twice, k 1, (p 2, k 2) twice, p 1, repeat from * to last 13 sts, (k 2, p 2) twice, k 1, p 2, k 2.

Row 27: p 2, k 2, p 1, *( k 2, p 2) twice, k 1, (p 2, k 2) twice, p 1, repeat from * to last 15 sts, ( k 2, p 2) twice, k 1, p 2, k 2, p 2.

Row 28: bind off 2 sts, p 2, k 2, p 1, *(k 2, p 2) twice, k 1, (p 2, k 2) twice, p 1, repeat from * to last 13 sts, (k 2, p 2) twice, k 1, p 2, k 2, cast on 2 sts.

Row 29: repeat row 13.

Row 30: repeat row 14.

Row 31: repeat row 15.

Row 32: repeat row 16.

Repeat rows 1-32 seven times, then repeat rows 1-16 once. (26 sts)

Work rows 17-32 as follow:

Row 17: (p 2, k 2) twice, p 1, (k 2, p 2) twice, k 1, (p 2, k 2) twice.

Row 18: bind off 2 sts, k 2, p 2, k 2, p 1, (k 2, p 2) twice, k 1, (p 2, k 2) twice. (24sts)

Row 19: (p 2, k 2) twice, p 1, (k 2, p 2) twice, k 1, p 2, k 2, p 2. (24 sts)

Row 20: bind of 2 sts, p 2, k 2, p 1, (k 2, p 2) twice, k 1, (p 2, k 2) twice, cast on 2 sts. (24 sts)

Row 21: repeat row 5.

Row 22: repeat row 6. (21 sts)

Row 23: repeat row 7.

Row 24: repeat row 8. (22 sts)

Row 25: p 2, k 2, p 1, (k 2, p 2) twice, k 1, (p 2, k 2) twice.

Row 26:  bind off 2 sts, k 2, p 2, k 2, p 1, (k 2, p 2) twice, k 1, p 2, k 2. (20 sts)

Row 27: p 2, k 2, p 1, (k 2, p 2) twice, k 1, p 2, k 2, p 2.

Row 28: bind off 2 sts, p 2, k 2, p 1, (k 2, p 2) twice, k 1, p 2, k 2, cast on 2 sts.

Row 29: p 1, k 2, p 2, k 3, p 2, k 2, p 2, k 3. p 2, k 1.

Row 30: bind off 3 sts, p 3, k 2, p 2, k 2, p 3, k 2, p 2, k 1. (17 sts)

Row 31: p 1, k 2, p 2, k 3, p 2, k 2, p 2, k 3.

Row 32: bind off 2 sts, p 1, k 2, p 2, k 2, p 3, k 2, p 2, k 1, cast on 2 sts.


Last Rows:

Row 1:  (k 2, p 2) twice, k 1, (p 2, k 2) twice. (17 sts)

Row 2: bind off 2 sts, k 2, p 2, k 2, p 1, (k 2, p 2) twice. (15 sts)

Row 3: (k 2, p 2) twice, k 1, (p 2, k 2, p 2.

Row 4: bind off 2 sts, p 2, k 2, p 1, (k 2, p 2) twice, cast on 2 sts.

Row 5: p 3, k 2, p 2, k 2, p 3. k 2, p 1.

Row 6: bind off 3 sts k 3, p 2, k 2, p 2, k 3. (12 sts)

Row 7: p 3, k 2, p 2, k 2, p 3.

Row 8: bind off 2 sts, k 1, p 2, k 2, p 2, k 3, cast on 3 sts. (13 sts)

Row 9: k 2, p 2, k 1, *(p 2, k 2) twice.

Row 10:  bind off 2 sts, k 2, p 2, k 2, p 1, k 2, p 2. (11 sts)

Row 11: k 2, p 2, k 1, p 2, k 2, p 2.

Row 12: bind off 2 sts, p 2, k 2, p 1, k 2, p 2, cast on 2 sts.

Row 13: p 1,  k 2, p 2, k 3. p 2, k 1.

Row 14: bind off 3 sts, p 3, k 2, p 2, k 1. (8 sts)

Row 15: p 1, k 2, p 2, k 3.

Row 16: bind off 2 sts, p 1, k 2, p 2, k 1.

Bind off the 6 sts and cut yarn. Weave in loose ends.


Lastly, feel free to leave a comment if you have any questions or find something confusing in the pattern.

Happy crocheting/knitting! follow me on Instagram @wiams_crafts and Twitter @wiamscrafts to see my upcoming projects.

Year Of The Ox Granny Square


Important notice: This written pattern has been reviewed and updated on June 9th, 2021. A chart has also been added.

Hi everyone! It's an every year contribution I've been doing, to come up with a granny square that has the face of the current year's Chinese zodiac animal. So far I've made the chicken, the dog, the rat, and now the ox. And I've also enjoyed making other animal granny squares, such as the cat and the frog, and have a few in the making (a rabbit and other animals) that I'm going to post in the future.
The only hard part for me when designing these granny squares is to show as many face traits as possible, while keeping the square easy to make. I think I've nailed it this time. So enjoy making this cute ox as a granny square unit for a baby blanket perhaps, plus, you can totally change the colors to make it look like a cow.
Stay safe and healthy, and happy (belated) Chinese new year!

Skill Level: Intermediate

GET printable PDF for this pattern here.

Check out the entire Animal Granny Square collection: 

Puppy | Frog | Koala | Chick Kitty | Chicken | Mouse | Bunny | Tiger | Duckling


Materials: 
  • Yarn: any fine cotton yarn, one skein of the following colors: dark brown, light brown, yellow, and a yard (meter) of black and white. Suggested yarn: D.M.C Happy Cotton, 0.7 oz (20 g), 47 yards (43 m).
  • Crochet hook, size US D (3 mm).
  • Tapestry needle.


Measurements of the square: 6" x 6" (15 cm x 15 cm), approx.

Yardage: 40-42 yards (36-38 m).

Gauge22 sts and 12 round = 4"x 4" (10 cm x 10 cm) in double crochet.


Crochet terms (US):
  • ch: chain.
  • st: stitch.
  • sts: stitches.
  • sl st: slip stitch.
  • sc: single crochet.
  • hdc: half double crochet.
  • dc: double crochet.
  • tr: treble crochet. 
  • hdc2tog: half double crochet 2 together.
  • dc2tog: double crochet 2 together.
  • tr2tog: treble crochet 2 together.
  • tr3tog: treble crochet 3 together.


Instructions:

Granny square base:

Note: ch 1 and ch 3 at the beginning of rounds count as sc and dc respectively.

With the dark brown yarn, make a magic circle, work as follows:

Round 1: ch 1 into the magic circle, sc 7, sl st into the first ch. (8 sts).


Round 2: ch 1 and sc in first st, sc 2 in each st, sl st into the first ch. (16 sts).


Round 3: ch 3 and dc in the first st, dc in st, *dc 2 in st, dc in st, repeat from * to end, sl st into the third ch of first ch 3. (24 sts).

Round 4: repeat row 3. (36 sts).


Round 5: ch 3 and dc in the first st, dc in st twice, *dc 2 in st, 
dc in st twice, repeat from * to end, sl st into the third ch of first ch 3. (48 sts).

Round 6: 
ch 3 and dc in the first st, dc in st three times, *dc 2 in st, dc in st three times, repeat from * to end, sl st into the third ch of first ch 3. (60 sts). 

Cut off the dark brown yarn and weave in loose ends. With the yellow yarn make a knot and at the eighth st after the end of last round, work as follows:

Round 7: (ch 4, tr, ch 2, tr 2) in first st, *tr in st, dc in st twice, hdc in st 3 times, sc in st twice, hdc in st 3 times, dc in st twice, tr in st, (tr 2, ch 2, tr 2) in st, repeat from * 3 times, tr in st, dc in st twice, hdc in st 3 times, sc in st twice, hdc in st 3 times, dc in st twice, tr in st, sl st into the fourth ch of first ch4.

Round 8: ch 3 in first st, dc in st, *(dc, tr, ch 2, tr, dc) in ch 2 space, dc in each st to next ch 2 space, repeat from * 3 times, (dc, tr, ch 2, tr, dc) in ch 2 space, dc in each st to last st, sl st into third ch of first ch 3.

Rounds 9 and 10:  ch 3 in first st, dc in each st to first ch 2 space, *(dc 2, ch 2, dc 2) in ch 2 space, dc in each st to next ch 2 space, repeat from * 3 times, (dc 2, ch 2, dc 2) in ch 2 space, dc in each st to last st, sl st into the third ch of first ch 3.
 
Cut off the yellow yarn and weave in loose ends.


The nostrils:
With light brown make 7 ch, work as follows:

Round 1: sc 5 in second ch from hook, sc in each ch to last ch, sc 5 in last ch, sc into other side of each ch to end, sl st to first ch.

Round 2: ch 3 and dc in first st, dc 2 in st 4 times, dc in st, hdc in st 3 times, dc in st, dc 2 in st 5 times, tr in st 5 times, sl st to the third ch of the first ch 3. Cut yarn leaving 8"/ 20 cm for sewing the nostril in place.


Right ear:
With dark brown ch 12, hdc in third ch from the hook, dc2tog, tr3tog, dc2tog, hdc2tog. Cut yarn leaving 4"/10 cm for sewing the ear in place.

Left ear: 
With dark brown ch 7, hdc in the third ch from the hook, dc 2 in st, tr 3 in st, dc 2 in st, hdc 2 in st. Cut yarn leaving 4"/10 cm for sewing the ear in place.

Right horn:
With light brown ch 15, hdc2tog in the second ch and third ch from the hook, dc2tog 3 times, tr2tog three times. Cut yarn leaving 4"/10 cm for sewing the horn in place.

Left horn: 
With dark brown ch 7, hdc 2 in the second ch from hook, dc 2 in st 3 times, tr 2 in st twice. Cut yarn leaving 4"/10 cm for sewing the horn in place.


Eye (make 2):

With black yarn make a magic circle, work as follows:

Round 1: sc 7, sl st to first sc. Cut yarn leaving 4"/10 cm for sewing the eye in place.

Round 2: with white yarn and at any st, ch 1, sc 2 in st three times, sl st in next st, cut yarn, weave in loose ends.

Nose Ring:
with yellow yarn make a simple I cord 5" (13 cm) long, cut yarn leaving  4"/10 cm for sewing the two ends together to make the ring.

Sew the nostril, the two ears and the two horns in place as shown in photo. Sew the two eyes in place, pull the I cord through the nose openings and make it a ring. Weave in loose ends. 


Lastly, feel free to leave a comment if you have any questions or find something confusing in the pattern.

Happy crocheting/knitting! follow me on Instagram @wiams_crafts and Twitter @wiamscrafts to see my upcoming projects.

Labels