Showing posts with label Granny Square. Show all posts

Piggy Granny Square

Hello everyone! I'm back again and excited to share with you another minimal-effort animal granny square to add to the collection. This time it's a cute little piggy with adjustable ears. You can make this easy and quick square with the ears folded or laid out flat as you see in the pictures. The square base is the same as my other granny square, which is a simple circle inside a square. Once you finish that, you only need to crochet the eyes, ears, and the nose/nostrils piece and sew them on. I hope you enjoy this little project as much as I did, and let me know what you think of it.

Overview:
  • Skill levelIntermediate.
  • Instructions style: written pattern + chart.
  • Crochet terminology: US.
  • Customization: the ears can be laid out flat or folded and sewn. 

Get the ad-free, printable PDF of this pattern from my store:

Or click here to jump to the instructions.


Want to pin this project for later? Just hover or click on any of the images in this post then click the red "save" button.

Check out the entire Animal Granny Square collection: 

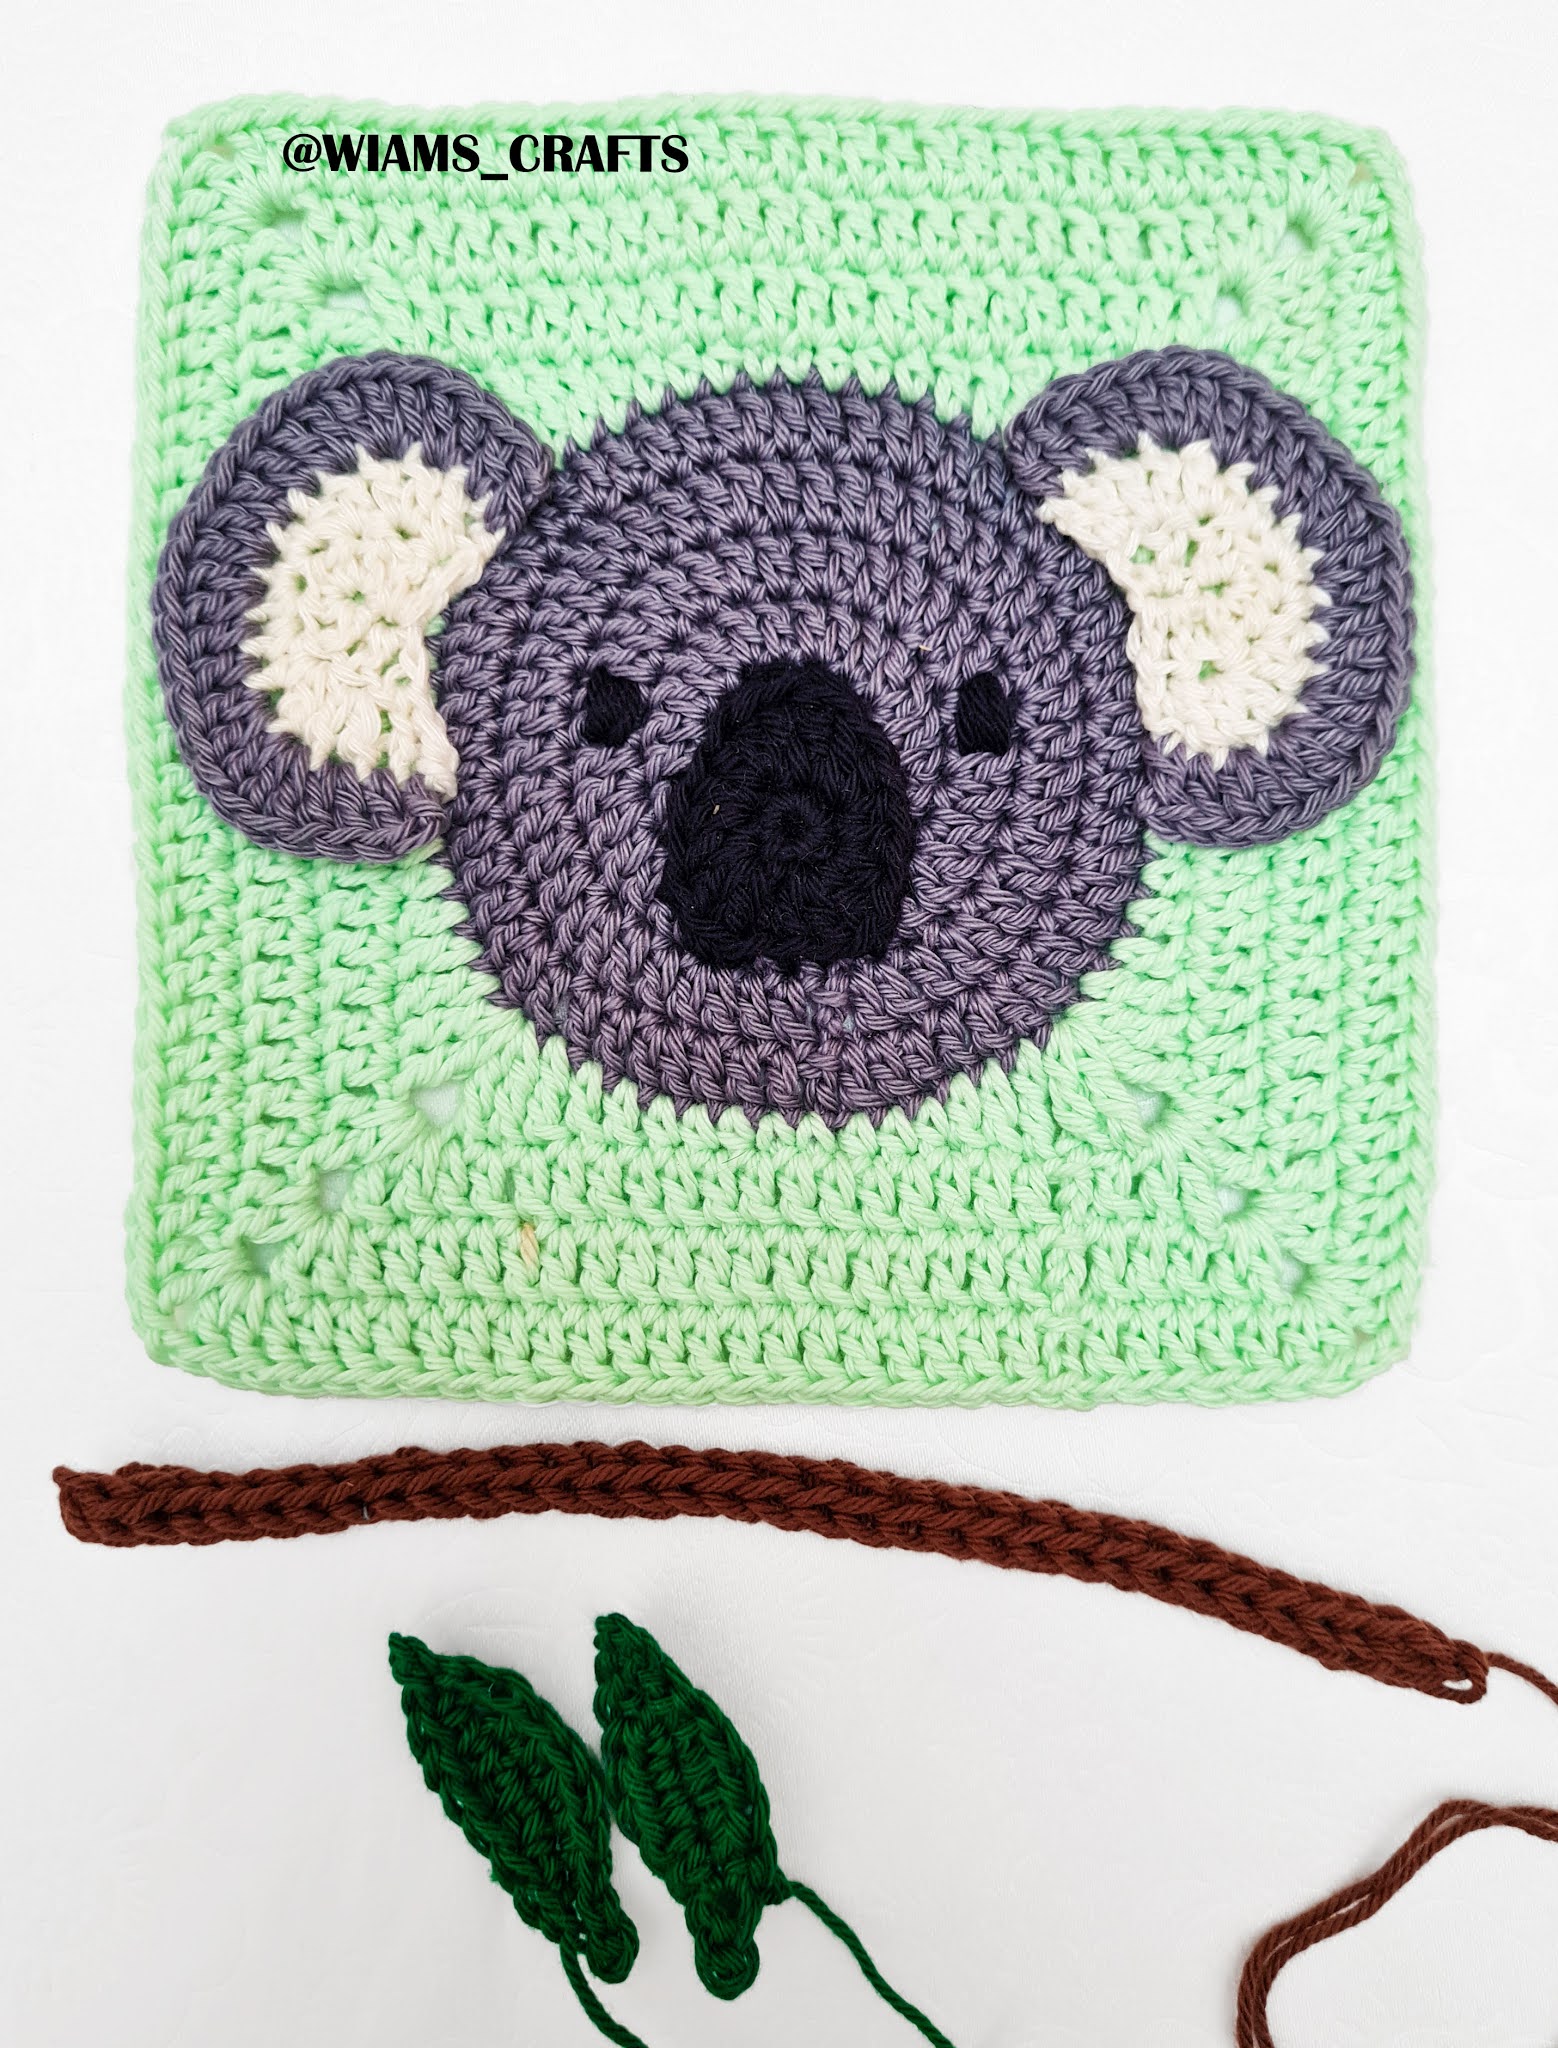
Puppy | Frog | Koala | Chick | Kitty | Chicken | Mouse | Bunny | Ox | Tiger | Duckling


Materials: 

  • Yarn: any cotton yarn in the following colors and quantities: beige (one skein), light pink (one skein), pink (one skein), and a few yards (meters) of black yarn. Suggested yarn: D.M.C Happy Cotton, 0.7 oz (20 g), 47 yards (43 m).
  • Crochet hooks, sizes D/3 (3 mm).
  • Tapestry needle.

Measurements of the square: 6" x 6" (15 cm x 15 cm) approx.

Gauge22 sts and 12 round = 4"x 4" (10 cm x 10 cm) in double crochet.

Yardage: 57- 60 yards (52- 55 m) approx.


Crochet terms (US):

  • ch: chain.
  • chs: chains.
  • st: stitch.
  • sts: stitches.
  • sl st: slip stitch.
  • sc: single crochet.
  • hdc: half double crochet.
  • dc: double crochet.
  • tr: treble crochet.
  • sc2tog: single crochet 2 sts together.
  • sc3tog: single crochet 3 sts together.


Instructions:

Granny square base:

Note: ch 1 and ch 3 at the beginning of rounds count as sc and dc respectively.

With the light pink yarn, make a magic circle, then work as follows:

Round 1: ch 1 into the magic circle, sc 7, sl st into the first ch. (8 sts)

Round 2: ch 1 and sc in the first st, sc 2 in each st, sl st into the first ch. (16 sts)

Round 3: ch 3 and dc in the first st, dc in st, *dc 2 in st, dc in st, repeat from * to end, sl st into the third ch of the first ch 3. (24 sts)

Round 4: repeat row 3. (36 sts)

Round 5: ch 3 and dc in the first st, dc in st twice, *dc 2 in st, dc in st twice, repeat from * to end, sl st into the third ch of the first ch 3. (48 sts)

Round 6: ch 3 and dc in the first st, dc in st three times, *dc 2 in st, dc in st three times, repeat from * to end, sl st into the third ch of the first ch 3. (60 sts)

Cut off light pink yarn and weave in loose ends. With beige yarn make a knot, then at the eighth st after the end of last round work as follows:

Round 7: (ch 4, tr, ch 2, tr 2) in the first st, *tr in st, dc in st twice, hdc in st 3 times, sc in st twice, hdc in st 3 times, dc in st twice, tr in st, (tr 2, ch 2, tr 2) in st, repeat from * 3 times, tr in st, dc in st twice, hdc in st 3 times, sc in st twice, hdc in st 3 times, dc in st twice, tr in st, sl st into the fourth ch of the first ch4.

Round 8:ch 3 in the first st, dc in st, *(dc, tr, ch 2, tr, dc) in ch 2 space, dc in each st to next ch 2 space, repeat from * 3 times, (dc, tr, ch 2, tr, dc) in ch 2 space, dc in each st to last st, sl st into the third ch of the first ch 3.

Rounds 9 and 10: ch 3 in the first st, dc in each st to the first ch 2 space, *(dc 2, ch 2, dc 2) in ch 2 space, dc in each st to next ch 2 space, repeat from * 3 times, (dc 2, ch 2, dc 2) in ch 2 space, dc in each st to last st, sl st into the third ch of the first ch 3.

Cut off beige yarn and weave in loose ends.


The nostrils:

With pink yarn make 6 chs, work as follows:

Round 1: sc 4 in second ch from hook, sc in each ch to last ch, sc 5 in last ch, sc into other side of each ch to end, sl st to first ch.

Round 2: ch 2, sc 2 in st, hdc 2 in st twice, hdc in st, sc in st, sl st in st, sc in st, hdc in st, hdc 2 in st twice, sc 2 in st, hdc in st, dc in st, tr in st, dc in st, hdc in st, sl st to the 2nd ch of the first ch 2. Cut yarn, leaving a 8" (20 cm) yarn tail to sew the nostrils in place.

Ear (make two):

With pink yarn make 7 chs. Leave a 4" (10 cm) yarn tail to sew ears in place, then work as follows:

Row 1: sc in second ch from hook and each ch to end. (6 sts)

Rows 2 and 3: ch 1, sc in each st to last st, sc 2 in sc. (8 sts)

Row 4: ch 1, sc in each st to end. (8 sts)

Rows 5- 7: ch 1, sc in each st to last st, sc2tog. (5 sts)

Row 8: ch 1, sc2tog, sc, sc2tog. (3 sts)

Row 9: sc3tog, cut yarn, weave in loose end.

Eye (make two): 

With black yarn, make a magic circle, ch 1 and sc 5 into it, sl st in the first ch, cut yarn, leaving enough yarn to sew eye in place.


Assembly:

  • Sew ears on the line of the piggy head as shown in picture. 
  • Sew the nostrils in place.
  • Sew eyes in place. 
  • Weave in loose ends.


Lastly, feel free to leave a comment if you have any questions or find something confusing in the pattern.

Happy crocheting/knitting! follow me on Instagram @wiams_crafts and Twitter @wiamscrafts to see my upcoming projects.

Duckling Granny Square

Hello guys! It’s been a while since I last made an animal themed granny square, and I truly miss making them. I’ve had such a good time coming up with all sorts of cute animal designs, such as the Puppy, Frog, Koala, Chick and all the other ones in my collection. Working on these granny squares is fun and relaxing, and a much-needed break to take while I’m working on other big projects like my knitted shawls. This time, I gathered my bright colored cotton yarn and came up with this adorable and ridiculously silly looking duckling. My little niece says it reminds her of a Pokémon, but I have no clue about that, so I’ll take her word for it. You can use this granny square in a number of awesome projects, like making an animal themed baby blanket, pillow covers, or simply framed and hung on a nursery’s wall. I hope you enjoy making this! Let me know if you have any comments or suggestions for future animal granny squares!

Skill level: Easy

Get printable PDF for this pattern:   or 

Check out the entire Animal Granny Square collection: 

Puppy | Frog | Koala | Chick Kitty | Chicken | Mouse | Bunny | Ox | Tiger


Materials: 

  • Yarn: any cotton yarn in the following colors and quantities: one yellow skein, one blue skein, a few yards (meters) of peach and black yarn. Suggested yarn: D.M.C Happy Cotton, 0.7 oz (20 g), 47 yards (43 m).
  • Crochet hooks, sizes D/3 (3 mm).
  • Tapestry needle.


Measurements of the square: 6" x 6" (15 cm x 15 cm) approx.

Gauge22 sts and 12 round = 4"x 4" (10 cm x 10 cm) in double crochet.

Yardage: 60- 62 yards (55- 58 m) approx.


Crochet terms (US):

  • ch: chain.
  • st: stitch.
  • sts: stitches.
  • sl st: slip stitch.
  • sc: single crochet.
  • hdc: half double crochet.
  • dc: double crochet.
  • tr: treble crochet.


Instructions:

Granny square base:

Note: ch 1 and ch 3 at the beginning of rounds count as sc and dc respectively.

With the yellow yarn, make a magic circle, then work as follows:

Round 1: ch 1 into the magic circle, sc 7, sl st into the first ch. (8 sts).

Round 2: ch 1 and sc in the first st, sc 2 in each st, sl st into the first ch. (16 sts).

Round 3: ch 3 and dc in the first st, dc in st, *dc 2 in st, dc in st, repeat from * to end, sl st into the third ch of the first ch 3. (24 sts).

Round 4: repeat row 3. (36 sts).

Round 5: ch 3 and dc in the first st, dc in st twice, *dc 2 in st, dc in st twice, repeat from * to end, sl st into the third ch of the first ch 3. (48 sts).

Round 6: ch 3 and dc in the first st, dc in st three times, *dc 2 in st, dc in st three times, repeat from * to end, sl st into the third ch of the first ch 3. (60 sts). 

Cut off yellow yarn and weave in loose ends. With blue yarn make a knot, then at the eighth st after the end of last round work as follows:

Round 7: (ch 4, tr, ch 2, tr 2) in the first st, *tr in st, dc in st twice, hdc in st 3 times, sc in st twice, hdc in st 3 times, dc in st twice, tr in st, (tr 2, ch 2, tr 2) in st, repeat from * 3 times, tr in st, dc in st twice, hdc in st 3 times, sc in st twice, hdc in st 3 times, dc in st twice, tr in st, sl st into the fourth ch of the first ch4.

Round 8:ch 3 in the first st, dc in st, *(dc, tr, ch 2, tr, dc) in ch 2 space, dc in each st to next ch 2 space, repeat from * 3 times, (dc, tr, ch 2, tr, dc) in ch 2 space, dc in each st to last st, sl st into the third ch of the first ch 3.

Rounds 9 and 10: ch 3 in the first st, dc in each st to the first ch 2 space, *(dc 2, ch 2, dc 2) in ch 2 space, dc in each st to next ch 2 space, repeat from * 3 times, (dc 2, ch 2, dc 2) in ch 2 space, dc in each st to last st, sl st into the third ch of the first ch 3.

Cut off blue yarn and weave in loose ends.


Eye (make two): 

With black yarn, make a magic ring, ch 1 and sc 6 into it, sl st into the first ch. Cut yarn, leaving a tail long enough to sew the eye in place.

Beak:

With peach yarn, ch 7 and work as follows:

Round 1: ch 1, hdc into the second ch from hook, hdc into each ch four times, hdc 3 into last ch. Now work on the other side of the chains. hdc into each ch four times, hdc twice into the last ch, sl st into the first ch.

Round 2: ch 1, hdc into each st six times, hdc 3 into st, hdc into each st six times, hdc 3 into st, sl st into the first ch.

Round 3: ch 1, hdc into each st seven times, hdc 3 into st, hdc into each st eight times, hdc 3 into st, hdc into st, sl st into the first ch.

Cut off the yarn, leaving a 6" (15 cm) tail to sew the beak in place.

Assembly:

Sew the beak on the lower half of the face. Cut four 3" (7.5 cm) long strands of yarn, then fold them together in half and sew them at the top center of the duck's head. Sew eyes in place. Weave in loose ends.


Lastly, feel free to leave a comment if you have any questions or find something confusing in the pattern.

Happy crocheting/knitting! follow me on Instagram @wiams_crafts and Twitter @wiamscrafts to see my upcoming projects.

Year of the Tiger Granny Square

Hello everyone! Wow, how time flies by! 2022 is here, and January is almost over. So it must be time to add a new granny square to my collection. It's the year of the tiger this time around, and let me tell you, it was a real challenge for me to make this one. I spent so many days researching both real, and crocheted tigers trying to come up with a good design. What I found more intriguing and charming was the white tiger rather than the orange one; they are quite majestic looking, their cubs are super cute, and to be honest with you, their color scheme can be interpreted somehow easier than the more known orange tigers. I hope I've caught your interest with this year's zodiac granny square of mine. Wish you all happy and warm days!

Skill level: Easy

Get printable PDF for this pattern:   or  

Check out the entire Animal Granny Square collection: 

Puppy | Frog | Koala | Chick Kitty | Chicken | Mouse | Bunny | Ox | Duckling


Are you a beginner in Crocheting? Check out AllFreeCrochet's  Ultimate Beginner Guide of Tutorials and Patterns: 


Materials: 

  • Yarn: any cotton yarn in the following colors and quantities: one white skein, one brown skein, a few yards (meters) of peach and black yarn. Suggested yarn: D.M.C Happy Cotton, 0.7 oz (20 g), 47 yards (43 m).
  • Crochet hooks, sizes D/3 (3 mm).
  • Tapestry needle.

Measurements of the square: 6" x 6" (15 cm x 15 cm) approx.

Gauge22 sts and 12 round = 4"x 4" (10 cm x 10 cm) in double crochet.

Yardage: 64- 66 yards (58- 60 m).


Crochet terms (US):

  • ch: chain.
  • st: stitch.
  • sts: stitches.
  • sl st: slip stitch.
  • sc: single crochet.
  • hdc: half double crochet.
  • dc: double crochet.
  • tr: treble crochet.


Instructions:

Granny square base: 

Note: ch 1 and ch 3 at the beginning of rounds count as sc and dc respectively.

With the white yarn, make a magic circle, then work as follows:

Round 1: ch 1, sc 7 into the magic circle, sl st into the first ch. (8 sts)

Round 2: ch 1 and sc in the first st, sc 2 in each st, sl st into the first ch. (16 sts).

Round 3: ch 3 and dc in the first st, dc in st, *dc 2 in st, dc in st, repeat from * to end, sl st into the third ch of the first ch 3. (24 sts).

Round 4: repeat row 3. (36 sts).

Note: the next 2 rounds are worked using white and black yarn.

Round 5: with white yarn, ch 3 and dc in the first st, dc in st twice, dc 2 in st, dc in st twice. Bind on black yarn. * With black yarn, dc 2 in st. With white yarn, dc in st twice*, repeat between ** one more time. With white yarn dc 2 in st, dc in st twice, repeat between ** three times. With white yarn, dc 2 in st, dc in st twice, repeat between ** twice. With white yarn, dc 2 in stitch, dc in st twice, sl st into the third ch of the first ch 3. (48 sts).

Round 6: with white yarn, ch 3 and dc in the first st, dc in st three times, dc 2 in st, dc in st three times, *with black yarn, dc 2 in st, dc in st once. With white yarn, dc in st twice*, repeat between ** one more time. With white yarn, dc 2 in st, dc in st three times, repeat between ** three times. With white yarn, dc 2 in st, dc in st three times, repeat between ** twice. With white yarn, dc 2 in st, dc in st three times, sl st into the third ch of the first ch 3. (60 sts). 

Cut white and black yarn and weave in loose ends. With brown yarn make a knot and in the fifth st after the end of last round, work as follows:

Round 7: (ch 4, tr, ch 2, tr 2) in the first st, *tr in st, dc in st twice, hdc in st 3 times, sc in st twice, hdc in st 3 times, dc in st twice, tr in st, (tr 2, ch 2, tr 2) in st, repeat from * 3 times, tr in st, dc in st twice, hdc in st 3 times, sc in st twice, hdc in st 3 times, dc in st twice, tr in st, sl st into the fourth ch of the first ch4.

Round 8: ch 3 in the first st, dc in st, *(dc, tr, ch 2, tr, dc) in ch 2 space, dc in each st to next ch 2 space, repeat from * 3 times, (dc, tr, ch 2, tr, dc) in ch 2 space, dc in each st to last st, sl st into the third ch of the first ch 3.

Rounds 9 and 10: ch 3 in the first st, dc in each st to the first ch 2 space, *(dc 2, ch 2, dc 2) in ch 2 space, dc in each st to next ch 2 space, repeat from * 3 times, (dc 2, ch 2, dc 2) in ch 2 space, dc in each st to last st, sl st into the third ch of the first ch 3.

Cut brown yarn and weave in loose ends.


Ear (make 2):

With peach yarn, make a knot and ch 3.

Row 1: hdc, dc 2, tr, dc 2, hdc into the third ch from hook. Cut peach yarn leaving enough for sewing, turn.

Row 2: Bind on white yarn. ch 3 and dc in the first st, dc 2 in each st to end, cut white yarn, leaving enough yarn to sew ear in place. 


Muzzle: 

With white yarn, make a knot and ch 7.

Round 1: hdc into the third ch from hook, dc 2 in next 3 chs, hdc 3 in last ch, dc 2 in other side of the next 3 chs, sl st to second ch of first st of the round.

Round 2: ch 3 and dc in the first st, dc 2 in next three sts, dc in st, dc 2 in next 2 sts, dc in dc, dc 2 in next five sts, dc in st, dc 2 in st, sl st in the third ch of first ch 3, cut yarn leaving enough yarn to sew in place.


Eye (make 2): 

With black yarn, make a magic circle, ch 1 and sc 5 into it, sl st in the first ch, cut yarn leaving enough yarn to sew eye in place. 


Nose:

With peach yarn make a knot and ch 5.

Row 1: hdc 2 into the third ch from hook, hdc in ch, hdc 2 into the last ch, cut yarn leaving enough for sewing in place, don't turn.

Row 2: with white yarn and in the right side of work, ch 4 and tr 4 together into each st of first row, cut yarn, leaving enough yarn to sew nose in place.  


Assembly:

  • Sew muzzle, ears, eyes and nose in place as shown in the picture at the beginning of the post.
  • Embroider the mouth with peach yarn.
  • Weave in loose ends.


Lastly, feel free to leave a comment if you have any questions or find something confusing in the pattern.

Happy crocheting/knitting! follow me on Instagram @wiams_crafts and Twitter @wiamscrafts to see my upcoming projects.

Koala Granny Square

Hello everyone! Frankly, I think I am obsessed with animal themed granny squares. Every time I browse the Internet and catch a picture of an animal, the first thing that comes to my mind is: can I make a granny square with its cute face on it? A koala’s face is easily recognized by its big oval nose, large ears, and small eyes. The challenge for me this time was to keep the big ears within my granny square base, which I succeeded at after numerous trials. I hope you all like it and get to make it for your next project.

Skill level: Intermediate

Get printable PDF for this pattern:   or  

Check out the entire Animal Granny Square collection: 

Puppy | Frog | Chick Kitty | Chicken | Mouse | Bunny | Ox | Tiger | Duckling


Materials: 

  • Yarn: any cotton yarn in the following colors and quantities: one gray skein, one light green skein, a few yards/meters of off white, black, brown and green. Suggested yarn: DMC Happy Cotton, 0.7 oz (20 g), 47 yards (43 m).
  • Crochet hook, size E/4 (3.5 mm).
  • Tapestry needle.


Measurements of the square: 6" x 6" (15 cm x 15 cm) approx.
 
Gauge22 sts and 12 round = 4" x 4" (10 cm x 10 cm) in double crochet.
 
Yardage: 60- 62 yards (54- 56 m).


Crochet terms (US):

  • ch: chain.
  • st: stitch.
  • sts: stitches.
  • sl st: slip stitch.
  • sc: single crochet.
  • hdc: half double crochet.
  • dc: double crochet.
  • tr: treble crochet. 


Instructions:

Granny square base:

Note: ch 1 and ch 3 at the beginning of rounds count as sc and dc respectively.

With the gray yarn, make a magic circle, work as follows:

Round 1: ch 1 into the magic circle, sc 7, sl st into the first ch. (8 sts).

Round 2: ch 1 and sc in the first st, sc 2 in each st, sl st into the first ch. (16 sts).

Round 3: ch 3 and dc in the first st, dc in st, *dc 2 in st, dc in st, repeat from * to end, sl st into the third ch of the first ch 3. (24 sts).

Round 4: repeat row 3. (36 sts).

Round 5: ch 3 and dc in the first st, dc in st twice, *dc 2 in st, dc in st twice, repeat from * to end, sl st into the third ch of the first ch 3. (48 sts).

Round 6: ch 3 and dc in the first st, dc in st three times, *dc 2 in st, dc in st three times, repeat from * to end, sl st into the third ch of the first ch 3. (60 sts). 
 
Cut off gray yarn and weave in loose ends. With light green yarn make a knot and at the eighth st after the end of last round, work as follows:

Round 7: (ch 4, tr, ch 2, tr 2) in the first st, *tr in st, dc in st twice, hdc in st 3 times, sc in st twice, hdc in st 3 times, dc in st twice, tr in st, (tr 2, ch 2, tr 2) in st, repeat from * 3 times, tr in st, dc in st twice, hdc in st 3 times, sc in st twice, hdc in st 3 times, dc in st twice, tr in st, sl st into the fourth ch of the first ch4.

Round 8:ch 3 in the first st, dc in st, *(dc, tr, ch 2, tr, dc) in ch 2 space, dc in each st to next ch 2 space, repeat from * 3 times, (dc, tr, ch 2, tr, dc) in ch 2 space, dc in each st to last st, sl st into the third ch of the first ch 3.

Rounds 9 and 10: ch 3 in the first st, dc in each st to the first ch 2 space, *(dc 2, ch 2, dc 2) in ch 2 space, dc in each st to next ch 2 space, repeat from * 3 times, (dc 2, ch 2, dc 2) in ch 2 space, dc in each st to last st, sl st into the third ch of the first ch 3.

Cut off light green yarn and weave in loose ends.


Ear (make 2):

With off white yarn, make 5 ch, then work as follows:

Row 1: dc into the fourth ch, (dc, hdc 3, dc) into the fifth ch, now work into the other side of the fourth chain, dc 2 into the fourth ch, turn. (9 sts)

Row 2: ch 2 and dc in first st, dc 2 in next st, (dc, hdc) in st, sc in st, sc 2 in st, sc in st, (hdc, dc) in st, dc 2 in st, (dc, hdc) in st, cut yarn, leaving a 4"(10 cm) long yarn for sewing ear in place.

With gray yarn work the next row starting from the same side of row 2 (see the chart please for more guidance):

Row 3: ch 3 (or make a standing dc into the first st), dc in st, dc 2 in st, dc 3 in st, dc 2 in st, dc in st twice, dc 2 in st twice, dc in st twice, dc 2, dc 3, dc 2, dc in st twice, cut yarn, weave in loose ends.

Nose: 

With black yarn make a magic ring, work as follows:

Round 1: ch 1 and sc 7 into the magic ring, sl st into the first ch.

Round 2: ch 2, dc 3 in first st, hdc 3 in st, (hdc 2, dc) in st, tr in st, (dc, hdc 2) in st, hdc 3 in st, dc 3 in st, sl st into the second ch of the first ch 2, cut yarn leaving a 4" (10 cm) long for sewing in place.


Twig: 

With brown yarn make a (3 st) I-Cord, 6" (15 cm) long, cut yarn leaving 6" (15 cm) for sewing in place.

Leaf (make 2):

With green yarn ch 10, sl st into the second and third ch, sc in ch twice, hdc in ch three times, sc in ch twice, make a picot (ch 3, sl st into first ch), now turn into the other side of chains, sc in ch twice, hdc in ch three times, sc in ch twice, sl st into next ch, cut yarn leaving 4" (10 cm) for sewing in place.


Sew ears, nose, twig and leaves in place as shown in picture. With black yarn, embroider the eyes.


Lastly, feel free to leave a comment if you have any questions or find something confusing in the pattern.

Happy crocheting/knitting! follow me on Instagram @wiams_crafts and Twitter @wiamscrafts to see my upcoming projects.