Mesh Pattern Vest

Hello everyone! Usually when I buy yarn for my projects, I keep in mind that the colors must be suitable for photography, as some yarn types and colors make it hard to get a clear picture of the design. This time, however, I've used yarn that I bought with a bunch of others about three years ago, when I was visiting a city abroad. Immediately after that, all the yarns transformed into projects on my blog within a few months.....well, except this one. After many failed trials, (and many years, in which it lived in a box) it came to my mind that this yarn needs a somehow transparernt pattern, one with big eyelets. And since I've been wanting to use Mesh patterns in my designs for a while, the decision was already made up for me, and I'm so happy with the result. It could be worn as a somewhat formal vest (and a hat), or -if another type of yarn is used- a tunic for summer outings. I hope everyone enjoys making and wearing it :).

Skill level: Intermediate


Materials:
  • Suggested yarn: Alize Superlana Midi, 75% acrylic, 25% wool, 3.53 oz (100 g), 186 yards (170 m), in the color 805: for Size S: 4 skeins, Size M: 5 skeins and Size L: 5 skiens.
  • Circular knitting needles, Size U.S. 10 (6 mm), 40" (100 cm) long.
  • Tapestry needle.
  • Stitch markers.
  • Small and large stitch holders.
  • Four buttons, 1.2" (3 cm) in diameter.


Yardage: 
  • Size S: 710-715 yards (650-655 m) approx.
  • Size M:750-755 yards (685-690 m) approx.
  • Size L: 790-795 yards (720-725 m) approx.
Sizes and measurements:

Size

Chest

S

 33.5-35.5" (85-90 cm) 

M

 37.5-40" (95-100 cm)

L

 42-44" (105-110 cm)


Gauge: 18 sts x 20 rows = 4"x 4" (10 cm x 10 cm) in Ribs Pattern.


Knitting Terms:

  • st : stitch.
  • sts : stitches.
  • k : knit.
  • p : purl.
  • yo : yarn over.
  • yot : yarn over twice.
  • k2tog : knit two stitches together.
  • ssk : slip, slip, knit: slip first stitch, slip second stitch, return both in their twisted positions, knit them together.
  • stm: stitch marker.
  • sth: stitch holder.


Instructions:

Cast on 176 (192, 208) sts, join in the round. Don't know how to join in the round? here is a short tutorial on how to do it (from 0:26 - 1:15 min): 


Put a ring stitch marker at the beginning of rounds. Work as follows:
Ribs round: k 1, *p 2, k 2, repeat from * to last st, k 1.

Repeat ribs round six times, put a stitch marker at the middle of sts [after 88 (96, 104) sts from the beginning of the round].

Mesh Pattern:
Round 1: k 1, p 2, k 2, *k2tog, yot, ssk*, repeat between ** to seven sts before the second stm, k2tog, yo, (k 2, p 2) twice, k 2, repeat between ** to last seven sts, k2tog, yo, k 2, p 2, k 1.

Round 2: k 1, p 2, k 3, *(p 1, k 1) into the yot, slip next stitch into the sth in back, k 1, k the sl st*, repeat between ** to six sts before the second stm, k 1, (k 2, p 2) twice, k 3, Repeat between ** to last six sts, k 3, p 2, k 1.

Round 3: k 1, p 2, k 2, yo, *ssk, k2tog, yot*, repeat between ** to seven sts before the second stm, ssk, (k 2, p 2) twice, k 2, repeat between ** to last seven sts, ssk, k 2, p 2, k 1.

Round 4: k 1, p 2, k 3, *slip next stitch into the sth in back, k 1, k the sl st, (p 1, k 1) into the yot*, repeat between ** to six sts before the second stm, k 1, (k 2, p 2) twice, k 3, Repeat between ** to last six sts, k 3, p 2, k 1.

Repeat rounds (1-4) fifteen (seventeen, seventeen) times. 


Front yoke:
With knitting needles, start working as follows:

Row 1: k 1, p 2, k 2, *k2tog, yot, ssk*, repeat between ** to seven sts before the second stm, k2tog, yo, k 2, p 2, k1, cast on 5 sts, turn.

Note: Leave the rest of sts 88(96,104) sts on the circular needles for back yoke.

Row 2: (p 2, k 2) twice, p 3, *slip next stitch into the sth in back, p 1, p the sl st,  (p 1, k 1) into the yot*, repeat between ** to last six sts, p 3, k 2, p 1, cast on 5 sts, turn. 98 (106, 114) sts 

Row 3:  (k 2, p 2) twice, k 2, yo, *ssk, k2tog, yot*, repeat between ** to last twelve sts, k2tog, (k 2, p 2) twice, k2.

Row 4: (p 2, k 2) twice, p 3, *(p 1, k 1) into the yot, slip next stitch into the sth in back, p 1, p the sl st*, repeat between ** to last eleven sts, p 1, (p 2, k 2) twice, p 2.

Row 5: (k 2, p 2) twice, k 2, *k2tog, yot, ssk*, repeat between ** to last twelve sts, k2tog, yo, (k 2, p 2) twice, k 2.

Row 6: (p 2, k 2) twice, p 3, *slip next stitch into the sth in back, p 1, p the sl st,  (p 1, k 1) into the yot*, repeat between ** to last eleven sts, p 1, (k 2, p 2) twice, k 2.

Row 7: repeat row 3.

Row 8: repeat row 4.

Repeat rows 5-8 four (five, six) times, then work as follows:

Ribs row: k 2, p 2, repeat to end.

Repeat ribs row 8(10,12) times. Bind off all sts tightly.


Back Yoke: 
Work as front yoke untill ribs row. Repeat ribs row 16(20, 24) times.

Left Stripe:
Row 1: k 2, p 2, repeat 9 times, k 2, turn. 34(38,42) sts

Row 2: p 2, k, 2 repeat 9 times, p 2.

Leave the rest of sts on a large sth. Repeat rows 1-2 twelve times, then work the next row:

Buttonhole Row (click here for a video tutorial): k 2, p 1, make a 4sts one row buttonhole, p 1, (k 2, p 2). Repeat to last 10 sts, k 2, p 1, make a second 4sts one row buttonhole, p 1, k 2. 
repeat row 2, rows 1-2 once, bind off all sts.

Right  stripe: 
Move the rest of sts onto knitting needles. Bind off 30 sts in the middle of the back, then work the remaining 38 sts as left stripe.

Sew under arms seems. Sew buttons in the place you prefer on the front yoke. Weave in loose ends.


Lastly, feel free to leave a comment if you have any questions or find something confusing in the pattern.

Happy crocheting/knitting! follow me on Instagram @wiams_crafts and Twitter @wiamscrafts to see my upcoming projects.

Mesh Pattern Hat

Hey knitters! Inspired by an upcoming vest design -that I'll be posting soon- I present to you this cute hat! It is a simple touque with a geometrical design, composed of squares separated by lines that meet into a vanishing point at the top. It comes in two sizes that I'm sure fits all, and can be knitted using light or dark colored yarn. I made this hat with this particular mesh pattern that I've been meaning to try for a long time. Needless to say, because mesh patterns are transparent, the hat actually needs less than 2 oz (50 g) of yarn. So grab any leftover yarn you see on your shelf, and start making this hat! It could be a very nice Christmas gift, as it is almost time to plan and do projects for winter occasions. Stay safe and healthy, and have a lovely summer!

Skill level: Intermediate


Size S


Materials:
  • Size S: Nako Pirlanta, 100% premium micro acrylic, 3.5 oz. (100 g), 264 yards (225 m), in the color 1297: 1 skeins. Size M/L: Alize Superlana Midi: 75% acrylic, 25% wool, 3.53 oz (100 g), 186 yards (170 m), in the color 805: 1 skein.
  • Circular knitting needles, 16" (40 cm) long, size US 10 (6 mm).
  • Double pointed needles (DPNs) set, size US 10 (6 mm).
  • Tapestry needle.
  • Stitch marker.


Size M/L


Sizes and measurements: 
  • Size S: head circumference = 19-20" (48-51 cm), height = 7.5" (19 cm).
  • Size M/L: head circumference = 21-22" (53-56 cm), height = 8" (20.25 cm).

Gauge: 16 sts and 20 rounds = 4"x 4" (10 cm x 10 cm) in stockinette pattern.


Yardage: 
  • Size S: 90-95 yards (83-86 m).
  • Size M/L: 104-109 yards (95-100 m). 


Knitting Terms:

  • st : stitch.
  • sts : stitches.
  • k : knit.
  • p : purl.
  • yo : yarn over.
  • yot : yarn over twice.
  • k2tog : knit two stitches together.
  • ssk : slip, slip, knit: slip first stitch, slip second stitch, return both in their twisted positions, knit them together.
  • p2tog: purl 2 sts together.
  • stm: stitch marker.
  • sth: stitch holder.


Instructions:

Cast on 84 (96) sts. Join in the round. Put a ring stitch marker at the beginning of rounds.

Ribs round: k 2, p 2, repeat to end.

Repeat the ribs round 6 times. 

Mesh Pattern:

Round 1: k 2, *(k2tog, yot, ssk) five (six) times, k2tog, yo, k 2, p 2, k 2, repeat from * twice, (k2tog, yot, ssk) five (six) times, k2tog, yo, k 2, p 2.

Round 2: k 3, *[(p 1, k 1) into the yot, slip next stitch into the sth in back, k 1, k the sl st] five (six) times, k3, p 2, k 3, repeat from * twice, [(p 1, k 1) into the yot, slip next stitch into the sth in back, k 1, k the sl st] five (six) times, k3, p 2.

Round 3: k 2, *yo, (ssk, k2tog, yot)* five (six) times, ssk, k 2, p 2, k 2, repeat from * twice, yo, (ssk, k2tog, yot)* five (six) times, ssk, k 2, p 2.

Round 4: k 3, *[slip next stitch into the sth in back, k 1, k the sl st, (p 1, k 1) into the yot] five (six) times, k 3, p 2, k 3, repeat from * twice, [slip next stitch into the sth in back, k 1, k the sl st, (p 1, k 1) into the yot] five (six) times, k 3, p 2.
    Repeat rounds (1-4) five times. Repeat ribs round three times.


    Decreasing rounds:

    Size S:

    Round 1: slip first st, *k 1, (p 2, k 2) twice, p 1, k2tog, ssk, p 1, (k 2, p 2) twice, k 1, ssk, k2tog, repeat from * five times, k 1, (p 2, k 2) twice, p 2, k 1, ssk, k2tog the last st and the first sl st at the beginning of the round. (72 sts)

    Round 2: [(k 2, p 2) twice, k 2, p 1, k 2, p 1, (k 2, p 2) twice, k 2,] three times.

    Round 3: [k2tog, (p 2, k 2) twice, k2tog, ssk, (k 2, p 2) twice, ssk] three times. (60 sts)

    Round 4: [k 1, (p 2, k 2) twice, k 2, (k 2, p 2,) twice, k 1] three times.

    Round 5: [p2tog, p 1, k 2, p 2, k 1, k2tog, ssk, k 1, p 2, k 2, p 1, p2tog] three times. (48 sts)

    Round 6: [(p 2, k 2) twice, (k 2, p 2) twice] three times.

    Change to DPNs and continue:

    Round 7: [p2tog, k 2, p 2, k2tog, ssk, p 2, k 2, p2tog] three times. (36 sts)
     
    Round 8: [p 1, (k 2, p 2) twice, k 2, p 1] three times.

    Round 9: [k2tog, k 1, p 1, k2tog, ssk, p 1, k 1, ssk] three times. (24 sts)

    Round 10: [(k 2, p 1) twice, k 2] three times.

    Round 11: [ssk, k2tog] repeat to end. (12 sts)

    Cut yarn leaving a 6" (15 cm) long yarn tail, pull it through all sts and tighten tog. Weave in loose ends. 


    Size M/L:

    Round 1: slip first st, *k 1, (p 2, k 2) twice, p 2, k 1, ssk, k2tog, repeat from * five times, k 1, (p 2, k 2) twice, p 2, k 1, ssk, k2tog the last st and the first sl st at the beginning of the round. (84 sts)

    Round 2: [(k 2, p 2) three times, k 2] six times.

    Round 3: [k2tog, (p 2, k 2) twice, p 2, ssk] six times. (72 sts)

    Round 4: [k 1, (p 2, k 2) twice, p 2, k 1] six times.

    Round 5: [p2tog, p 1, k 2, p 2, k 2, p 1, p2tog] six times. (60 sts)

    Round 6: (p 2, k 2), repeat to end.

    Change to DPNs and continue:

    Round 7: [p2tog, k 2, p 2, k 2, p2tog] six times. (48 sts)
     
    Round 8: [p 1, k 2, p 2, k 2, p 1] six times.

    Round 9: [k2tog, k 1, p 2, k 1, ssk] six times. (36 sts)

    Round 10: 9k 2, p 2), repeat to end.

    Round 11: [k2tog, p 2, k2tog] six times. (24 sts)

    Round 12: k2tog to end. (12 sts)

    Cut yarn leaving a 6" (15 cm) long yarn tail, pull it through all sts and tighten tog. Weave in loose ends. 


    Lastly, feel free to leave a comment if you have any questions or find something confusing in the pattern.

    Happy crocheting/knitting! follow me on Instagram @wiams_crafts and Twitter @wiamscrafts to see my upcoming projects.

    Honey Chocolate Cowl

    Hello everyone! It's very fun making a simple and quick-to-knit project using leftover yarn from previous projects. The challenge is creating a design that uses just what's left without having to go and purchase more of it -because you overshot- which beats the purpose (I'm obviously speaking from experience, haha!). Sometimes though, you have just enough material left to come up with a beautiful piece that complements the main one. For example, one of my favorite works, the Hashtag Jacket, the leftovers of which I turned into a Slouchy and Mittens matching set. Now, I've made many cowls from bulky yarn in the past, because I think it keeps the neck especially cozy during really cold days. This Nako Spaghetti Effect yarn (left unused from my Scalloped Chocolate Shawlette and Hat) is so easy to knit using 8 mm to 10 mm needles, and looks so stunning even with a simple garter pattern. I found that garter stitch and lace pattern worked in stripes of two colors gave the cowl the wavy shape I was aiming for. I hope you like it and enjoy making it.

    Skill level: Easy


    Materials:

    • Yarn: Nako, Spaghetti Effect, 25% wool, 75% premium acrylic, 100 g/ 3.53 oz, 60 m/ 65.6 yards. Color: 75533: 1 skein, color: 7511: 1 skein.
    • Circular knitting needles 60 cm/ 24" long, size US 11 (8 mm).
    • Tapestry needle.
    • Ring stitch marker.


    Measurements: 
    • Height: 8" (20 cm), approx.
    • Diameter: Upper: 25" (64 cm), lower: 33" (84 cm).

    Yardage: 116-118 yards (106-108 m) approx.

    Gauge: 10 sts x 17 rows = 4"x 4" (10 cm x 10 cm) in garter pattern.

    Knitting Terms: 
    • st: stitch.
    • sts: stitches.
    • k: knit.
    • p: purl.
    • k2tog: knit 2 sts together.
    • ssk: slip, slip, knit the 2 sts together through back loops.


    Instructions:

    With dark brown, cast on 72 sts, join in the round. Don't know how to join in the round? here is a short tutorial on how to do it (from 0:26 - 1:15 min): 
      Put the ring stitch marker at the beginning of rounds. work as follows:

    Round 1: k all sts.

    Round 2: p all sts.

    General Pattern:

    Round 1: (k2tog, yo) three times, k 6, repeat to end.

    Round 2: k 6, p 6, repeat to end.

    Repeat rounds 1 and 2 three times.

    Bind light brown yarn (don't cut dark brown yarn), work as follows;

    Round 3: k 6, (yo, ssk) three times, repeat to end.

    Round 4: p 6, k 6, repeat to end.

    Repeat rounds 3 and 4 three times.

    Repeat the general pattern once more, then repeat the first six rounds with the dark brown yarn, p one round.

    Stretchy bind off row: k 2, slip the 2 sts back to left needle, k2tog, *k 1, slip the 2 sts back to left needle, k2tog, repeat from * to end. You can watch my tutorial video for the stretchy bind off method here: 


    Weave in loose ends.


    Lastly, feel free to leave a comment if you have any questions or find something confusing in the pattern.

    Happy crocheting/knitting! follow me on Instagram @wiams_crafts and Twitter @wiamscrafts to see my upcoming projects.

    3D Beret

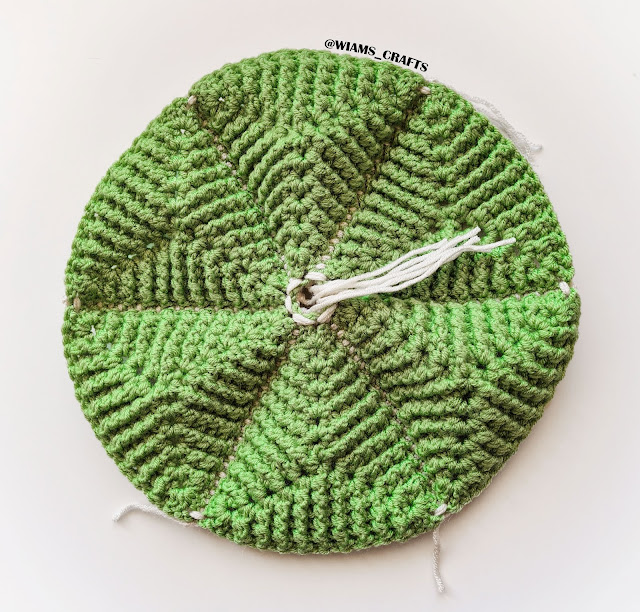
    Hi crocheters! I was always fascinated with 3D crochet patterns, but I didn't get the opportunity to integrate any of them into a design of mine. This time, I think it worked well with me, and I really like what came out of this experiment. To me this beret has a military feel to it, maybe because of the shape, or the color choice, though the larger size looks more like a crown, don't you think! I hope you won't be intimidated by the many triangles you make at first, because each is simple to make, joining them takes no time, and before you know it, et vois la! 

    Skill level: Intermediate


    Materials:

    • Yarn: NAKO Elit Baby 100% premium anti-pilling acrylic, 3.5 oz. (100 g), 273 yards (250 m), in the following colors:
      Size S: skin tone (6792): one skein. for the 2 colors version, Almond (11451): one skein, apple green (5956): one skein.
      Size M/L: apple green (5956): 2 skeins.
    • Crochet Hook: Size US H (5 mm).
    • Tapestry needle.


    Sizes and measurements: 
    • Size S: head circumference = 20" (51 cm), height = 6.5" (17 cm), diameter = 9" (23 cm).
    • Size M/L: head circumference = 20" (51 cm), height = 7.5" (19 cm), diameter = 11" (28 cm).
    Gauge: 22 sts and 10 rounds = 4" x 4" (10 cm x 10 cm) in double crochet stitch.

    Yardage: 
    • S: 230 - 240 yards (210 - 220 m) approx.
    • M/L: 330 - 340 yards (300 - 310 m) approx.


    Crochet terms (US):
    • mc: magic circle.
    • ch: chain.
    • sl st: slip stitch.
    • sctbl: single crochet through back loop.
    • dc: double crochet.
    • fpdc: front post double crochet.
    • bpdc: back post double crochet.


    Instructions:

    Triangle unit (make 6):

    Make a magic circle, or chain five and sl st to first ch. Into the magic circle, work as follows:

    Round 1: ch 3, (dc 3, ch 1) twice, dc 2, sl st into the second ch of first ch 3.

    Round 2: sl st into the first ch 1 space, (ch 3, dc 2) in the ch 1 space, *fpdc in dc, bpdc in dc, fpdc in dc, (dc 2, ch 1, dc 2) in ch 1 space, repeat from * twice, fpdc in dc, bpdc in dc, fpdc in dc, dc in ch 1 space, sl st to second ch of first ch 3.

    Round 3: sl st into the first ch 1 space, (ch 3, dc 2) in the ch 1 space, *(fpdc in dc, bpdc in dc) 3 times, fpdc in dc, (dc 2, ch 1, dc 2) in ch 1 space, repeat from * twice, (fpdc in dc, bpdc in dc) 3 times, fpdc in dc, dc in ch 1 space, sl st to second ch of first ch 3.

    Round 4: sl st into the first ch 1 space, (ch 3, dc 2) in the ch 1 space, *(fpdc in dc, bpdc in dc) 5 times, fpdc in dc, (dc 2, ch 1, dc 2) in ch 1 space, repeat from * twice, (fpdc in dc, bpdc in dc) 5 times, fpdc in dc, dc in ch 1 space, sl st to second ch of first ch 3.

    Round 5: sl st into the first ch 1 space, (ch 3, dc 2) in the ch 1 space, *(fpdc in dc, bpdc in dc) 7 times, fpdc in dc, (dc 2, ch 1, dc 2) in ch 1 space, repeat from * twice, (fpdc in dc, bpdc in dc) 7 times, fpdc in dc, dc in ch 1 space, sl st to second ch of first ch 3.

    Round 6: sl st into the first ch 1 space, (ch 3, dc 2) in the ch 1 space, *(fpdc in dc, bpdc in dc) 9 times, fpdc in dc, (dc 2, ch 1, dc 2) in ch 1 space, repeat from * twice, (fpdc in dc, bpdc in dc) 9 times, fpdc in dc, dc in ch 1 space, sl st to second ch of first ch 3.

    For size S: cut yarn, weave in loose ends.

    Round 7: sl st into the first ch 1 space, (ch 3, dc 2) in the ch 1 space, *(fpdc in dc, bpdc in dc) 11 times, fpdc in dc, (dc 2, ch 1, dc 2) in ch 1 space, repeat from * twice, (fpdc in dc, bpdc in dc) 11 times, fpdc in dc, dc in ch 1 space, sl st to second ch of first ch 3.

    For size M/L: cut yarn, weave in loose ends.


    Joining the triangles together:

    Note: for the two colored beret, use the skin tone yarn from now on.
    Take two triangles and put them together along one side facing backwards, join them as follows: sc the two triangles together through the ch 1 space, then through each dc to next ch 1 space, cut yarn. Attach the rest of the triangles the same way to make a circle. Pull the six threads through the hole in the center, and tie them tightly together until the center opening is closed.


    Finishing the beret:

    In the middle dc of the free edge of any triangle, make a standing bpdc, or ch 2. Work as follows:

    Round 1: (fpdc in dc, bpdc in dc) to last dc in the first triangle, (fpdc2tog the last dc of the triangle and first dc of next triangle), bpdc in dc, repeat along all triangles to first one, fpdc, (bpdc, fpdc) five(six) times, sl st to second ch of first ch 2.


    Note: in the rounds 2-4 rounds, skip each (bpdc, fpdc2tog, bpdc) cluster.

    Round 2: ch 2, (fpdc in dc, bpdc in dc) four (five) times, *fpdc2tog, bpdc, (fpdc in dc, bpdc in dc) eight (ten) times, repeat to first triangle, (bpdc, fpdc) four (five) times, sl st to second ch of first ch 2.


    Round 3: ch 2, (fpdc in dc, bpdc in dc) three (four) times, *fpdc2tog, bpdc, (fpdc in dc, bpdc in dc) six (eight) times, repeat to first triangle, (bpdc, fpdc) three (four) times, sl st to second ch of first ch 2.

    For size M/L only: work the next round.

    Round 4: ch 2, (fpdc in dc, bpdc in dc) three times, *fpdc2tog, bpdc, (fpdc in dc, bpdc in dc) six times, repeat to first triangle, (bpdc, fpdc) three times, sl st to second ch of first ch 2.


    Beret Band: 

    Band round: ch 1 and sctbl into first st, sctbl into each st to end.

    For size S: repeat round 3 four times.
    For size M/L: repeat round 3 five times. 

    Cut yarn. Weave in loose ends. 


    Lastly, feel free to leave a comment if you have any questions or find something confusing in the pattern.

    Happy crocheting/knitting! follow me on Instagram @wiams_crafts and Twitter @wiamscrafts to see my upcoming projects.

    Labels