


Hello crocheters! today I bring you a classic design of mine from a few years ago. It is a stress-free, straight forward project to make if you know the basic crochet stitches. I have revamped this little square's design and rewritten the pattern to be super clear to follow. Now the instructions come with a lot of tutorial photos on how to attach the separate pieces together, and a detailed chart for the cherry and the leaves. Coming back to this design after so many years got me really inspired, and now I have many ideas for more charismas themed units to add to my collection. Hopefully, they will be posted soon so stay tuned!
Overview:
- Skill level: Intermediate.
- Instructions style: written pattern + chart + tutorial photos.
Get the ad-free, printable PDF of this pattern from my store:
Want to pin this project for later? Just hover or click on any of the images in this post then click the red "save" button.

Materials:
- Yarn: NAKO Elit Baby, 100% premium anti-pilling acrylic, 3.5 oz. (100 g), 273 yards (250 m), in the following colors and quantities: green 1594 (1 skein), white 208 (1 skein), and red 298 (1 skein).
- Crochet hook, size 4 mm (G).
- Tapestry needle.
- Stitch markers.
Measurements of the square: 7.25" x 7.25" (18.5 cm x 18.5 cm) approx.
Gauge: 20 sts and 11 rounds = 4" x 4" (10 cm x 10 cm) in double crochet.
Yardage: 66- 68 yards (60- 62 m) approx.
Crochet terms (US):
- ch: chain.
- chs: chains.
- st: stitch.
- sts: stitches.
- sl st: slip stitch.
- sc: single crochet.
- hdc: half double crochet.
- dc: double crochet.
- tr: treble crochet.
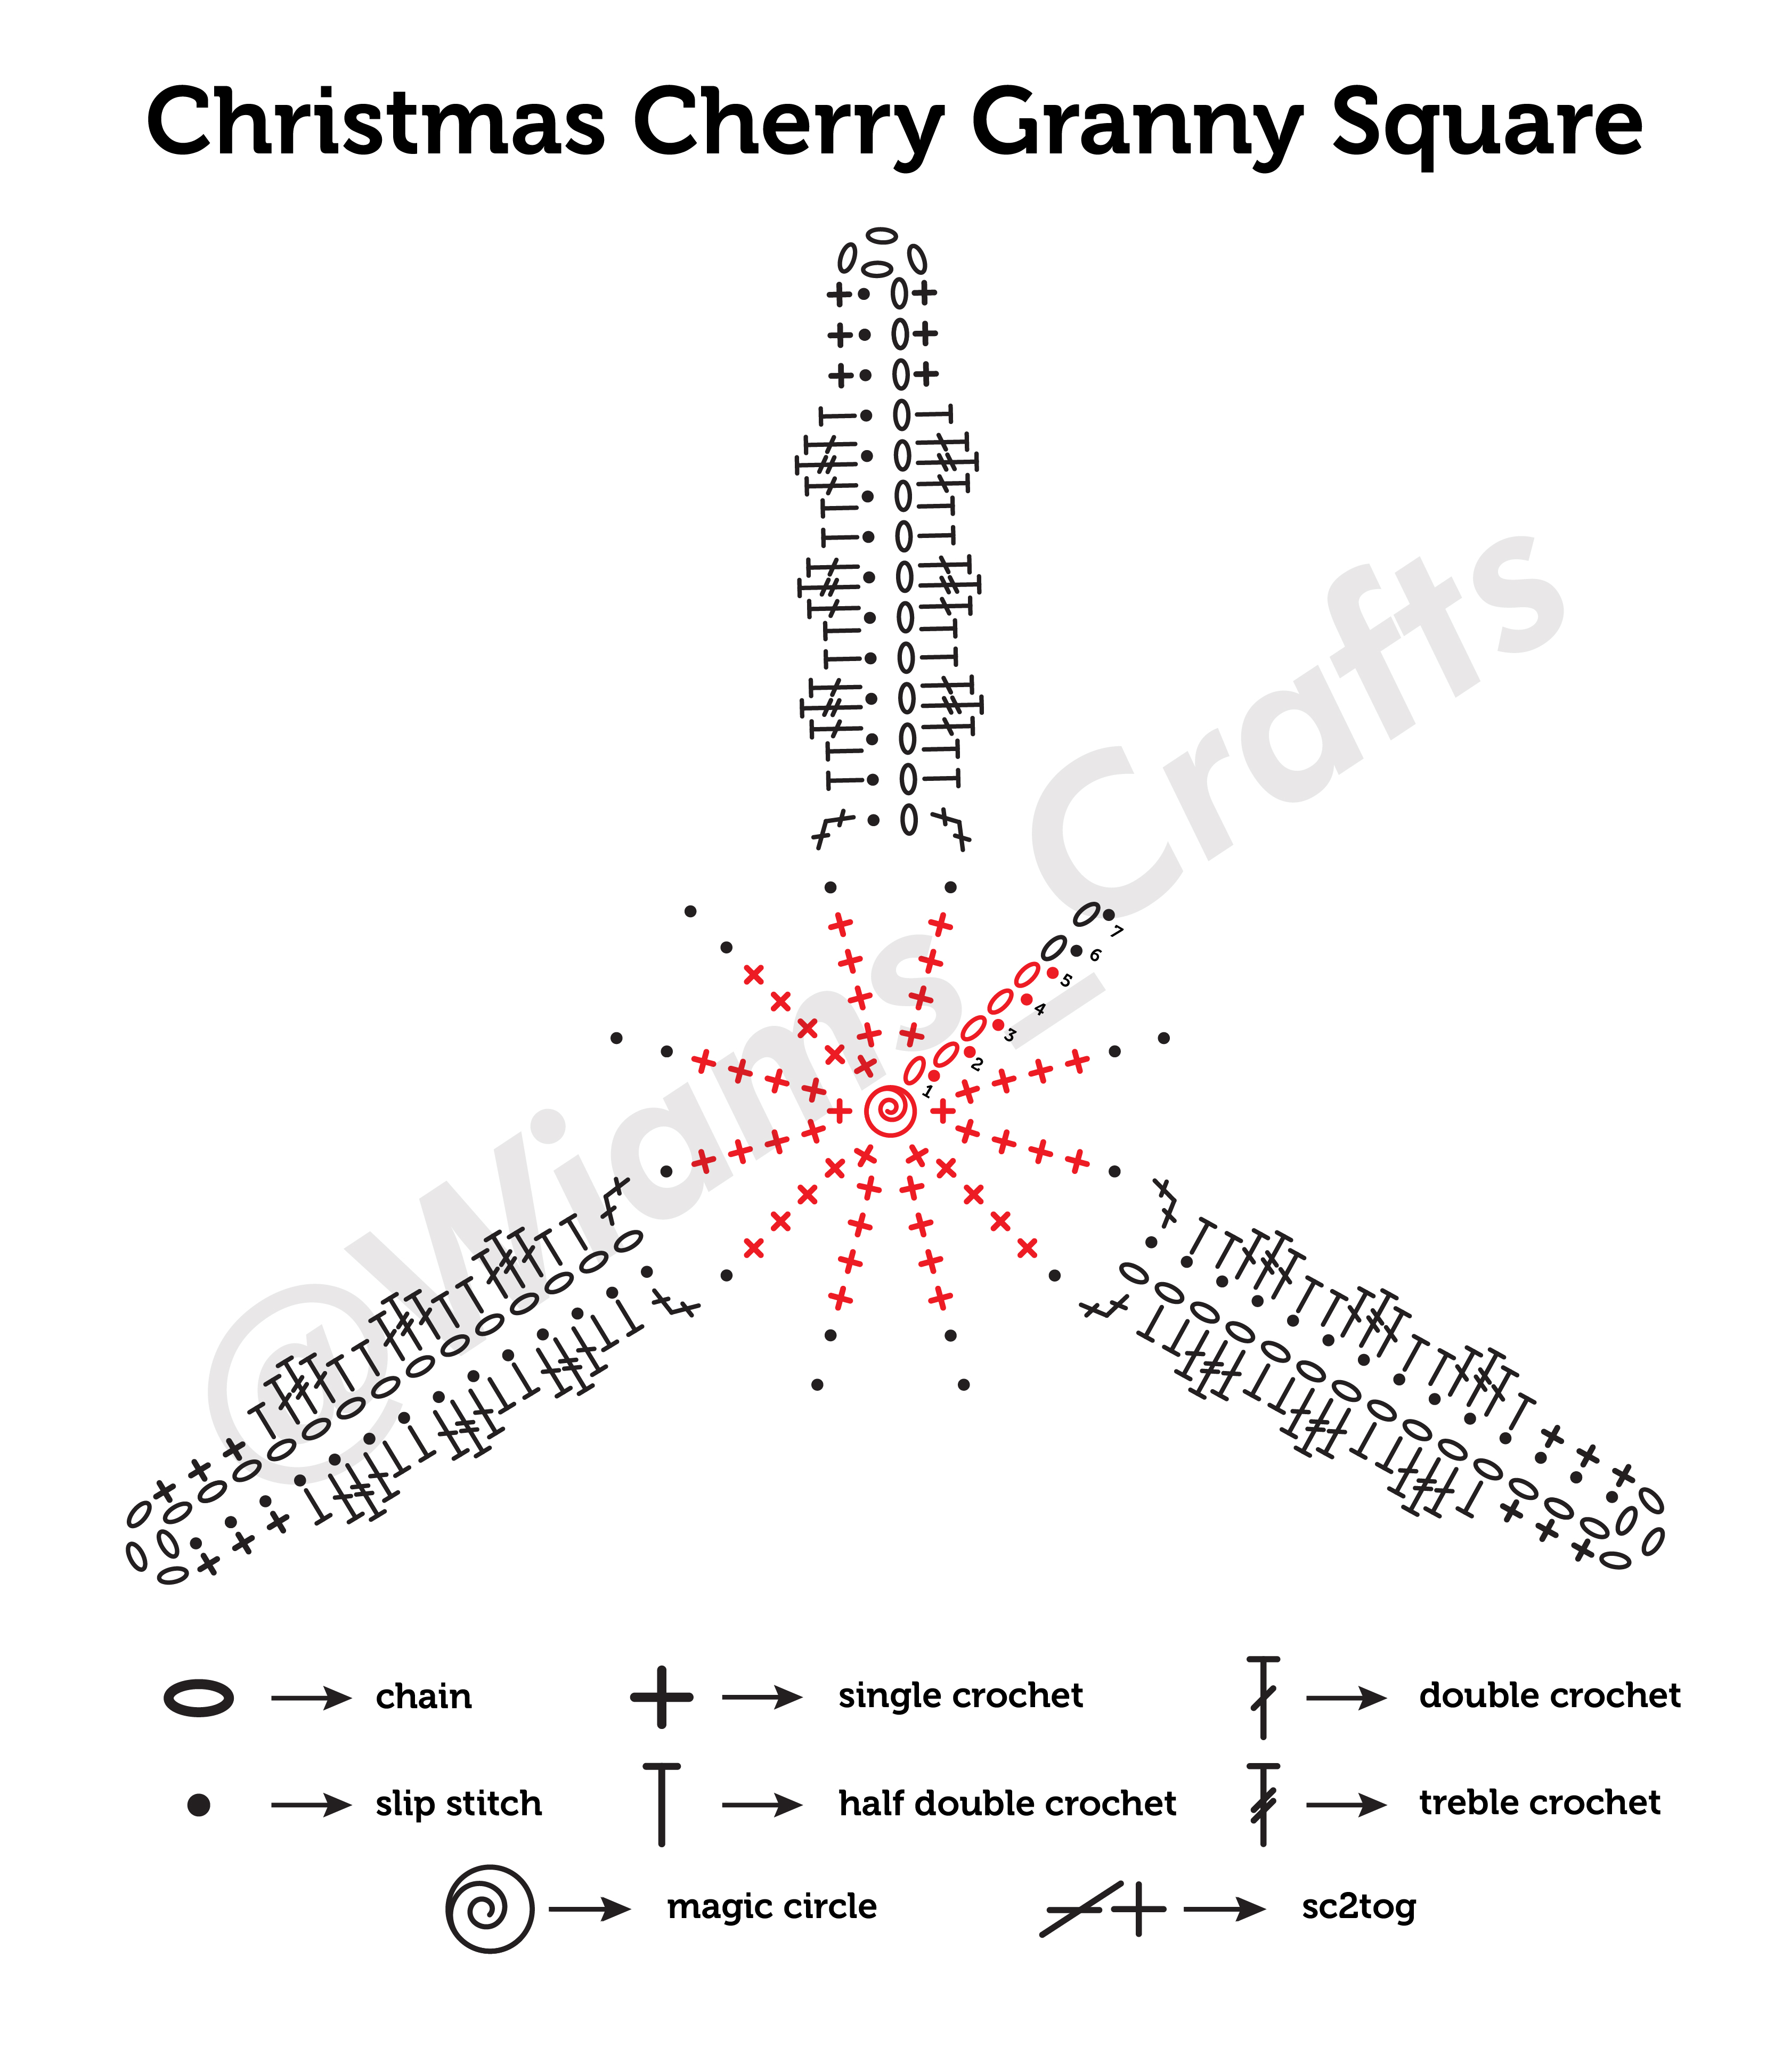
The cherry:
With red yarn, leave out a 4" (10 cm) yarn tail, then make a magic ring, work as follows:
Round 1: into the magic ring make ch 1, sc 5, sl st into the first ch of the round. (6 sts)
Round 2: ch 1 and sc in the first st, sc 2 into each st, sl st into the first ch of the round. (12 sts)
Rounds 3-5: ch 1, sc into each st, sl st into the first ch of the round. (12 sts)
Cut off yarn, leaving a 2" (5 cm) strand, to bind the cherry to the square base.
The leaves:
Round 6 (this round is worked through back loops): with green yarn, in any st, make ch 1, *sl st into the next st, ch 15, in the second chain from the hook make a sl st, sl st in ch thirteen times, sl st into st three times, repeat from * one more time, sl st into st, ch 15, in the second chain from the hook make a sl st, sl st in ch thirteen times, sl st into st twice, sl st into the first ch of the round.
Round 7: ch 1, then work the first leave as follows: [sc2tog in next st and first ch, *hdc in next ch, hdc and dc in next ch, tr and dc in next ch, repeat from * two more times, hdc in next ch, sc in ch three times, skip the last ch, ch 3, sc in sl st three times, **hdc in next sl st, dc and tr in next sl st, dc and hdc in next sl st, repeat from ** two more times, hdc in sl st, sc2tog in the next 2 sl sts, sl st in st twice].
Repeat between [ ] once more, sc2tog in next st and first ch, hdc and dc in next ch, tr and dc in next ch, repeat from * two more times, hdc in next ch, sc in ch three times, skip the last ch, ch 3, sc in sl st three times, *hdc in next sl st, dc and tr in next sl st, dc and hdc in next sl st, repeat from * two more times, hdc in sl st, sc2tog in the next 2 sl sts, sl st in st, sl st into the first ch of the round.
Cut green yarn, weave in any loose ends (in that color only).
The granny square base:
With white yarn make a magic ring, work as follows:
Round 1: into the magic ring ch 1, sc 5, sl st into the first ch of the round. (6 sts)
Round 2: ch 1 and sc in the first st, sc 2 into each st, sl st into the first ch of the round. (12 sts)
Round 3: ch 3 and dc in the first st, dc 2 in each st, sl st into the third ch of first ch 3. (24 sts)
Round 4: ch 3 and dc in first st, dc in st, *dc 2 in st, dc in st, repeat from * to end, sl st into the third chain of the first ch 3. (36 sts)
Round 5: ch 2 (this counts as a hdc) and skip the first st, *sc in st three times, hdc in st, dc in st, tr 2 in st, ch 3 , tr 2 in st, dc in st, hdc in st, repeat from * two more times, sc in st three times, hdc in st, dc in st, tr 2 in st, ch 3 , tr 2 in st, dc in st, sl st into the second ch of the first ch 2.
Rounds 6-9: ch 3 (count as a dc), *dc into each st to next ch 3 space, (dc 2, ch 3, dc 2) into the ch 3 space, repeat from * three more times, dc in st to end of round, sl st into the third ch of first ch 3. Cut white yarn and weave in loose ends.
Round 10: with red yarn and in the first st of round 9, make a standing dc (or ch 3) in the st, *dc into each st to next ch 3 space, (dc 2, ch 3, dc 2) into the ch 3 space, repeat from * three more times, dc in st to end of round, sl st into the third ch of first ch 3. Cut red yarn and weave in loose ends.
Round 11: with green yarn, make a standing dc (or ch 3) in any st, *dc into each st to next ch 3 space, (dc 2, ch 3, dc 2) into the ch 3 space, repeat from * three more times, dc in st to end of round, sl st into the third ch of first ch 3. Cut green yarn and weave in loose ends.
Assembly:
Pass a 6" (15 cm) strand of green yarn through the three-chain spaces at the tip of each of the leaves as shown in the picture below:


Place the cherry and leaves piece on top of the granny square base, making sure to position it so that one leaf tip aligns with the center dc of the red outer square on one side of the square, then mark that place with a stitch marker. The two other leaf tips should now align with the fifth dc from the far away corners of the two other sides of the red outer square. Mark these two places too with stitch markers as shown in the picture.


Lastly, feel free to leave a comment if you have any questions or find something confusing in the pattern.
Happy crocheting/knitting! follow me on Instagram @wiams_crafts and Twitter @wiamscrafts to see my upcoming projects.


