Showing posts with label Christmas. Show all posts

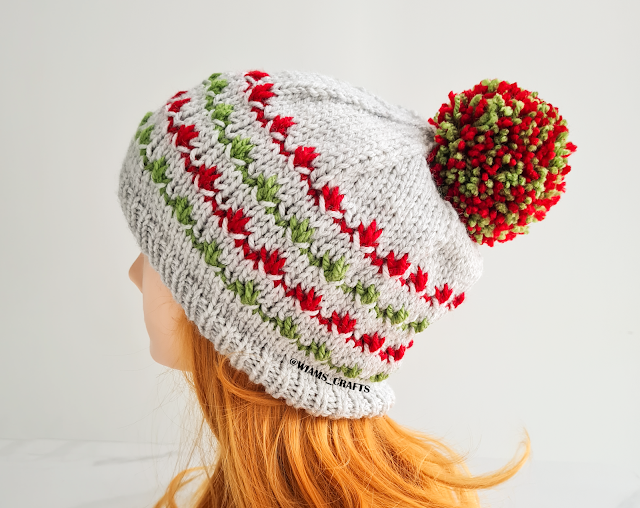
Christmas Lily Hat


Hello friends! I tend to share at least one Christmas themed pattern around this time of every year, matter of fact, I am in the middle of finalizing one at the moment. But I took a small break from that to share this pattern with you upon a request I received recently about a pattern from a couple of years ago. A nice lady had asked about my Christmas Lotus Hat, of which I had originally made two versions, but only posted the instructions for one. I promised her to make a new post for the second version, and here am fulfilling my promise. Instructions are available for three sizes: small, suitable for 8-12 year-old children, while medium and large can fit teens and adults. Feel free to choose your own color combo, but don’t forget to top it off with a colorful pompom. You can check out my previous designs for Christmas below. Happy Holidays everyone!

  
 Candy Cane BeanieChristmas Lights HatChristmas Angel Hat
   
Christmas Gifts HatChristmas Wreath HatChristmas Lotus Hat


Overview:

  • Skill levelIntermediate.
  • Instructions style: written pattern + video tutorial.
  • Sizes: this hat is available in three sizes S (for kids)M, and L (for teens and adults). (see detailed measurements below). 

Get the ad-free, printable PDF of this pattern from my store:

Or click here to jump to the instructions.

Want to pin this project for later? Just hover or click on any of the images in this post then click the red "save" button.


Materials:

  • Yarn: Alize Burcum Classic, 100% acrylic, 3.35 oz (100 g), 230 yards (210 m), in the following colors and quantities: "light grey" 208 (1 skein), "green" 41 (1 skein), and "red" 106 (1 skein).
  • Circular knitting needles, 16" (40 cm) long, sizes US 7 (4.5 mm) and US 9 (5.5 mm).
  • Double pointed needles (DPNs) set, size US 9 (5.5 mm).
  • Tapestry needle.
  • Ring stitch marker.


Sizes and measurements: 

  • Size S (for kids)head circumference = 18" (46 cm), height = 8" (20 cm).
  • Size M: head circumference = 20" (51 cm), height = 8.5" (21.5 cm).
  • Size L (for teens and adults): head circumference = 22" (56 cm), height = 9" (23 cm).

Gauge: 18 sts and 22 rounds = 4"x 4" (10 cm x 10 cm) in stockinette stitch.

Yardage: 

  • Size S: 130 - 135 yards (120- 125 m), approx.
  • Size M: 153- 158 yards (140- 145 m), approx. 
  • Size L: 180- 185 yards (160- 165 m), approx.


Knitting Terms:
  • st: stitch.
  • sts: stitches.
  • sl st: slip stitch.
  • k: knit.
  • p: purl.
  • k2tog: knit two stitches together.


Instructions:

With light denim  yarn and US 8 (5 mm) circular knitting needles, cast on 72 (8088) sts. Join in the round. Don't know how to join in the round? here is a short tutorial on how to do it (from 0:26 - 1:15 min): 

Put a ring stitch marker at the beginning of rounds, work as follows:

Rib round: k 1, p 1, repeat to end.

Repeat the rib round four (fivesix) more times. Change to US 9 (5.5 mm) circular needles while knitting one round, then knit two (threefour) more rounds. Bind on green yarn.

General pattern:

Note: Always sl st through back loop.

With green yarn knit two rounds. Cut green yarn. With light cream work as follows:

Round 1: k 1, insert needle in the second st on the left needle, two rounds below (in the light cream round), yo, pull the needle out of the st with yo, sl st 3, pass the yo over the 3 slipped sts, repeat to end.

Round 2: k 2, sl st 1, k 1, repeat to end. 

Knit two rounds.

Repeat the general pattern using red yarn once. Cut red yarn.

Repeat the general pattern using green yarn once. Cut green yarn.

Repeat the general pattern using red yarn once. Cut red yarn.

Knit (12) round(s).

Here is a video of the general pattern, which is the same one I used in the other version of this hat:


Decreasing rounds:

Round 1: k2tog, k (89), repeat to end. [64 (7280) sts]

Round 2: k to end.

Round 3: k2tog, k (78), repeat to end. [56 (6472) sts]

Round 4: k to end.

Round 5: k2tog, k (67), repeat to end. [48 (5664) sts]

Round 6: k to end.

Change to DPNs when needed.

Round 7: k2tog, k (56), repeat to end. [40 (4856) sts]

Round 8: k to end.

Round 9: k2tog, k (45), repeat to end. [32 (4048) sts]

Round 10: k to end.

Round 11: k2tog, k (34), repeat to end. [24 (3240) sts]

Round 12: k to end.

Round 13: k2tog, k (23), repeat to end. [16 (2432) sts]

For Size S:

Round 14: k2tog, repeat to end. (8 sts)

Cut yarn, leaving a 6" (15 cm) long yarn tail, pull it through all sts and tighten together. Weave in loose ends.

For size M:

Round 14: k to end.

Round 15: k2tog, k 1, repeat to end. (16 sts) 

Round 16:k2tog, repeat to end. (8 sts)

Cut yarn leaving a 6" (15 cm) long yarn tail, pull it through all sts and tighten together. Weave in loose ends.

For size L:

Round 14: k to end. 

Round 15: k2tog, k 2, repeat to end. (24 sts) 

Round 16: k to end. 

Round 17: k2tog, k 1, repeat to end. (16 sts)

Round 18: k2tog, repeat to end. (8 sts)

Cut yarn, leaving a 6" (15 cm) long yarn tail, pull it through all sts and tighten together. Weave in loose ends.

With red and green yarn, make a 2.5" (6 cm) diameter pompom and fix it tight on top.


Lastly, feel free to leave a comment if you have any questions or find something confusing in the pattern.

Happy crocheting/knitting! follow me on Instagram @wiams_crafts and Twitter @wiamscrafts to see my upcoming projects.

Christmas Santa Ornament


Hi everyone! This Christmas ornament is a matching piece to one of my most popular designs, my Christmas Wreath Ornament, which I made a few years ago. Until now I am both astonished and grateful for all the attention that post has gained, and so for this year I decided to come up with a new ornament inspired by it. About this Santa ornament, I used a plastic ring that I purchased from a crafts store as a base to crochet Santa faces around it in a circle. You can swap for a bigger or smaller ring than the one I used easily and make as many faces as you want by allocating six double crochet stitches in the first round for each face. I hope you have fun with this quick and easy project, and make sure to check out my other Christmas crochet projects.

Overview:

  • Skill level: Intermediate.
  • Instructions style: written instructions + charts.

Get the ad-free, printable PDF of this pattern from my store:

Or click here to jump to the instructions.


Want to pin this project for later? Just hover or click on the image below or any of the images in this post then click the red "save" button.


Check out my other crochet Christmas projects:

Christmas Wreath Ornament

Christmas Hat and Tree Granny Squares


Christmas Cherry Granny Square


Santa Club Coaster

Christmas Stocking Granny Square


Materials: 

  • Yarn: any cotton yarn in the following colors and quantities: one red skein, one white skein, and one pink skein. Suggested yarn: D.M.C Happy Cotton, 0.7 oz (20 g), 47 yards (43 m).
  • Crochet hooks, sizes E/4 (3.5 mm).
  • One plastic ring, 2" (5 cm) in diameter, 1/4" (0.7 cm) thick.
  • Beads, eight in red, 0.25" (0.6 cm) in diameter, and sixteen in black, 0.2" (0.5 cm) in diameter.
  • Tapestry needle.


Measurements:

  • Ornament diameter: 5" (12.5 cm).
  • Cord length: 9" (22 cm). 

Yardage: 37- 38 yards (34- 35 m), approx. 

Gauge: 28 st and 12 rounds = 4"x 4" (10 cm x 10 cm) in dc stitch.

Crochet terms (US):

  • ch: chain.
  • st: stitch.
  • sts: stitches.
  • sl st: slip stitch.
  • sc: single crochet.
  • dc: double crochet.
  • picot: ch 3, sl st in first ch.


Instructions:

With red yarn, work as follows:

Round 1: make a standing dc around the ring as shown in photos, dc 48, sl st into first dc. Cut red yarn and weave in loose ends. Cut yarn and weave loose ends. (48 sts)


Round 2: with white yarn and into any st, make a standing sc (or bind the yarn, ch 1 and sc), sc in each st to end, sl st into first sc. Cut yarn and weave in loose ends. (48 sts)

Work the next round through back loops of the sts only.

Round 3: with pink yarn and into any st, make a standing sc (or bind the yarn, ch 1 and sc), sc in each st 4 more times, *skip st, ch 3, sc in each st 5, repeat from * to last st, skip st, ch 3, sl st into first sc.

Round 4: ch 1 and sc in first st, sc in st 4 more times, *ch 1, sc 1 in the ch 3 space, ch 1, sc in st 5 times, repeat from * to last ch 3 space, ch 1, sc in the ch 3 space, ch 1, sl st into first sc. Cut yarn and weave in loose ends.

Round 5: with white yarn, and into any sc between any of the sc 5 clusters, make a standing sc (or bind the yarn, ch 1 and sc), ch 1, *(dc, make one picot) six times into the middle st of next five sc cluster, dc into the same st one more time, ch 1, sc into next st, repeat from * to end, but don't make the last sc, instead, sl st to the first sc of the round. Cut yarn and weave in loose ends.

Sew the beads of the nose and eyes of each Santa face in place as shown in the photos.

With red yarn, make a 9" (22 cm) cord of any type (I-cord, or Romanian Cord), leaving out a 3" (7.5 cm) yarn tail at the beginning and the end. Make an overhand knot using the two ends of the yarn. Insert the two strands of yarn in the back of round 1, right at the center of any Santa face, then tie them together.


Lastly, feel free to leave a comment if you have any questions or find something confusing in the pattern.

Happy crocheting/knitting! follow me on Instagram @wiams_crafts and Twitter @wiamscrafts to see my upcoming projects.

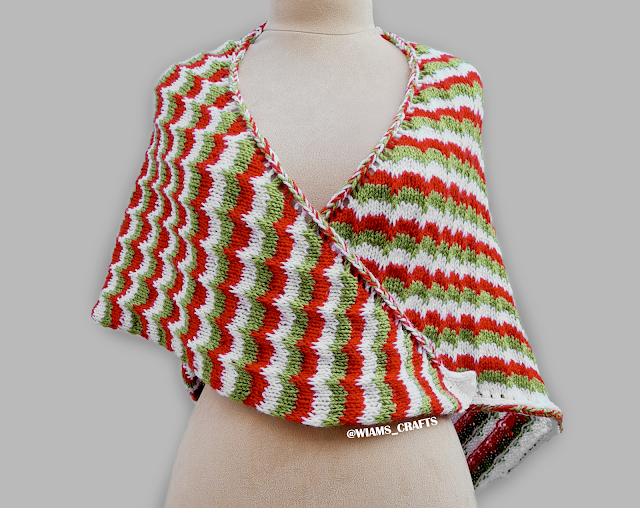
Christmas Jingle Shawl

Hello my fellow knitters! as promised in my previous post, this shawl design is my second contribution for this year's Christmas season. I bring you another asymmetrical triangle shawl with wavy stripes, knitted with the beautiful colors of Christmas. Like most of my other shawl patterns, the size for this one is adjustable; you can repeat the general pattern as many times as you like until you reach the size you prefer. 

For more inspiring designs, check out my previous Christmas shawl here: 


Christmas Holly Scarf

 Christmas Snow Shawl

Christmas Eve Shawl 


Overview:

  • Skill level: Intermediate.
  • Instructions style: written pattern.
  • Yarn weight: #2/ fine/ sport.
  • Available sizes: one size (see detailed measurements below).
  • Size customization: you can adjust the size to be bigger or smaller by repeating the general pattern more or less times than mentioned in the instructions.

Get the ad-free, printable PDF of this pattern from my store:

Or click here to jump to the instructions.

Want to pin this project for later? Just hover or click on any of the images in this post then click the red "save" button.


Materials:

  • Yarn: Alize Sekerim Bebe, %100 acrylic, 3.53 oz, (100 g), 350 yards (320 m), one skein in white, red and green.
  • Circular knitting needles, 32" (80 cm) long, size US 7 (4.5 mm). 
  • Tapestry needle.


Measurements: width = 26" (66 cm), length = 47" (120 cm), approx.

Yardage: 625- 635 yards (570- 580 m), approx.

Gauge: 18 sts and 27 rows = 4" x 4" (10 cm x 10 cm) in stockinette stitch.


Knitting Terms:

  • st: stitch.
  • sts: stitches.
  • k: knit.
  • p: purl.
  • yo: yarn over.
  • sl st: slip stitch purl wise.
  • k2tog: knit two sts together.


Instructions:

Note: at the beginning of even numbered rows (sl st, k 1), after slipping the first stitch, knit the second stitch using the three strands (white, red and green).

With white yarn cast on 5 sts, k one row, then work next rows:

Row 1, 3, 5, 7, 9, 11 (wrong side): sl st, yo, p to last 2 sts, sl st, p 1.

Row 2, 4, 6, 8, 10: sl st, k 1, yo, k to last 2 sts, k2tog. (10 sts)

Bind on red yarn and don't cut white yarn, work next rows:

Row 12: sl st, k 1 (knit this stitch using the two yarns: white and red), yo, k 2, sl st three, k 2, k2tog. 

Row 13: sl st, yo, p 3, sl st 1, p to last 2 sts, sl st, p 1.

Row 14: sl st, k 1 (knit this stitch using the two yarns: white and red), yo, k to last 2 sts, k2tog. 

Row 15: sl st, yo, p to last 2 sts, sl st, p 1.

Bind on green yarn and don't cut white and red yarn, work next rows:

Row 16: sl st, k 1, yo, k 4, sl st 3, k 2, k2tog. 

Row 17: sl st, yo, p 3, sl st 1, p to last 2 sts, sl st, p 1.

Row 18: sl st, k 1, yo, k to last 2 sts, k2tog. 

Row 19: sl st, yo, p to last 2 sts, sl st, p 1.

With white yarn, work next rows:

Row 20: sl st, k 1, yo, sl st 3, k 3, sl st 3, k 2, k2tog. 

Row 21: sl st, yo, p 3, sl st 1, p 5, sl st, p 2, sl st, p 1.

Row 22: sl st, k 1, yo, k to last 2 sts, k2tog. 

Row 23: sl st, yo, p to last 2 sts, sl st, p 1.

General Pattern:

With red yarn, work the next rows:

Row 24: sl st, k 1, yo, k 1, *k 1, sl st 3, k 2, repeat from * to last 2 sts, k2tog. 

Row 25: sl st, yo, p 1, * p 2, sl st 1, p 3, repeat from * to last to 3 sts, p 1, sl st, p 1.

Row 26: sl st, k 1, yo, k to last 2 sts, k2tog. 

Row 27: sl st, yo, p to last 2 sts, sl st, p 1.

With green yarn work the next rows:

Row 28: sl st, k 1, yo, k 3, * k 1, sl st three, k 2, repeat from * to last 2 sts, k2tog. 

Row 29: sl st, yo, p 1, * p 2, sl st 1, p 3, repeat from * to last 5 sts, p 3, sl st, p 1.

Row 30: sl st, k 1, yo, k to last 2 sts, k2tog. 

Row 31: sl st, yo, p to last 2 sts, sl st, p 1.

With white yarn, work the next rows:

Row 32: sl st, k 1, yo, sl st 3, k 2, * k 1, sl st three, k 2, repeat from * to last 2 sts, k2tog. 

Row 33: sl st, yo, p 1, * p 2, sl st 1, p 3, repeat from * to last 7 sts, (p 2, sl st) twice, p 1.

Row 34: sl st, k 1, yo, k to last 2 sts, k2tog. 

Row 35: sl st, yo, p to last 2 sts, sl st, p 1.

Repeat the general pattern twenty-four more times (or as many times as you like, until you reach the size you desire), then work as follows:

Row 36: sl st, k 1, *k2tog, yo, repeat from * to last 3 sts, k 1, k2tog.

Row 37: p all sts.

With white, red and green yarn, bind off all sts using the I-cord bind off method.

I-cord bind off row: *k 1 with white yarn, k 1 (with white, red and green as one yarn), ssk, pass the three sts back to the left needle, repeat from * to the last 3 sts, ssk with three color yarn. You can watch my tutorial video for the I-cord bind off method here:


Lastly, feel free to leave a comment if you have any questions or find something confusing in the pattern.

Happy crocheting/knitting! follow me on Instagram @wiams_crafts and Twitter @wiamscrafts to see my upcoming projects.

Christmas Jingle Beret

 Hello everyone! now that we’re in December, it is high time for me to post the designs I’ve been working on to commemorate this year’s Christmas and the upcoming new year. So, I’m starting with this Jingle Beret Hat, which comes in two sizes and has a simple pattern. It is knitted using red and green in the spirit of Christmas, but feel free to choose your own palette if you want to go for a neutral, everyday hat. When making this hat I decided to go with a Parisian overall look, and I included this zigzag edge around the head that I think adds a nice touch. I’m linking below my Christmas collection from last year and the year before, so you can select and make a different hat for each of your family and friends: 

     
 Candy Cane Beanie Christmas Lights Hat Christmas Angel Hat
     
Christmas Gifts Hat Christmas Wreath Hat Christmas Lotus Hat

I wish you joyous times knitting gifts and a happy holiday spent with all your loved ones. Keep an eye out because a new Christmas shawl design is dropping soon in the next few days.

Overview:
  • Skill levelIntermediate.
  • Instructions style: written pattern + video tutorials.
  • Sizes: this hat is available in two sizes, S/M, M/L (see detailed measurements below). 

Get the ad-free, printable PDF of this pattern from my store:

Or click here to jump to the instructions.

Want to pin this project for later? Just hover or click on any of the images in this post then click the red "save" button.


Materials:

  • Yarn: Alize Sekerim Bebe, %100 acrylic, 3.53. oz, (100 g), 350 yards (320 m), one skein in white, black, red and green for both sizes.
  • Circular knitting needles, 16" (40 cm) long, sizes US 5 (3.75 mm) and US 7 (4.5 mm).
  • Double pointed needles (DPNs) set, size US 7 (4.5 mm).
  • Tapestry needle.
  • Stitch marker.


Sizes and measurements: 
  • Size S/M: head circumference = 20"- 21" (50- 53 cm), hat height = 8.5" (21.6 cm). 
  • Size M/L: head circumference = 22"- 23" (56- 58 cm), hat height = 9" (22.9 cm).

Yardage:

  • Size S/M: 126- 128 yards (115- 117 m), approx.
  • Size M/L: 142- 144 yards (130- 132 m), approx.

Gauge: 18 sts and 24 rounds = 4" x 4" (10 cm x 10 cm) in stockinette stitch.


Knitting Terms:

  • st: stitch.
  • sts: stitches.
  • k: knit.
  • p: purl.
  • yo: yarn over.
  • sl st: slip stitch purl wise.
  • m1: make one stitch increase purl-wise.
  • k2tog: knit 2 sts together.
  • ssk: slip, slip, knit the 2 slipped sts together through back loops.


Instructions:

With US 5 (3.75 mm) circular knitting needles, cast on 88 (92) sts using stretchy cast on method. Follow the instructions in my tutorial video to learn how to do this type of cast on: 

Join in the round. Don't know how to join in the round? here is a short tutorial on how to do it (from 0:26 - 1:15 min): 


Put a ring stitch marker at the beginning of rounds. Knit 7 rounds, then work as follows:

Round 1: k2tog, yo, repeat to end.

Knit 7 rounds, then p one round.

Change to US 7 (4.5 mm) circular knitting needles while working the next round:

Increasing round: k 2, m1, repeat to end. 132 (138) sts

Knit 3 (4) rounds. Cut black yarn

General pattern:

With green yarn work next rows:

Round 1: k 2, sl st 3, k 1, repeat to end. 

Round 2: k 3, sl st 1, k 2, repeat to end.

Rounds 3 and 4: k to end. Don't cut green yarn.

With white yarn, repeat the general pattern once.

With red yarn, repeat the general pattern once, cut red yarn.

With white yarn, repeat general pattern once, cut white yarn.

With green yarn, repeat general pattern once, cut green yarn.

With black yarn, repeat general pattern once.

Decreasing Rounds:

Size S/M: 

Round 1: ssk, k 10, repeat to end. 

Round 2 and every even number round: k to end.

Round 3: ssk, k 9, repeat to end.

Round 5: ssk, k 8, repeat to end.

Round 7: ssk, k 7, repeat to end.

Round 9: ssk, k 6, repeat to end.

Round 11: ssk, k 5, repeat to end.

Change to Double pointed needles.

Round 13: ssk, k 4, repeat to end.

Round 15: ssk, k 3, repeat to end.

Round 17: ssk, k 2, repeat to end.

Round 19: ssk, k 1,Repeat to end.

Round 21: ssk, repeat to end. (11 sts)

Round 22: ssk, repeat to last st, k 1. (6 sts)

Cut yarn, leaving a 6" (15 cm) long yarn tail, pull it through all sts and tighten together. 


Size M/L:

Round 1: ssk, k 9, ssk, k 10, repeat to end. 

Round 2 and every even number round: k to end.

Round 3: ssk, k 8, ssk, k 9, repeat to end.

Round 5: ssk, k 7, ssk, k 8, repeat to end.

Round 7: ssk, k 6, ssk, k 7, repeat to end.

Round 9: ssk, k 5, ssk, k 6, repeat to end.

Round 11: ssk, k 4, ssk, k 5, repeat to end.

Change to Double pointed needles.

Round 13: ssk, k 3, ssk, k 4, repeat to end.

Round 15: ssk, k 2, ssk, k 3, repeat to end.

Round 17: ssk, k 1, ssk, k 2, repeat to end.

Round 19: ssk twice, k 1, repeat to end. (18 sts)

Round 21: ssk, repeat to end. (9 sts)

Cut yarn, leaving a 6" (15 cm) long yarn tail, pull it through all sts and tighten together. 

Fold in the bottom edge of the hat towards the wrong side along the (k2tog, yo) round, then sew it with small stitches just under the (purl all sts) round. Make sure the seam is not tight.

I-cord rope:

With red yarn, knit a three sts, 3" (7.5 cm) I-cord rope, leaving a 5" (10 cm) yarn tail on both ends. Pass the two ends of the cord through the top of the beret and tie them together tightly with the yarn tail of the black yarn. Trim excess yarn. Weave in loose ends. 


Lastly, feel free to leave a comment if you have any questions or find something confusing in the pattern.

Happy crocheting/knitting! follow me on Instagram @wiams_crafts and Twitter @wiamscrafts to see my upcoming projects.