Dragon Tongue Shawlette


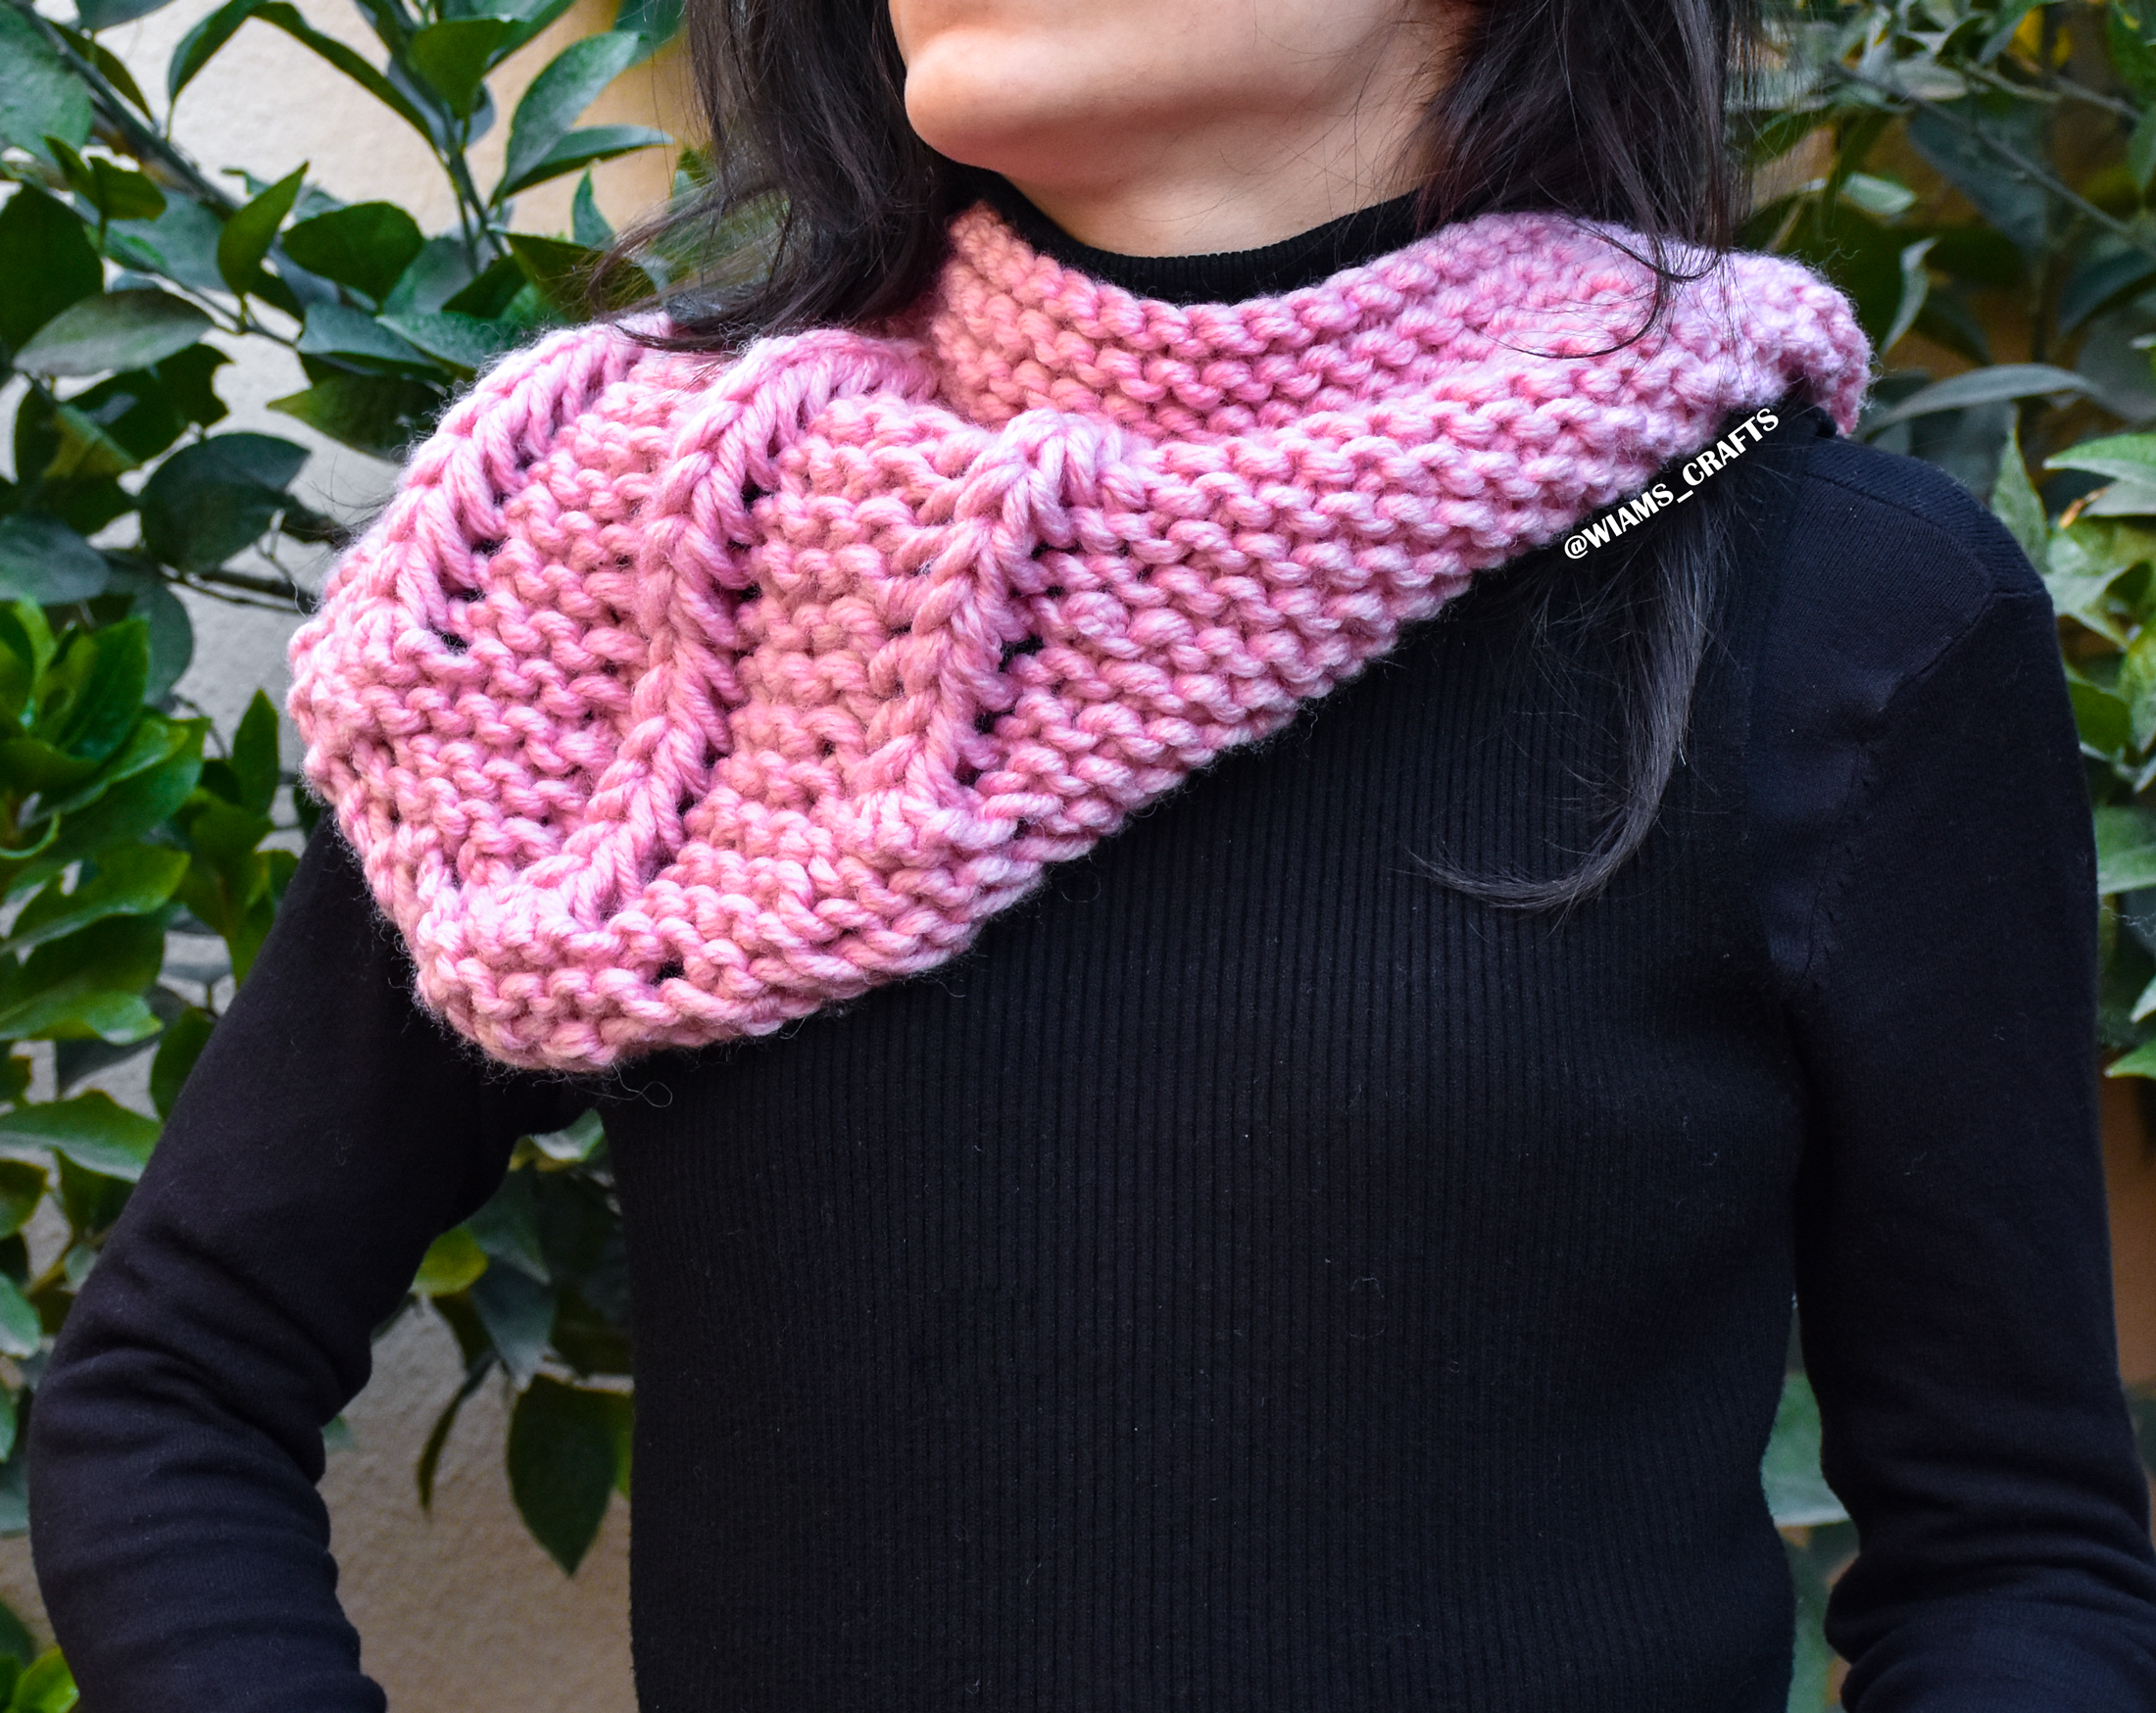
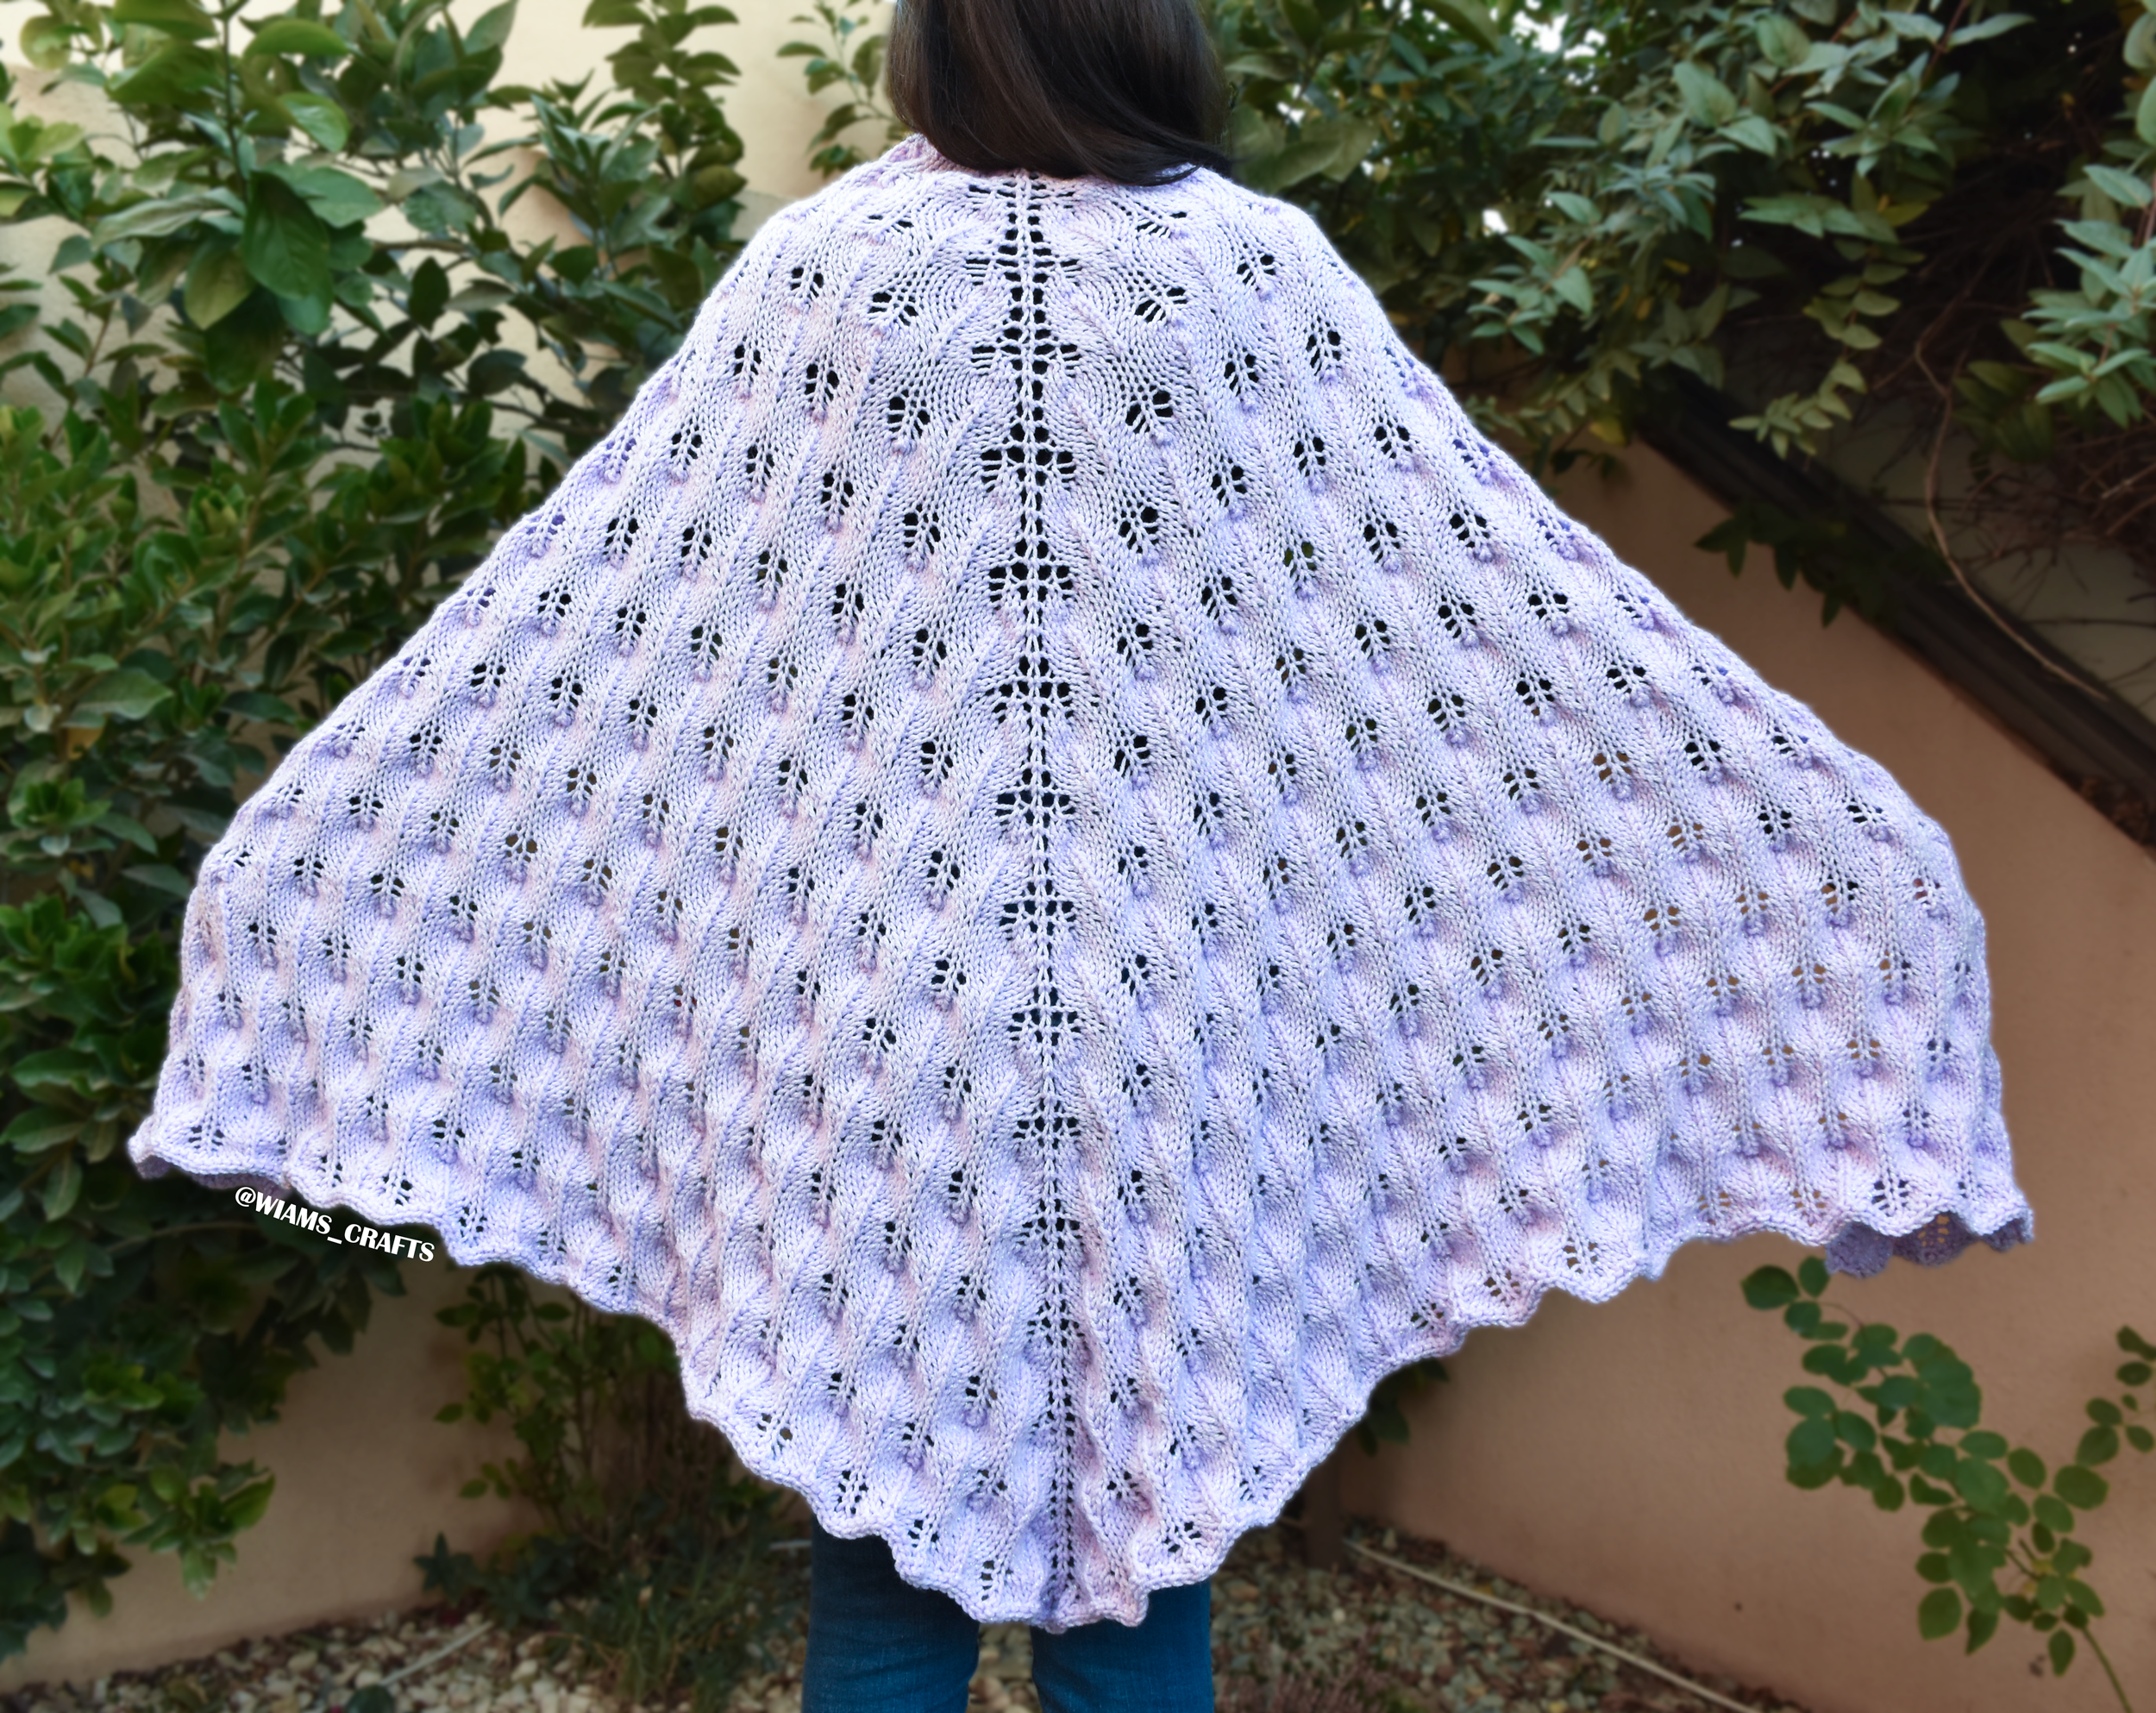
Hello friends! today I bring you another small shawl design (see the previous one here: Carrie Shawlette), but this time I made it using chunky yarn. when me and my girls were taking photos of the finished piece, I had yet to settle on a name for it, that’s when my daughter said jokingly that it looks like a coarse dragon tongue around her neck. I thought it was hilarious and decided to stick with the name Dragon Tongue. For the pattern I went with a simple one, with the addition of a small twist, enough to make it interesting, but still easy to work out. The size can be made larger by basically repeating the general pattern more times than what I chose to go with. This small wrap will keep you warm and cozy for the rest of this cold winter, plus It’s a super easy and quick project that takes less than a hundred yards of chunky yarn to knit. So, I hope you give it a try: make this shawlette in a short time and match it with your favorite jacket and hat. Have a nice knitting day!  

Overview:

  • Skill level: Intermediate.
  • Instructions style: written pattern.
  • Yarn weight: #6/ super bulky.
  • Available sizes: one size (see detailed measurements below). Size can be adjusted by repeating the general pattern as many times as you prefer. .

Get the ad-free, printable PDF of this pattern from my store:

Or click here to jump to the instructions.

Want to pin this project for later? Just hover or click on any of the images in this post then click the red "save" button.


Materials:

  • Yarn: Alize Superlana Megafil, 25% wool, 75% acrylic, 3.53 oz (100 g), 60 yards (55 m), in the color "161" (2 skeins).
  • Circular knitting needles, 24" (60 cm) long, size US 15 (10 mm).
  • Tapestry needle.
  • Ring stitch markers.


Measurements: width = 11.5" (29 cm), length = 30.5" (77 cm), approx.

Yardage: 80- 82 yards (73 - 75 m), approx.

Gauge: 9 sts and 15 rounds = 4" x 4" (10 cm x 10 cm) in garter pattern.


Knitting Terms:

  • st: stitch.
  • sts: stitches.
  • sl st: slip stitch.
  • k: knit.
  • p: purl.
  • yo: yarn over.
  • stm: stitch marker.


Instructions:

Cast on 2 sts and k them, then work as follows:

Rows 1 and 2: k 1, yo, k to end. (4 sts)

Rows 3 and 4: (k 1, yo) twice, k to end. (8 sts)

Repeat these four rows once more (14 sts).

Put one stm before the four middle sts, and one after them, then work as follows:

Row 5: k 1, yo, k to first stm, yo, k 4 sts together through back loops, k the same 4 sts together through front loops, yo, k to end.

Row 6: k 1, yo, k to first stm, p 1, sl st 2, p 1, k to end.

Row 7: (k 1, yo) twice, k to first stm, yo, k 4 sts together through back loops, k the same 4 sts together through front loops, yo, k to end.

Row 8: (k 1, yo) twice, k to first stm, p 1, sl st 2, p 1, k to end.

Repeat rows 5-8 once more. Remove both stm. Locate the eighteen middle sts of the row then put one stm before them and one after them.

Row 9: k 1, yo, k to first stm, yo, *k 4 sts together through back loops, k the same 4 sts together through front loops, yo, k 3, repeat from * once more, k 4 sts together through back loops, k the same 4 sts together through front loops, yo, k to end.

Row 10: k 1, yo, k to first stm, *p 1, sl st 2, p 1, k 3, repeat from * once more, p 1, sl st 2, p 1, k to end.

Row 11: (k 1, yo) twice, k to first stm, yo, *k 4 sts together through back loops, k the same 4 sts together through front loops, yo, k 3, repeat from * once more, k 4 sts together through back loops, k the same 4 sts together through front loops, yo, k to end.

Row 12: (k 1, yo) twice, k to first stm, *p 1, sl st 2, p 1, k 3, repeat from * once more, p 1, sl st 2, p 1, k to end.

Repeat rows 9-12 five more times, or as many times as you like if you want to adjust the size. Remove stms. Repeat rows 1-4 once, then repeat rows 1-2 once. Bind off all sts, and weave in loose ends.


Lastly, feel free to leave a comment if you have any questions or find something confusing in the pattern.

Happy crocheting/knitting! follow me on Instagram @wiams_crafts and Twitter @wiamscrafts to see my upcoming projects.

Carrie Shawlette


Hello fellow knitters! As a knitter who strongly adheres to the motto "no yarn should go to waste", I made this shawl of the leftover yarn of my Anna Crop Top project. Once again, I've kept the design simple, as I believe it is the best choice for a color changing yarn. Size-wise, you can consider this shawlette as a mix between scarf and a mini shawl, the perfect tiny piece to finish knitting in no time. The final look will depend on the color sequence of your yarn of choice, and how you choose to put it around your neck. So, if you are in a hurry and need a casual and fun neck wrap, look no further. Grab some yarn scraps and start making this shawlette today.

Overview:

  • Skill level: Easy.
  • Instructions style: written pattern.
  • Yarn weight: #4/ medium/ worsted.
  • Available sizes: one size (see detailed measurements below).
  • Size customization: you can adjust the size to be bigger or smaller by repeating the general pattern more or less times than mentioned in the instructions.

Get the ad-free, printable PDF of this pattern from my store:

Or click here to jump to the instructions.

Want to pin this project for later? Just hover or click on any of the images in this post then click the red "save" button.


Materials:

  • Yarn: Daiso Mix Cake, 100% acrylic, 2.82 oz (80 g), 135.6 yards (124 m), in the color beige "41": 2 skeins.
  • Circular knitting needles, 32" (80 cm) long, size US 10 (6 mm). 
  • Tapestry needle.

Measurements: width = 9.5" (24 cm), length = 58.25" (148 cm), approx.

Yardage: 180- 182 yards (165- 167 m), approx.

Gauge: 12 sts and 24 rows = 4" x 4" (10 cm x 10 cm) in garter stitch.


Knitting Terms:

  • st: stitch.
  • sts: stitches.
  • k: knit.
  • yo: yarn over.
  • k2tog: knit two sts together.


Instructions:

Cast on 4 sts, k one row, then work as follows:

Row 1: k 1, yo, k to last 2 sts, k2tog.

Row 2: k to last st, yo, k 1.

Repeat rows 1 and 2 sixty-eight times more, or as many as you prefer. Bind off all sts. Weave in loose ends. 


Lastly, feel free to leave a comment if you have any questions or find something confusing in the pattern.

Happy crocheting/knitting! follow me on Instagram @wiams_crafts and Twitter @wiamscrafts to see my upcoming projects.

Metallic Leaves Shawl

Hello knitters every where! I am back with another one of my classic, go-to shawl designs: a symmetrical shawl worked by repeating a general pattern. You can say it's a variation of one of my previous designs called "Sunflower Swirls Shawl", which I knitted using Caron's One Pound yarn. Just keep on knitting this rather simple pattern with your choice of aran yarn, and you'll be done in no time. 

Overview:

  • Skill level: Intermediate.
  • Instructions style: written pattern + chart.
  • Yarn weight: #4/ medium/ aran.
  • Available sizes: one size (see detailed measurements below).
  • Size customization: you can adjust the size to be bigger or smaller by repeating the general pattern more or less times than mentioned in the instructions.


Get the ad-free, printable PDF of this pattern from my store:

Or click here to jump to the instructions.

Want to pin this project for later? Just hover or click on any of the images in this post then click the red "save" button.


Materials:

  • Yarn: Hobby Lobby I Love This Yarn Metallic, 97% acrylic, 3% metallic polyester, 5 oz (142 g), 252 yards (230 m), in the color Lavender Sparkle "764" (4 skeins).
  • Circular knitting needles, 32" (80 cm) long, size US 10 (6 mm). 
  • Tapestry needle.


Measurements: width = 39" (99 cm), length = 78" (198 cm), approx.

Yardage: 930- 940 yards (850- 860 m), approx.

Gauge: 14 sts and 16 rows = 4" x 4" (10 cm x 10 cm) in stockinette stitch.


Knitting Terms:

  • st: stitch.
  • sts: stitches.
  • k: knit.
  • p: purl.
  • yo: yarn over.
  • s2s1ktog: slip two sts as if to knit them together, slip the third one knit-wise, knit the three sts together through back loops (centered double decrease). You can watch my tutorial video below to learn how to knit this stitch:


Instructions:

Cast on 3 sts, knit 7 rows, turn work 90 degrees clockwise, pick up 1 st out of each purl row side (3 sts in total), turn work 90 degrees clockwise again, pick up 3 sts from bottom. (9 sts)

You can also watch this video tutorial to learn how to do this type of cast on:

Row 1 (wrong side): k 3, p 3, k 3. Put a ring stitch marker before and after the middle stitch, this is the center stitch.

Row 2: k 3, (yo, k 1) three times, yo, k 3. (13 sts)

Row 3: k 3, p to last 3 sts, k 3. 

Row 4: k 3, *yo, k 3, yo*, k the center st, repeat between ** once, k 3. (17 sts)

Row 5: repeat row 3.

Row 6: k 3, *yo, k 5, yo*, k the center st, repeat between ** once, k 3. (21 sts)

Row 7: repeat row 3.

Row 8: k 3, *yo, k 7, yo*, k the center st, repeat between ** once, k 3. 

Row 9: repeat row 3.

Row 10: k 3, *yo, k 3, s2s1ktog, k 3, yo*, k the center st, repeat between ** once, k 3. 

Row 11: repeat row 3.

Row 12: k 3, *yo, k 1, yo, k 2, s2s1ktog, k 2, yo, k 1, yo*, k the center st, repeat between ** once, k 3. 

Row 13: k 3, *p 2, yo, p 7, yo, p 2*, p the center st, repeat between ** once, k 3. 

Row 14: k 3, *yo, k 2, yo, k 3, s2s1ktog, k 3, yo, k 2, yo*, k the center st, repeat between ** once, k 3. 

Row 15: k 3, *p 3, yo, p 9, yo, p 3*, p the center st, repeat between ** once, k 3. 

Row 16: k 3, *yo, k 7, s2s1ktog, k 7, yo*, k the center st, repeat between ** once, k 3. 

Row 17: repeat row 3.

Row 18: k 3, yo, k to center st, yo, k the center st, yo, k to last 3 sts, yo, k 3.

Row 19: repeat row 3. 

General pattern:

Row 20: k 3, yo, k 3, *s2s1ktog, k 7* repeat between ** to 6 sts before center st, s2s1ktog, k 3, yo, k the center st, yo, k 3, repeat between ** to last 9 sts, s2s1ktog, k 3, yo, k 3. 

Row 21: repeat row 3.

Row 22: k 3, yo, *k 1, yo, k 2, s2s1ktog, k 2, yo*, repeat between ** to one st before center st, k 1, yo, k the center st, yo, repeat between ** last 4 sts, k 1, yo, k 3. 

Row 23: k 3, p 1, *p 1, yo, p 7, yo*, repeat between ** to 2 sts before center st, p 2, p the center st, p 1, repeat between ** to last 5 sts, p 2, k 3. 

Row 24: k 3, yo, k 1, *k 1, yo, k 3, s2s1ktog, k 3, yo*, repeat between ** to 2 sts before center st, k 2, yo, k the center st, yo, k 1, repeat between ** to last 5 sts, k 2, yo, k 3. 

Row 25: k 3, p 2, *p 1, yo, p 9, yo* repeat between ** to 3 sts before center st, p 3, p the center st, p 2, repeat between ** to last 6 sts, p 3, k 3. 

Row 26: k 3, yo, *k 7, s2s1ktog, k 2*, repeat between ** to 5 sts before center st, k 5, yo, k the center st, yo, repeat between ** to last 8 sts, k 5, yo, k 3. 

Row 27: repeat row 3.

Row 28: repeat row 16.

Row 29: repeat row 3. 

Repeat the general pattern fourteen more times then repeat 18-28 rows of the general pattern once, knit one row. Bind off all sts. Block well.


Lastly, feel free to leave a comment if you have any questions or find something confusing in the pattern.

Happy crocheting/knitting! follow me on Instagram @wiams_crafts and Twitter @wiamscrafts to see my upcoming projects.

Kiki Vest

Hi knitters everywhere! as a request from my youngest daughter, who loves form-fitting vests that she can wear over baggy shirts, I've made this blue knitted vest. This is my first time knitting a whole piece using rib pattern only, which in turn gives this garment enough elasticity to mold to the shape of the body. The style of this vest leans towards formal with a casual flare, making it the perfect attire to wear to the office or school. It is made in two pieces; front and back, from which extends four bands that make up the sides. No need for side seems because the sides are secured together with buttons. I also added bands around the armholes to accentuate the shape of the shoulders. 

I hope you like this design and the matching beanie that I will post soon. Make sure to add it to next year’s to-do-list, because I am sure you will be surprised to see how simple and easy knitting it is. I wish you all a happy new year and see you all in 2023!

Overview:

  • Skill level: Intermediate.
  • Instructions style: written pattern.
  • Yarn weight: #4/ medium/ aran.
  • Available sizes: this vest is available in four sizes for adults: XS/S, M/L, XL/2XL, and 3XL/4XL (see detailed measurements below).

Get the ad-free, printable PDF of this pattern from my store:

Or click here to jump to the instructions.

Want to pin this project for later? Just hover or click on any of the images in this post then click the red "save" button.


Materials:

  • Yarn: Alize Burcum Klasik, 100% acrylic, 3.53 oz (100 g), 230 yards (210 m), in the color "353": (34, 4) skeins.
  • Knitting needles, size US 8 (5 mm).
  • Circular knitting needles, 16" (40 cm) long, size US 8 (5 mm).
  • Six (sixeight, eight) buttons, 1" (2.4 cm) in diameter.
  • Tapestry needle.
  • Ring stitch marker.


Sizes and measurements:

Size Chest-bust measurements Waist measurements
XS/S 34"- 36" (86- 92 cm) 26"- 28" (66- 70 cm)
M/L 38"- 40" (96- 100 cm) 29"- 31" (74- 78 cm)
XL/2XL 42"- 44" (107- 112 cm) 32"- 35.5" (82- 90 cm)
3XL/4XL 46"- 48" (117- 122 cm) 37"- 39" (94- 99 cm)

Yardage: 

  • Size XS/S: 580- 590 yards (530- 540 m), approx.
  • Size M/L: 655- 665 yards (600- 610 m), approx. 
  • Size XL/2XL: 765- 775 yards (700- 710 m), approx.
  • Size 3XL/4XL: 890- 900 yards (820- 830 m), approx.

Gauge: 24 sts and 24 rows = 4" x 4" (10 cm x 10 cm) in rib pattern and US 8 (5 mm) knitting needles.


Knitting Terms:

  • st: stitch.
  • sts: stitches.
  • k: knit.
  • p: purl.


Instructions:

Front Piece:

Cast on 75 (8799, 113) sts, start working as follows:

Rib Row 1 (right side): k 1, p 1, repeat to last st, k 1.

Rib row 2: p 1, k 1, repeat to last st, p 1.

Repeat rib rows 1 and 2 six more times. 

Side Bands:

Cast on 12 sts at the beginning of next two rib rows, then repeat the rib rows 1 and 2 seventeen (nineteentwenty-three, twenty-six) times. At the same time, work buttonholes row at (5th, 17th and 29th) [(7th, 19th and 31st), (5th, 17th, 29th and 31st), (7th, 19th, 31st and 43rd)] rows of both side bands. 

Buttonholes row: (k 1, p 1) twice, make 4 sts wide buttonhole, (p 1, k 1) to last 8 sts, make 4 sts wide buttonhole, (p 1, k 1) twice. 

You can watch my tutorial video for knitting this type of buttonhole here: 


Bind off 12 sts at the beginning of next two rows. 

Keep on working rib rows 1 and 2 fifteen (sixteenseventeen, eighteen) times.

Front neck shaping:

Work 30 (3540, 46) sts in rib row 1, bind off 15 (1719, 21) sts in the middle, work the 30 sts in rib row 1. Keep on knitting the left side.

Left side:

On the beginning of each right-side row, bind off 3 sts once, 2 sts twice, 1 st three times. [20 (2530, 36) sts] 

Keep on working the rib rows until the front measures 17" (18.5"20.8", 23.25"43 (4753, 59) cm from cast on row. Bind off all sts.

Right side:

Work the right side the same way as the left one, but in reverse.


Back piece:

Cast on 75 (8799, 113) sts, then repeat rib rows 1 and 2 ten times. 

Side Bands:

Cast on 12 sts at the beginning of next two rib rows, then repeat the rib rows 1 and 2 seventeen (nineteentwenty-three, twenty-six) times. Bind off 12 sts at the beginning of the next two rows, then repeat rib rows 1 and 2 twenty-two (twenty-threetwenty-four, twenty-five) times. Work as follows: 

Back neck shaping:

Work 21 (2631, 37) sts in rib row 1. Bind off 33 (3537, 39) sts in the middle, work the 21 (2631, 37) sts in rib row 1. Keep on knitting the left side.

Left side:

On the beginning of the next right-side row bind off 1 st. [20 (2530, 36) sts] 

Keep on working the rib rows until the back measures 18.5" (20"22.5", 24.8")47 (5157, 63) cm from cast on row. Bind off all sts.

Right side:

Work the right side the same way as the left one, but in reverse.

Assembly:

Sew shoulder seams.

Armhole Bands:

Along the front and back of armhole openings, pick up about 101 (109121, 133) sts, work rib rows 1 and 2 six times, or until the width matches that of the side bands, then bind off all sts. Sew the free ends of the armhole bands with the upper ends of the side bands.

Neck edge:

With circular knitting needles, and starting at the middle back, pick up approximately 88 (94100, 108) sts. Use a stitch marker at the beginning of rounds if you need. Work rib round as follows, matching the rib stitches of the front and back when applicable:

Rib Round: k 1, p 1, to end.

Repeat the rib round seven more times, then bind off all sts.

Weave in loose ends and sew buttons in place.


Lastly, feel free to leave a comment if you have any questions or find something confusing in the pattern.

Happy crocheting/knitting! follow me on Instagram @wiams_crafts and Twitter @wiamscrafts to see my upcoming projects.

Labels