Showing posts with label stripes. Show all posts

Forest Beehive Shawlette


Hello everyone! I made this shawlette after I received a very cute gift from my eight-year-old niece when she returned from vacation. She brought me a pack of three yarn skeins, which she carefully picked herself. I was ecstatic to be given such a thoughtful present, plus, it was my first encounter with Daiso's yarn, or any Japanese yarn, ever. The yarn is bulky and has a nice earthy color palette. Knitting a simple-patterned, asymmetrical shawl is the best way to showcase the lovely color sequence of this yarn, so once the bases of the design were set, I finished knitting the whole thing in two days. I am incredibly happy with the outcome, and I hope you will try making it, too. Please let me know what you think of it and stay tuned for more projects!

Skill level: Easy

Instructions style: written pattern +chart + video tutorial (see below).

Get printable PDF for this pattern:      or   


Materials:

  • Yarn: any self-striping or gradient yarn you like (aran or bulky weight). I used Daiso Pâtissier, 100% acrylic, 2.82 oz (80 g), 142 yards (130 m), in the color VPA3 Natural wood: 3 skeins.
  • Circular knitting needles, 32" (80 cm) long, size US 9 (5.5 mm).
  • Tapestry needle.


Measurements: length = 49" (125 cm), width = 24" (61 cm), approx.

Yardage: 415- 425 yards (380- 390 m), approx.

Gauge: 19 sts and 23 rows = 4" x 4" (10 cm x 10 cm) in beehive stitch pattern.


Knitting Terms:

  • st: stitch.
  • sts: stitches.
  • k: knit.
  • p: purl.
  • yo: yarn over.
  • sl st: slip stitch.
  • k2tog: knit 2 sts together.
  • ssk: slip, slip, knit the two slipped sts together through back loops.
  • sssk: slip, slip, slip, knit the three slipped sts together through back loops.


Instructions:

Cast on 5 sts.

Row 1: k 3, p 2.

Note: when knitting even numbered rows, always slip the first st purl-wise.

Row 2: sl st, k 1, yo, k to end. (6 sts)

Row 3 and every odd numbered row: k 3, p to last 2 sts, sl st, p 1.

Rows 4 and 6: repeat row 2. (8 sts)

Row 8: sl st, k 1, yo, k 1, switch the next two sts with the first st in front and knit them, k 3. (9 sts)

Row 10: repeat row 2. (10 sts)

Row 12: sl st, k 1, yo, k 1, switch the next two sts with the first st in front and knit them, switch the next two sts with the first st to the back and knit them, k 3. (11 sts)

Row 14: repeat row 2. (12 sts)

Row 16: sl st, k 1, yo, k 1, switch the next two sts with the first st in front and knit them, switch the next two sts with the first st to the back and knit them, switch the next two sts with the first st in front and knit them, k 3.

Row 18: repeat row 2. 


General pattern:

Row 20: sl st, k 1, yo, k 1, *switch the next two sts with the first st in front and knit them, switch the next two sts with the first st to the back and knit them, repeat from * to last 3 sts, k 3.

Row 22: repeat row 2. 

Row 24: sl st, k 1, yo, k 1, *switch the next two sts with the first st in front and knit them, switch the next two sts with the first st to the back and knit them, repeat from * to last 7 sts, switch the next two sts with the first st in front and knit them, k 3. 

Row 26: repeat row 2. 

Repeat rows (20- 27) twenty-nine more times, or you can do as many repeats as you prefer until you reach the size you like.

General pattern tutorial video:


Bind off all sts using the I-cord bind off method.

I-cord bind off row: *k 1, ssk, pass the two sts back to the left needle, repeat from * to the last 2 sts, ssk. You can watch my tutorial video for the I-cord bind off method here:

Cut yarn. Weave in loose ends. Block well and enjoy wearing.


Lastly, feel free to leave a comment if you have any questions or find something confusing in the pattern.

Happy crocheting/knitting! follow me on Instagram @wiams_crafts and Twitter @wiamscrafts to see my upcoming projects.

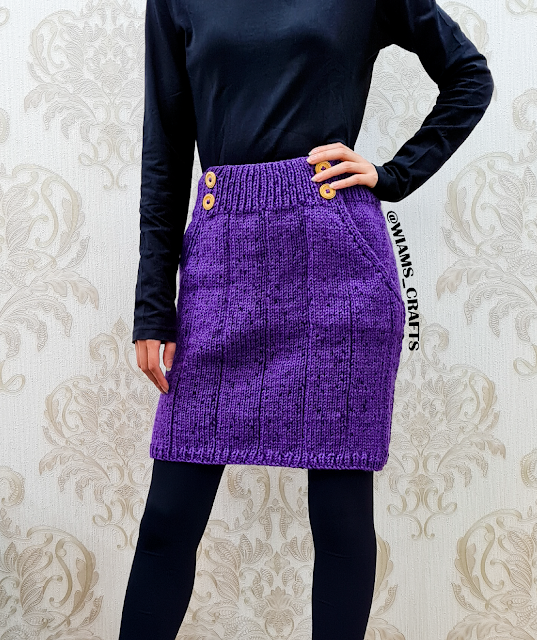
Big Pockets Skirt


Hi everyone! I'm back again with another knitted skirt. Knitting a basic skirt like this one is an overall easy project. You can follow one of two strategies to make one; either knit it as one piece, worked in rounds (see my Bold Stripes Skirt post), or as two pieces, front and back, sewn together along the side seems. I made a skirt of the second kind and added two large side pockets. One of my favorite aspects about this skirt is the buttons; they are not only decorative, but they also fasten the front to back part of the waistband. Another feature of the skirt that I took great care to show off is the “I-cord” like line that starts from the waistband, along the pocket opening, and continues down the side seams to the hem. I hope you try out this design, and I can’t wait to hear your feedback about this project. Let me know if you liked it or had any comments about it. My next project might be a matching top, but I haven’t decided yet, so stay tuned!

Skill level: Intermediate

Get printable PDF for this pattern:    or  


Materials:

  • Suggested yarn: Alize, Burcum, Nokta, 100% acrylic, 3.53 oz. (100 g), 230 yards (210 m), in the color 5665: 3 (3, 4) skeins.
  • knitting needles, sizes US 7 (4.5 mm) and US 9 (5.5 mm). 
  • Tapestry needle.
  • Four buttons, 1" (2.5) in diameter.
  • Transparent elastic thread.
  • A few pins.


Sizes and measurements:

Size Waist Hips Skirt Length
XS/S 26"- 28" (66- 70 cm) 36"- 37" (90- 94 cm) 18" (46 cm)
M/L 29"- 31" (74- 78 cm) 39"- 40" (98- 102 cm) 19.5" (50 cm)
XL/2XL 32"- 35.5" (82- 90 cm) 42"- 45" (106- 114 cm) 21.5" (54 cm)


Yardage: 

  • Size XS/S: 515- 520 yards (470- 475 m), approx.
  • Size M/L: 585- 590 yards (535- 540 m), approx. 
  • Size XL/2XL: 645- 650 yards (590- 595 m), approx.

Gauge: 15 sts and 21 rows = 4" x 4" (10 cm x 10 cm) in stockinette stitch.

Knitting Terms:

  • st: stitch.
  • sts: stitches.
  • k: knit.
  • p: purl.
  • m1L: one stitch increase left-wise.
  • m1R: one stitch increase right-wise.


Instructions:

Note: an advice to get a neat side edge, instead of knitting or purling the first st of each row, slip it purl-wise.

Front:

Upper band:

With US 7 (4.5 mm) knitting needles, cast on 35 (4555) sts. work as follows:

Rib row 1: (k 1, p 1), repeat to last st, k 1.

Rib row 2: purl the p sts and knit the k sts. 

Repeat rib row 2 two more times.

Buttonholes row: (k 1, p 1) twice, make 3 sts wide buttonhole, (p 1, k 1) to last 8 sts, p 1, make 3 sts wide buttonhole, (p 1, k 1) twice. 

You can watch my tutorial video for knitting this type of buttonhole here: 

Repeat rib row 2 five times. Repeat buttonhole row once, then repeat rib row 2 five times. 


Side pocket shaping:

Change to US 9 (5.5 mm) knitting needles while working the next row:

Row 1: (k 1, p 1) twice, m1L, k 8, (p 1, k 9) to last 13 sts, p 1, k 8, m1R, (p 1, k 1) twice. [37 (47, 57) sts]

Row 2 and every even numbered row (unless mentioned otherwise): knit the k sts, and purl the p sts.

Row 3: (k 1, p 1) twice, m1L, (k 9, p 1) to last 13 sts, k 9, m1R, (p 1, k 1) twice. [39 (49, 59) sts]

Row 4: (p 1, k 1) twice, (k 1, p 9) to last 5 sts, k 1, (k 1, p 1) twice.

Row 5: (k 1, p 1) twice, m1L, (p 1, k 9) to last 5 sts, p 1, m1R, (p 1, k 1) twice. [41 (5161) sts]

Row 7: (k 1, p 1) twice, m1L, k 1, (p 1, k 9) to last 6 sts, p 1, k 1, m1R, (p 1, k 1) twice. [43 (53, 63) sts]

Row 9: (k 1, p 1) twice, m1L, k 2, (p 1, k 9) to last 7 sts, p 1, k 2, m1R, (p 1, k 1) twice. [45 (55, 65) sts]

Row 11: (k 1, p 1) twice, m1L, k 3, (p 1, k 9) to last 8 sts, p 1, k 3, m1R, (p 1, k 1) twice. [47 (57, 67) sts]

Row 13: (k 1, p 1) twice, m1L, k 4, (p 1, k 9) to last 9 sts, p 1, k 4, m1R, (p 1, k 1) twice. [49 (59, 69) sts]

Row 15: (k 1, p 1) twice, m1L, k 5, (p 1, k 9) to last 10 sts, p 1, k 5, m1R, (p 1, k 1) twice. [51 (61, 71) sts]

Row 17: (k 1, p 1) twice, m1L, k 6, (p 1, k 9) to last 11 sts, p 1, k 6, m1R, (p 1, k 1) twice. [53 (63, 73) sts]

Row 19: (k 1, p 1) twice, m1L, k 7, (p 1, k 9) to last 12 sts, p 1, k 7, m1R, (p 1, k 1) twice. [55 (65, 75) sts]

Repeat rows (1-10) once more. [65 (75, 85) sts]

Continue working the front as follows:

Basic row 1: (k 1, p 1) twice, k 3, (p 1,k 9) to last 8 sts, p 1, k 3, (p 1, k 1) twice.
 
Basic row 2: knit the k sts, and purl the p sts.

Repeat basic rows twenty-three (twenty-sixtwenty-nine) more times. Repeat rib row 1 once then rib row 2 twice. Bind off all sts.


Back:

Upper band:

With US 7 (4.5 mm) knitting needles, cast on 121 (131141) sts. work as follows:

Rib row 1: k 1, p 1, repeat to last st, k 1.

Rib row 2: purl the p sts and knit the k sts. 

Repeat rib row 2 fourteen more times.

Change to US 9 (5.5 mm) knitting needles while working the next row:

Row 1: k 35, (p 1, k 9) to last 36 sts, p 1, k to end.

Row 2: purl the p sts and knit the k sts.

Repeat rows 1 and 2 fourteen more times, then work as follows:

Ending pockets rows:

Row 1: bind off 28 sts, (k 1, p 1) twice, k 3, (p 1,k 9) to last 36 sts, p 1, k 3, (k 1, p 1) twice, k to end.

Row 2: bind off 28 sts, purl the p sts and knit the k sts. [65 (75, 85) sts]

Finish knitting the back piece by following the same instructions for the front, starting with Basic rows 1 and 2 to the end of that section. 


Sewing skirt pieces: Place the back piece face down on your working table, then fold the pockets towards the middle line of the skirt. Place the front piece on top and pin the two pieces together. Sew the seams of the pockets to the underside of the front (use hidden st technique). Sew skirt front and back side seams together (from pocket ends to the hem). Sew buttons in place. Weave in loose yarn ends. To prevent the skirt's waistband from becoming too loose, I passed four pieces of transparent elastic thread through it. 

You can watch my tutorial video to see more details about making this skirt, including the sewing process: 


Lastly, feel free to leave a comment if you have any questions or find something confusing in the pattern.

Happy crocheting/knitting! follow me on Instagram @wiams_crafts and Twitter @wiamscrafts to see my upcoming projects.

Bold Stripes Hat


Hello friends! Making an accessory from yarn, such as a hat, a set of mittens or a head band that matches a sweater or skirt can seriously enhance the overall look of your chosen outfit. So, having a lot of leftover yarn, I had to make a matching hat for the Bold Stripes Skirt and Top set to be complete. This hat has the same general pattern of the other two pieces, although the final look leans more towards a beret shape. I've made this hat in two sizes that I hope can fit most heads. You can even knit it with a different colored yarn to break the monotone of the outfit. It's a pretty easy knit, especially if you had made the skirt or the top before. I hope you enjoy making and wearing it! 

Skill level: Intermediate

Get printable PDF for this pattern: or 

Click here for the matching Skirt: Bold Stripes Skirt

Click here for the matching Top: Bold Stripes Top


Materials:

  • Yarn: Alize Superlana Midi Mosaic, 25% wool, 75% acrylic, 3.53 oz (100 g), 186 yards (170 m), in the color "5227": 1 skein.
  • Circular knitting needles, 16" (40 cm) long, sizes US 9 (5.5 mm) and US 10.5 (6.5 mm).
  • Tapestry needle.
  • Ring stitch marker.


Sizes and measurements: 
  • Size S/M: head circumference = 20"- 21" (50- 53 cm), hat height = 9" (23 cm). 
  • Size M/L: head circumference = 22"- 23" (56- 58 cm), hat height = 9" (23 cm).

Yardage:

  • Size S/M: 126- 128 yards (115- 117 m), approx.
  • Size M/L: 142- 144 yards (130- 132 m), approx.

Gauge: 14 sts and 18 rounds = 4" x 4" (10 cm x 10 cm) in stockinette stitch.


Knitting Terms:

  • st: stitch.
  • sts: stitches.
  • k: knit.
  • p: purl.
  • m1: make one stitch increase purl-wise.
  • k2tog: knit 2 sts together.
  • ssk: slip, slip, knit the 2 slipped sts together through back loops.
  • sssk: slip, slip, slip knitwise, knit the 3 slipped sts together through back loops.


Instructions:

With US 9 (5.5 mm) circular knitting needles, cast on 64 (72) sts. Join in the round. Don't know how to join in the round? here is a short tutorial on how to do it (from 0:26 - 1:15 min): 


Put a ring stitch marker at the beginning of rounds. Work as follows:

Rib round 1: k 2, p 1, k 1, repeat to end.

Repeat the rib round 5 more times. 

Change to US 10.5 (6.5 mm) circular knitting needles while working the next round:

Increasing rounds:

Round 1: k 2, p 5, k 1, repeat to end.

Round 2: k 2, m1, p 5, m1, k 1, repeat to end. [80 (90) sts]

Round 3: k 2, p 7, k 1, repeat to end.

Round 4: k 2, m1, p 7, m1, k 1, repeat to end. [96 (108) sts]

Round 5: k 2, p 9, k 1, repeat to end.


Pattern Rounds:

Round 1: k 3, p 7, k 1, p 1, repeat to end.

Round 2: p 1, k 3, p 5, k 3, repeat to end.

Round 3: p 2, k 3, p 3, k 3, p 1, repeat to end.

Round 4: p 3, k 3, p 1, k 3, p 2, repeat to end.

Round 5: p 4, k 1, p 1, k 3, p 3, repeat to end.

Round 6: p 5, k 3, p 4, repeat to end.

Round 7: p 4, k 3, p 1, k 1, p 3, repeat to end.

Round 8: p 3, k 3, p 1, k 3, p 2, repeat to end.

Round 9: p 2, k 3, p 3, k 3, p 1, repeat to end.

Round 10: p 1, k 3, p 5, k 3, repeat to end.

Round 11: k 3, p 7, k 1, p 1, repeat to end.

Basic round: knit the k sts and purl the p sts.

Repeat the basic round five more times.


Decreasing rounds:

Decreasing round 1: k 1, ssk, p 7, k2tog, repeat to end. [80 (90) sts]

Repeat the basic round twice.

Decreasing round 2: k 1, ssk, p 5, k2tog, repeat to end. [64 (72) sts] 

Repeat the basic round twice.

Decreasing round 3: k 1, ssk, p 3, k2tog, repeat to end. [48 (54) sts]

Repeat the basic round twice.

Decreasing round 4: k 1, ssk, p 1, k2tog, repeat to end. [32 (36) sts] 

Decreasing round 5: k 1, sssk, repeat to end. [16 (18) sts] 

Cut yarn leaving a 6" (15 cm) long yarn tail, pull it through all sts and tighten together. Weave in loose ends.


Lastly, feel free to leave a comment if you have any questions or find something confusing in the pattern.

Happy crocheting/knitting! follow me on Instagram @wiams_crafts and Twitter @wiamscrafts to see my upcoming projects.

Powder Stripes Shawl

Hello guys! I’m glad to be back and working after I inevitably got infected with Omicron a couple of weeks ago and had my fair share of all its symptoms. I feel much better now and hope to regain my full strength soon! And that’s why, due to my health state, this shawl took a relatively long time to finish, though it’s here at last! I think my saving grace was that it was an easy knit, the yarn colors are also very easy on the (tired) eyes and didn’t give me a hard time during my illness. As it is a quick work, it could be a great gift for the coming spring weeks with all its lovely occasions. The pattern is simple and consists of 20 rows that are worked using each yarn color alternately. I hope you enjoy making this beautiful shawl, and I wish you all a very healthy spring!

Skill level: Easy

Get printable PDF for this pattern:     or  

or click here to jump to the instructions


Materials:

  • Yarn:
    • Yarn A: NAKO Elit Baby Mini Batik, 100% premium anti-pilling acrylic, 3.5 oz. (100 g), 273 yards (250 m), in the color Variegated (32463): 2 skeins.
    • Yarn B: Alize Baby Best, 90% acrylic, 10% bamboo, 3.35 oz (100 g), 262 yards (240 m), in the color Powder (390): 2 skeins.
  • Circular knitting needles, 32" (80 cm) long, size US 8 (5 mm). 
  • Tapestry needle.


Measurements: width = 55" (140 cm), height = 35.5" (90 cm), approx.

Yardage:

  • Yarn A: 558- 563 yards (510- 515 m), approx.
  • Yarn B: 460- 465 yards (420- 425 m), approx.

Gauge: 18 sts and 26 rows = 4" x 4" (10 cm x 10 cm) in stockinette stitch.


Knitting Terms:

  • st: stitch.
  • sts: stitches.
  • k: knit.
  • p: purl.
  • yo: yarn over.
  • sl st: slip stitch.
  • k2tog: knit 2 sts together.


Instructions:

With Yarn A cast on 5 sts.

Row 1: k 3, p 2.

Row 2: sl st, k 1, yo, k 3. (6 sts)

Row 3 and every odd numbered row: k 3, p to last 2 sts, sl st, p 1.

Row 4: sl st, k 1, yo, k to end. (7 sts)

Row 6: sl st, k 1, yo, k2tog, yo, k 3. (8 sts)

Row 8: sl st, k 1, yo, k2tog, yo, k 4. (9 sts)

Row 10: sl st, k 1, yo, (k2tog, yo) twice, k 3. (10 sts)

Row 12: sl st, k 1, yo, (k2tog, yo) twice, k 4. (11 sts)

Row 14: sl st, k 1, yo, (k2tog, yo) three times, k 3. (12 sts)

Row 16: sl st, k 1, yo, (k2tog, yo) three times, k 4. (13 sts)

Row 18: sl st, k 1, yo, (k2tog, yo) four times, k 3. (14 sts)

Row 19: repeat row 3, bind on Yarn B and work next row as follows:

Note: starting from the next right side row, always knit the first (k 1) using both yarns.

Row 20: repeat row 4. (15 sts)

Row 22: sl st, k 1, yo, k 8, k2tog, yo, k 3. (16 sts)

Row 24: sl st, k 1, yo, k 8, k2tog, yo, k 4. (17 sts)

Row 26: sl st, k 1, yo, k2tog, yo, k 6, (k2tog, yo) twice, k 3. (18 sts)

Row 28: sl st, k 1, yo, k2tog, yo, k 6, (k2tog, yo) twice, k 4. (19 sts)

Row 30: sl st, k 1, yo, (k2tog, yo) twice, k 4, (k2tog, yo) three times, k 3. (20 sts)

Row 32: sl st, k 1, yo, (k2tog, yo) twice, k 4, (k2tog, yo) three times, k 4. (21 sts)

Row 34: sl st, k 1, yo, (k2tog, yo) three times, k 2, (k2tog, yo) four times, k 3. (22 sts)

Row 36: sl st, k 1, yo, (k2tog, yo) three times, k 2, (k2tog, yo) four times, k 4. (23 sts)

Row 38: sl st, k 1, yo, (k2tog, yo) repeat to last 3 sts, k 3. (24 sts)

Row 39: repeat row 3, change to other yarn. 


General pattern:

Note: switch to the other yarn each time you repeat the general pattern.

Row 40: sl st, k 1, yo, k to end. 

Row 42: sl st, k 1, yo, *k 8, k2tog, yo, repeat from * to last 3 sts, k 3. 

Row 44: sl st, k 1, yo, k 1, *k 7, k2tog, yo, k 1, repeat from * to last 3 sts, k 3. 

Row 46: sl st, k 1, yo, k2tog, yo, *k 6, (k2tog, yo) twice, repeat from * to last 3 sts, k 3. 

Row 48: sl st, k 1, yo, k2tog, yo, k 1, *k 5, (k2tog, yo) twice, k 1, repeat from * to last 3 sts, k 3. 

Row 50: sl st, k 1, yo, (k2tog, yo) twice,*k 4, (k2tog, yo) three times, repeat from * to last 3 sts, k 3.

Row 52: sl st, k 1, yo, (k2tog, yo) twice, k 1, *k 3, (k2tog, yo) three times, k 1, repeat from * to last 3 sts, k 3.  

Row 54: sl st, k 1, yo, (k2tog, yo) three times, *k 2, (k2tog, yo) four times, repeat from * to last 3 sts, k 3.  

Row 56: sl st, k 1, yo, (k2tog, yo) three times, k 1, *k 1, (k2tog, yo) four times, k 1, repeat from * to last 3 sts, k 3.

Row 58: sl st, k 1, yo, (k2tog, yo) repeat to last 3 sts, k 3. 

Row 59: k 3, p to last 2 sts, sl st, p 1, change to the other yarn.

Repeat the general pattern sixteen more times. With Yarn B, work the last rows as follows:

Row 1: sl st, k 1, yo, k to end. 

Row 2: k to last 2 sts, sl st, p 1.

Repeat these two rows once more, then bind off all sts loosely. Cut yarn and weave in loose ends. Block If you like and enjoy.


Lastly, feel free to leave a comment if you have any questions or find something confusing in the pattern.

Happy crocheting/knitting! follow me on Instagram @wiams_crafts and Twitter @wiamscrafts to see my upcoming projects.

Bold Stripes Skirt

Hi knitters! Back in my twenties and thirties, I used to sew every piece of clothing I wore myself, and making skirts was my specialty. I've probably sewn and worn every kind of skirt that was popular back then. Nowadays I may no longer sew as I used to, but I still have passion for skirt making. That's why when I saw this 'mosaic' yarn at the store, I knew I had to make one. My debut knitted skirt design is simple, with bold lines, and a clear statement. It is an easy pattern, made with only knit and purl stitches, and the length is easily customizable to be as long or short as you prefer. So here is a quick winter project for you that you can finish in a day or two. If this skirt design does well, I'm planning to make more, perhaps longer and flowy-er ones, using thinner types of yarn, but non the less simple and easy to make. So, stay tuned to all my future projects, especially the matching crop top that I'm working on right now. Happy holidays everyone!

Skill level: Easy

Get printable PDF for this pattern:   or  

The matching top is finally here! click the link to see the post: Bold Stripes Top


Materials:

  • Yarn: Alize Superlana Midi Mosaic, 25% wool, 75% acrylic, 3.53 oz (100 g), 186 yards (170 m), in the color 5245: 2 (3, 3) skeins.
  • Circular knitting needles, 24" (60 cm) long, sizes US 8 (5 mm), (7 mm) and US 11 (8 mm).  
  • Tapestry needle.
  • Ring stitch marker.

Sizes and measurements:

Size Waist Hips Skirt Length
XS/S 26"- 28" (66- 70 cm) 36"- 37" (90- 94 cm) 18" (46 cm)
M/L 29"- 31" (74- 78 cm) 39"- 40" (98- 102 cm) 19.5" (50 cm)
XL/2XL 32"- 35.5" (82- 90 cm) 42"- 45" (106- 114 cm) 21.5" (54 cm)


Yardage: 

  • Size XS/S: 370- 372 yards (338- 340 m), approx.
  • Size M/L: 435- 437 yards (398- 400 m), approx. 
  • Size XL/2XL: 490- 492 yards (448- 450 m), approx.

Gauge: 14 sts and 18 rounds = 4"x 4" (10 cm x 10 cm) in stockinette stitch and 7 mm knitting needles.

Knitting Terms:

  • st: stitch.
  • sts: stitches.
  • k: knit.
  • p: purl.


Instructions:

With 5 mm circular knitting needles, cast on 108 (120, 132) sts. Join in the round. Don't know how to join in the round? here is a short tutorial on how to do it (from 0:26 - 1:15 min): 


Put a ring stitch marker at the beginning of rounds, work as follows:

Rib round: k 2, p 1, k 1, p 1, k 1, repeat to end.

Repeat the rib round 10 (12, 12) times. Change to 7 mm circular needles, then knit the next round as follows:

Basic round: p 5, k 3, p 4, repeat to end.

Repeat the round until skirt length measures 32 (34, 36) cm


Pattern Rounds:

Round 1: p 4, k 1, p 1, k 3, p 3, repeat to end.

Round 2: p 3, k 3, p 1, k 3, p 2, repeat to end.

Round 3: p 2, k 3, p 3, k 3, p 1, repeat to end.

Round 4: p 1, k 3, p 5, k 3, repeat to end.

Round 5: k 3, p 7, k 1, p 1, repeat to end.

Round 6: k 2, p 9, k 1, repeat to end.

Round 7: k 1, p 1, k 1, p 7, k 2, repeat to end.

Round 8: p 1, k 3, p 5, k 3, repeat to end.

Round 9: p 2, k 3, p 3, k 3, p 1, repeat to end.

Round 10: p 3, k 3, p 1, k 3, p 2, repeat to end.

Round 11: p 4, k 1, p 1, k 3, p 3, repeat to end.

Change to 8 mm circular needles and repeat the basic round 4 (6, 8) times.

Work rib round 5 (5, 7) times, then bind off all sts. Weave in loose ends.

(Click to enlarge)


Lastly, feel free to leave a comment if you have any questions or find something confusing in the pattern.

Happy crocheting/knitting! follow me on Instagram @wiams_crafts and Twitter @wiamscrafts to see my upcoming projects.