Showing posts with label Down up. Show all posts

Christmas Angel Hat

Greetings Knitters! My projects for this year’s holiday season will mainly be headwear, as I'm trying to post as many of them as I can before the end of the year. My first design is this hat, which has a fair isle white angel and snowflakes pattern that me and my daughter came up with, using white, green, and red yarn. It is simple and easy to make, and should suits most adult head sizes, hopefully. You will notice that I have included two angle pattern charts to accommodate the difference in hat sizes. If you wish to make this hat for your little ones, please let me know, and if there is enough interest, I'll work on making a smaller angel pattern with instructions. 

Update: upon request, instruction for Size Preemie have been added on May 7, 2022.

Skill level: Intermediate


Materials:

  • Yarn: NAKO Elit Baby, 100% premium anti-pilling acrylic, 3.5 oz. (100 g), 273 yards (250 m), in the following colors and quantities: green 5956 (1 skein), white 208 (1 skein), and red 298 (1 skein).
  • Circular knitting needles, 16" (40 cm) long, size US 6 (4 mm) and US 7 (4.5 mm).
  • Double pointed needles (DPNs) set, size US 7 (4.5 mm).
  • For Size Preemie only: double pointed needles (DPNs) set, size US 8 (5 mm).
  • Tapestry needle.
  • Ring stitch marker.


Sizes and measurements: 
  • Size S: head circumference = 20" (53 cm), height = 7" (18 cm). 
  • Size M/L: head circumference = 24" (61 cm), height = 9" (23 cm).
  • Size Preemie: head circumference = 10" (25 cm), height = 4.5" (11 cm).
Yardage: 
  • Size S: 120- 122 yards (110 - 112 m).
  • Size M/L: 153- 155 yards (140 - 142 m).
  • Size Preemie: 44- 46 yards (40 - 42 m), approx.

Gauge: 20 sts and 22 rounds = 4" x 4" (10 cm x 10 cm) in stockinette stitch.


Knitting Terms:
  • st: stitch.
  • sts: stitches.
  • k: knit.
  • p: purl.
  • ssk: slip, slip, knit the two slipped stitches together through back loops.


Instructions for Size S and Size M/L:

With green yarn, cast on 80 (100) sts. Join in the round. Don't know how to join in the round? here is a short tutorial on how to do it (from 0:26 - 1:15 min): 


Put a ring stitch marker at the beginning of rounds, knit one round, then work as follows:

Rib round: k 3, p 1, repeat to end.

Repeat the rib round eight times. Purl one round. With green, red, and white yarn work the chart: 


Cut red and white yarn. With green yarn knit one round.


Decreasing rounds:

Round 1: k 6 (8), ssk, repeat to end. [70 (90) sts]

Round 2 and every even numbered round: k to end 

Round 3: k 5 (7), ssk, repeat to end. [60 (80) sts]

Round 5: k 4 (6), ssk, repeat to end. [50 (70) sts]

Round 7: k 3 (5), ssk, repeat to end. [40 (60) sts]

Round 9: k 2 (4), ssk, repeat to end. [30 (50) sts]

Round 11: k 1 (3), ssk, repeat to end. [20 (40) sts]

For size S:

Round 13: ssk, repeat to end. (10 sts)

Cut yarn leaving a 6" (15 cm) long yarn tail, pull it through all sts and tighten together. Weave in loose ends.

For size M/L:

Round 13: k 2, ssk, repeat to end. (30 sts)

Round 15: k 1, ssk, repeat to end. (20 sts)

Round 17: ssk, repeat to end. (10 sts)

Cut yarn leaving a 6" (15 cm) long yarn tail, pull it through all sts and tighten together. Weave in loose ends.

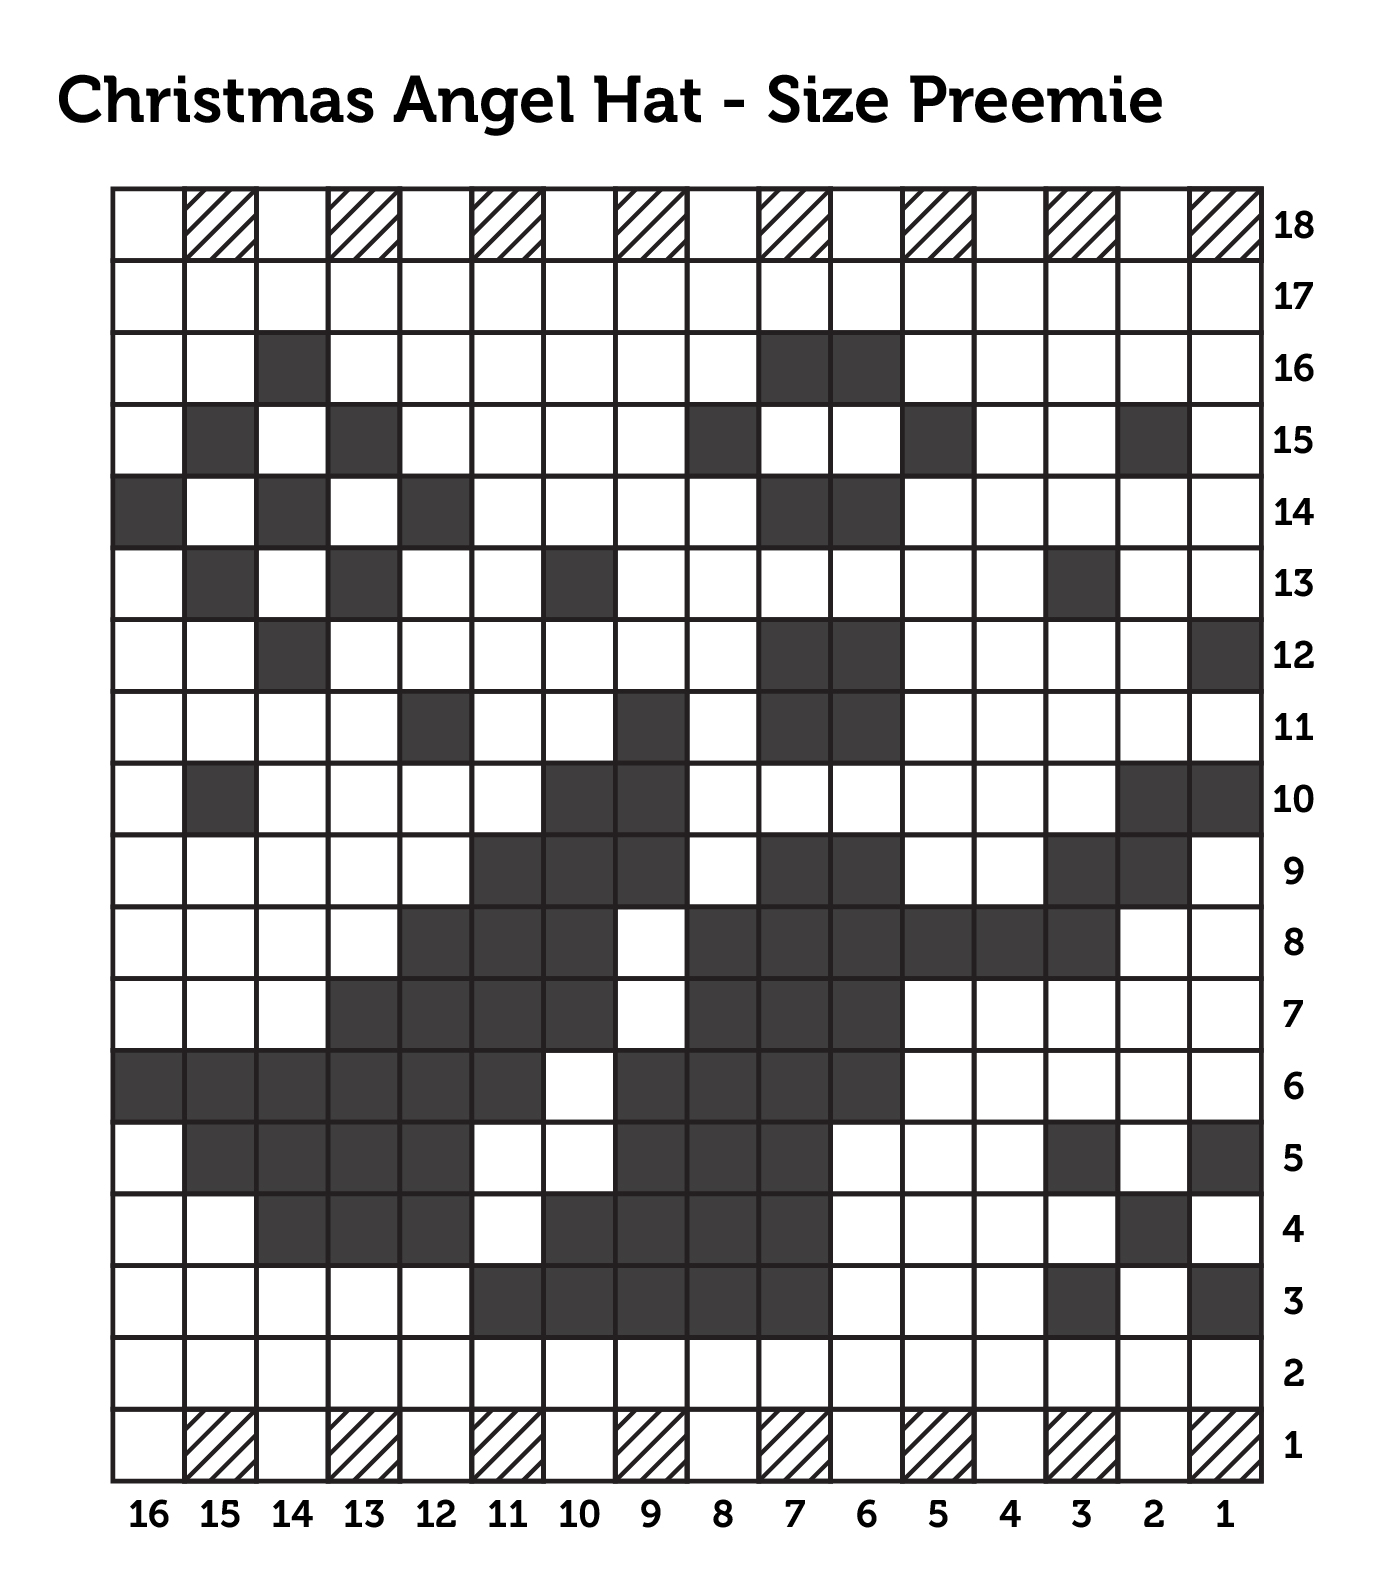
Instructions for size Preemie:

With green yarn and size US 8 (5 mm) DPNs, cast on 48 sts. Join in the round. Put a ring stitch marker at the beginning of rounds, then work as follows:

Rib round: k 3, p 1, repeat to end.

Repeat the rib round three times. Purl one round. With green, red, and white yarn work the chart: 

Cut red and white yarn. With green yarn work as follows:

Decreasing rounds:

Round 1: k 6, ssk, repeat to end. (42 sts)

Round 2: k to end. 

Round 3: k 5, ssk, repeat to end. (36 sts)

Round 4: k to end.

Round 5: k 4, ssk, repeat to end. (30 sts)

Round 6: k to end.

Round 7: k 3, ssk, repeat to end. (24 sts)

Round 8: k 2, ssk, repeat to end. (18 sts)

Round 9: k 1, ssk, repeat to end. (12 sts)

Cut yarn leaving a 6" (15 cm) long yarn tail, pull it through all sts and tighten together. Weave in loose ends.


Lastly, feel free to leave a comment if you have any questions or find something confusing in the pattern.

Happy crocheting/knitting! follow me on Instagram @wiams_crafts and Twitter @wiamscrafts to see my upcoming projects.

Simple Checkered Beanie


Hello everyone! Sometimes, a nice and quick project is all you need to make a cute present for this season's celebrations. So a pattern that only has knit and purl stitches, and could be finished within a few hours is the perfect project! This is a very easy to make beanie hat that features a simple but detectable checkered pattern, even though its knit from a single colored yarn. What I did -which was new for me in this hat- is the decreasing rows; they don't consist of lines that start after the general pattern and end up meeting at the center top. Instead, they are rounds that get smaller as you reach the top. I hope you have fun making this hat!

Skill level: Intermediate

GET printable PDF for this pattern here.


Materials:

  • Yarn: NAKO Elit Baby, 100% premium anti-pilling acrylic, 3.5 oz. (100 g), 273 yards (250 m), in the following colors: Lavender 10625 (1 skein) and White 208 (1 skein).
  • Circular knitting needles, 16" (40 cm) long, size US 6 (4 mm) and US 8 (5 mm).
  • Double pointed needles (DPNs) set, size US 6 (4 mm).
  • Tapestry needle.
  • Stitch marker.


Sizes and measurements: 

  • Size S: head circumference = 20" (53 cm), height = 8" (20 cm).
  • Size M: head circumference = 22" (56 cm), height = 8" (20 cm).
  • Size L: head circumference = 24" (61 cm), height = 8.5" (22 cm).

Gauge: 20 sts and 25 rounds = 4"x 4" (10 cm x 10 cm) in stockinette stitch.

Yardage: 

  • Size S: 198 - 200 yards (180 - 182 m), approx.
  • Size M: 208 - 210 yards (190 - 192 m), approx. 
  • Size L: 218 - 220 yards (200 - 202 m), approx.


Knitting Terms:

  • st: stitch.
  • sts: stitches.
  • k: knit.
  • p: purl.
  • k2tog: knit two stitches together.


Instructions:

With lavender yarn and size 6 (4 mm) circular knitting needles, cast on 96 (108120) sts. Join in the round. Don't know how to join in the round? here is a short tutorial on how to do it (from 0:26 - 1:15 min): 


Put a ring stitch marker at the beginning of rounds, knit one round, then work as follows:

Ribs round: k 1, p 1, repeat to end.

Repeat the ribs round 12 times. Switch to size 8 (5 mm) circular knitting needles, then work as follows:

Round 1: k all sts.

Round 2: p all sts.

Round 3: k all sts.

Round 4: p 6, k 6, repeat to end.

Round 5: k all sts.

Repeat rounds 4 and 5 two more times.

Round 6: p all sts.

Round 7: k all sts.

Round 8: k 6, p 6, repeat to end.

Round 9: k all sts.

Repeat rounds 8 and 9 two more times.

Round 10: p all sts.

Round 11: k all sts.

Round 12: p 6, k 6, repeat to end.

Round 13: k all sts.

Repeat rounds 12 and 13 two more times.

Size S: start decreasing rounds.

Sizes M and L: keep working the pattern.

Round 14: p all sts.

Round 15: k all sts.

Round 16: k 6, p 6, repeat to end.

Round 17: k all sts.

Repeat rounds 16 and 17 two more times.  


Decreasing Rounds: 

Round 1: p all sts.

Round 2: k 14 (16, 18), k2tog, repeat to end.

Round 3: p all sts.

Round 4: k 6 (7, 8), k2tog, *k 13 (15, 17), k2tog, repeat from * to last 7 (8, 9) sts, k to end. 84 (96, 108) sts

Round 5: p all sts.

Round 6: k 12 (14, 16), k2tog, repeat to end.

Round 7: p all sts.

Round 8: k 5 (6, 7), k2tog, *k 11 (13, 15), k2tog, repeat from * to last 6 (7, 8) sts, k to end. 72 (84, 96) sts

Round 9: p all sts.

Round 10: k 10 (12, 14), k2tog, repeat to end.

Round 11: p all sts.

Round 12: k 4 (5, 6), k2tog, *k 9 (11, 13), k2tog, repeat from * to last 5 (6, 7) sts, k to end. 60 (72, 84) sts

Change to DPNs.

Round 13: p all sts.

Round 14: k 8 (10, 12), k2tog, repeat to end.

Round 15: p all sts.

Round 16: k 3 (4, 5), k2tog, *k 7 (9, 11), k2tog, repeat from * to last 4 (5, 6) sts, k to end. 48 (60, 72) sts

Round 17: p all sts.

Round 18: k 6 (8, 10), k2tog, repeat to end.

Round 19: p all sts.

Round 20: k 2 (3, 4), k2tog, *k 5 (7, 9), k2tog, repeat from * to last 3 (4, 5) sts, k to end. 36 (48, 60) sts

Round 21: p all sts.

Round 22: k 4 (6, 8), k2tog, repeat to end.

Round 23: p all sts.

Round 24: k 1 (2, 3), k2tog, *k 3 (5, 7), k2tog, repeat from * to last 2 (3, 4) sts, k to end. 24 (36, 48) sts

Size S:

Last round: k2tog to end. (12 sts)

Cut yarn, leaving a 6" (15 cm) long yarn tail, pull it through all sts and tighten tog. Weave in loose ends. 

Size M:

Round 25: p all sts.

Round 26: k 4, k2tog, repeat to end.

Round 27: p all sts.

Round 28: k 1, k2tog, *k 3, k2tog, repeat from * to last 2 sts, k to end. (24 sts)

Last round: k2tog to end. (12 sts)

Cut yarn leaving a 6" (15 cm) long yarn tail, pull it through all sts and tighten tog. Weave in loose ends.

Size L: 

Round 25: p all sts.

Round 26: k 6, k2tog, repeat to end.

Round 27: p all sts.

Round 28: k 2, k2tog, *k 5, k2tog, repeat from * to last 3 sts, k to end. (36 sts)

Round 29: p all sts.

Round 30: k 4, k2tog, repeat to end.

Round 31: p all sts.

Round 32: k 1, k2tog, *k 3, k2tog, repeat from * to last 2 sts, k to end. (24 sts)

Last round: k2tog to end. (12 sts)

Cut yarn, leaving a 6" (15 cm) long yarn tail, pull it through all sts and tighten tog. Weave in loose ends.

Make a 2.5" (6 cm) diameter pompom using lavender and white yarn and fix it tight on top.


Lastly, feel free to leave a comment if you have any questions or find something confusing in the pattern.

Happy crocheting/knitting! follow me on Instagram @wiams_crafts and Twitter @wiamscrafts to see my upcoming projects.

Rose Filet Top

Hello everyone! Filet crochet is a very easy technique once you get the hang of it. It's quite similar to cross stitch embroidery. You can choose any pixel art shape and turn it into a crochet chart with a few simple steps. I've explained all of this to the best of my ability in a video posted on my YouTube channel (see below). I decided to make a step-by-step tutorial for this technique after most of the comment I received on one of my earlier designs, my RoseRelief Shawl, were questions about how to follow the chart or how to do filet crochet. Now, I finally have the means to explain it using this post. This top is very easy to make once you grasp the basics of the filet crochet technique. It’s made up of four pieces: the back and front, joined by two stripes that make up the sides. I am absolutely pleased with the way this top turned out, and how very nice and unique it looks. I hope you try it out yourselves. Stay safe and healthy!  

Skill level: Intermediate


Materials:

  • Yarn: Alize Diva Silky Effect, 100% microfiber acrylic, 3.53 oz. (100 g), 383 yards (350 m), in the color cream 01 (2 skeins), dark green 131 (2 skeins) and orange 83 (1 skein).
  • Crochet hook, size US D (3 mm).
  • Tapestry needle.


Measurements: 

Size

Chest circumference

S

 33.5-35.5" (85-90 cm) 

M

 37.5-40" (95-100 cm)

L

 42-44" (105-110 cm)


Yardage: 

Size S: 1200- 1220 yards (1100- 1120 m) approx.

Size M: 1315 - 1335 yards (1200 - 1220 m) approx.

Size L: 1420- 1445 yards (1300 - 1320 m) approx.

Gauge: 30 sts and 16 rows = 4" x 4" (10 cm x 10 cm) in double crochet stitch.


Crochet terms (US):
  • ch: chain.
  • sc: single stitch.
  • dc: double crochet.
  • picot: ch 3, slip stitch into the first ch.
Note: this pattern follows the filet crochet technique. You can learn more about it by watching this video:


Instructions:

Back:

With cream yarn, make 144 (160, 176) chains, work as follows:

Row 1: dc in the seventh ch from hook, *skip ch, ch 1, dc in ch, repeat from * to end, turn.

Row 2: ch 4, dc in dc, *skip ch, ch 1, dc in dc, repeat from * to end, turn.

Repeat row 2 twelve (fourteen, sixteen) times, cut cream yarn.

With dark green yarn, repeat row 2 sixteen times, cut dark green yarn.

With orange yarn, repeat row 2 twenty six times, cut orange yarn.

With dark green yarn, repeat row 2 sixteen times, cut dark green yarn.

With cream yarn, repeat row 2 fifteen (sixteen, seventeen) times, cut dark green yarn.


Front:

Work the front like you worked the back until the last upper dark green row. At the same time, work the filet crochet pattern as the chart shows. Watch the tutorial video on the filet crochet technique above.


Upper cream yarn stripe: 

Repeat row 2 six (six, eight) times.

Neck line shaping:

Work as follows:

Right shoulder

Row 3: ch 4, dc in dc, *skip ch, ch 1, dc in dc, repeat from * 20 times, turn.

Repeat row 3 seven (nine, nine) more times. Cut yarn, leaving a 12" (30 cm) yarn tail to sew the shoulder seem.

Left shoulder

Work the same as the right side.


Side stripes (make 2):

With cream yarn, make 16 (18, 20) chs, work as follows;

Row 1: sc in the second ch, sc in every ch, turn. 15 (17, 19) scs

Row 2: ch 3, dc in every sc to end, turn.

Row 3: ch 3, dc in every dc to end, turn. 

Repeat row 3 fourty nine (fourty nine, fifty one) times. Cut yarn.


Assembly: 

  • Sew shoulders.
  • Skip the first column of the back and the front and sew the side stripe along the edge between the first two columns. Sew side stripes to both the back and the front, starting from the upper most orange row, then all the way down (see image below).


Side edging: 

Weave in loose ends and work edge pattern as follows:

Edge row: with cream yarn sc into the corner of the first square on the bottom right, *skip first square side, (dc 3, picot 1, dc 3) into next square, skip next square side, sc into st between squares, repeat from * along the sides of the front and back. Cut yarn. Repeat on the other side of the top. Weave in loose ends.


Lastly, feel free to leave a comment if you have any questions or find something confusing in the pattern.

Happy crocheting/knitting! follow me on Instagram @wiams_crafts and Twitter @wiamscrafts to see my upcoming projects.

Leaf Relief Shawlette


Greetings everyone! Shawlettes and small scarves are so cute! and sometimes, are the key element in a chic look. That’s why I design at least one every year. This shawlette features a botanical-inspired, leaf-shaped pattern that flows in vertical stripes, all contained in a triangle structure. The challenging part in making this piece is getting the hang of knitting two types of Double Stitch Decreases, for which you will be happy to know that I've made a very short video tutorial about. Yes! at last, I've started my own YouTube channel, where I will show you how to knit/crochet the more complex stitches used in my designs. I would love to hear your feedback after you watch them, and I’m open to your constructive criticism. This shawlette is my last cotton-based design for this year; I'll start working with heavier yarns that suit the cold weather in my upcoming projects. Until then, I hope you all stay well and healthy.

Skill level: Intermediate

GET printable PDF for this pattern here.


Materials:

  • Yarn: Kartopu Baby One, 100% premium acrylic, 3.53 oz. (100 g), 273 yards (250 m), in the color K1321: 2 skeins.
  • Circular knitting needles, 32" (80 cm) long, size US 8 (5 mm).
  • Tapestry needle.


Measurements: width = 47" (120 cm), height = 27.5" (70 cm), approx.

Yardage: 542- 546 yards (495- 500 m), approx.

Gauge:
 22 sts and 32 rows = 4"x 4" (10 cm x 10 cm) in garter stitch.


Knitting Terms:

  • st: stitch.
  • sts: stitches.
  • k: knit.
  • p: purl.
  • yo: yarn over.
  • sk2p: slip 1 st knitwise, knit 2 together, pass the slipped stitch over k2tog (Left-leaning double decrease).
  • sskp: slip 2 sts knitwise, knit these 2 sts through back loops, slip the knitted stitch to the left needle and pass the third st over it, slip it back to the right needle (Right-leaning double decrease). 
I highly recommend that you watch these two video before you start: 


Instructions:

Cast on 15 sts, knit 2 rows. Work as follows:

Row 1 (wrong side): k 3, p 9, k 3.

Row 2: k 3, sk2p, (yo, k 1) three times, yo, sskp, k 3.

Row 3: repeat row 1.

Row 4: cast on 3 sts and knit them, k to end, cast on 3 sts. (21 sts)

Row 5: k 6, p 9, k 6.

Row 6: k 6, sk2p, (yo, k 1) three times, yo, sskp, k 6.

Row 7: repeat row 5.

Row 8: k to end.

Row 9: repeat row 5.

Row 10: cast on 3 sts and knit them, k 6, sk2p, (yo, k 1) three times, yo, sskp, k 6, cast on 3 sts. (27 sts)

Row 11: k 9, p 9, k 9.

Row 12: k to end.

Row 13: k 3, p 9, repeat to last 3 sts, k 3.

Row 14: k 3, *sk2p, (yo, k 1) three times, yo, sskp*, p 3, repeat between ** once, k 3.

Row 15: repeat row 13.

Row 16: cast on 3 sts and knit them, k 12, p 3, k 12, cast on 3 sts. (33 sts)

Row 17: k 3, *k 3, p 9, repeat from * to last 6 sts, k 6.

Row 18: k 6, *sk2p, (yo, k 1) three times, yo, sskp*, p 3, repeat between ** once, k 6.

Row 19: repeat row 17.

Row 20: k 15, p 3, k 15.

Row 21: repeat row 17.

Row 22: cast on 3 sts and knit them, k 6, *sk2p, (yo, k 1) three times, yo, sskp*, p 3, repeat between ** once, k 6, cast on 3 sts. (39 sts)

Row 23: k 9, *p 9, k 3, repeat from * to last 6 sts, k 6.

Row 24: k 18, p 3, k 18.


General Pattern:

Row 25: k 3, p 9, repeat to last 3 sts, k 3.

Row 26: k 3, *sk2p, (yo, k 1) three times, yo, sskp, p 3, repeat from * to last 12 sts, sk2p, (yo, k 1) three times, yo, sskp, k 3.

Row 27: repeat row 25.

Row 28: cast on 3 sts and knit them, k 3, *k 9, p 3, repeat from * to last 12 sts, k 12, cast on 3 sts. 

Row 29: k 3, *k 3, p 9, repeat from * to last 6 sts, k 6.

Row 30: k 6, *sk2p, (yo, k 1) three times, yo, sskp, p 3, repeat from * to last 15 sts, sk2p, (yo, k 1) three times, yo, sskp, k 6.

Row 31: repeat row 29.

Row 32: k 6, *k 9, p 3, repeat from * to last 15 sts, k 15.

Row 33: repeat row 29.

Row 34: cast on 3 sts and knit them, k 6, *sk2p, (yo, k 1) three times, yo, sskp, p 3, repeat from * to last 6 sts, k 6, cast on 3 sts. 

Row 35: k 9, *p 9, k 3, repeat from * to last 6 sts, k 6.

Row 36: k 9, *k 9, p 3, repeat from * to last 18 sts, k 18.

Repeat the general pattern rows 14 times (or as you prefer), repeat 25-35 rows once, knit 3 rows.

Stretchy bind off row: k 2, slip the 2 sts back to left needle, k2tog, *k 1, slip the 2 sts back to left needle, k2tog, repeat from * to end. You can watch my tutorial video for the stretchy bind off method here: 

Weave in loose ends. Block well and enjoy.


Lastly, feel free to leave a comment if you have any questions or find something confusing in the pattern.

Happy crocheting/knitting! follow me on Instagram @wiams_crafts and Twitter @wiamscrafts to see my upcoming projects.