Hello friends! another year is about to wrap up. I had my ups and downs, but some of the best moments I've had were definitely the ones spent making crafts. This is the last post for 2018, made with love and yarn that is 20% wool, very suitable for the winter, and it has some twists in its design; it's not the traditional triangle-shape, and it has a unique color combination. I am hoping 2019 will bring with it new Ideas, new yarn, more posts and more joyful times that alleviate the stress during bad days. I wish you all the same. Happy new year to you all!
Hello friends! my new post is both simple and fun, the concept is inspired by Christmas sweets. I tried to make the design as simple and as quick to make as possible; you know the year is about to end, and this beanie would be perfect to make as a last minute gift. All my other unfinished Christmas project ideas will be stored away for next year, until then, I hope you all have a wonderful new year!
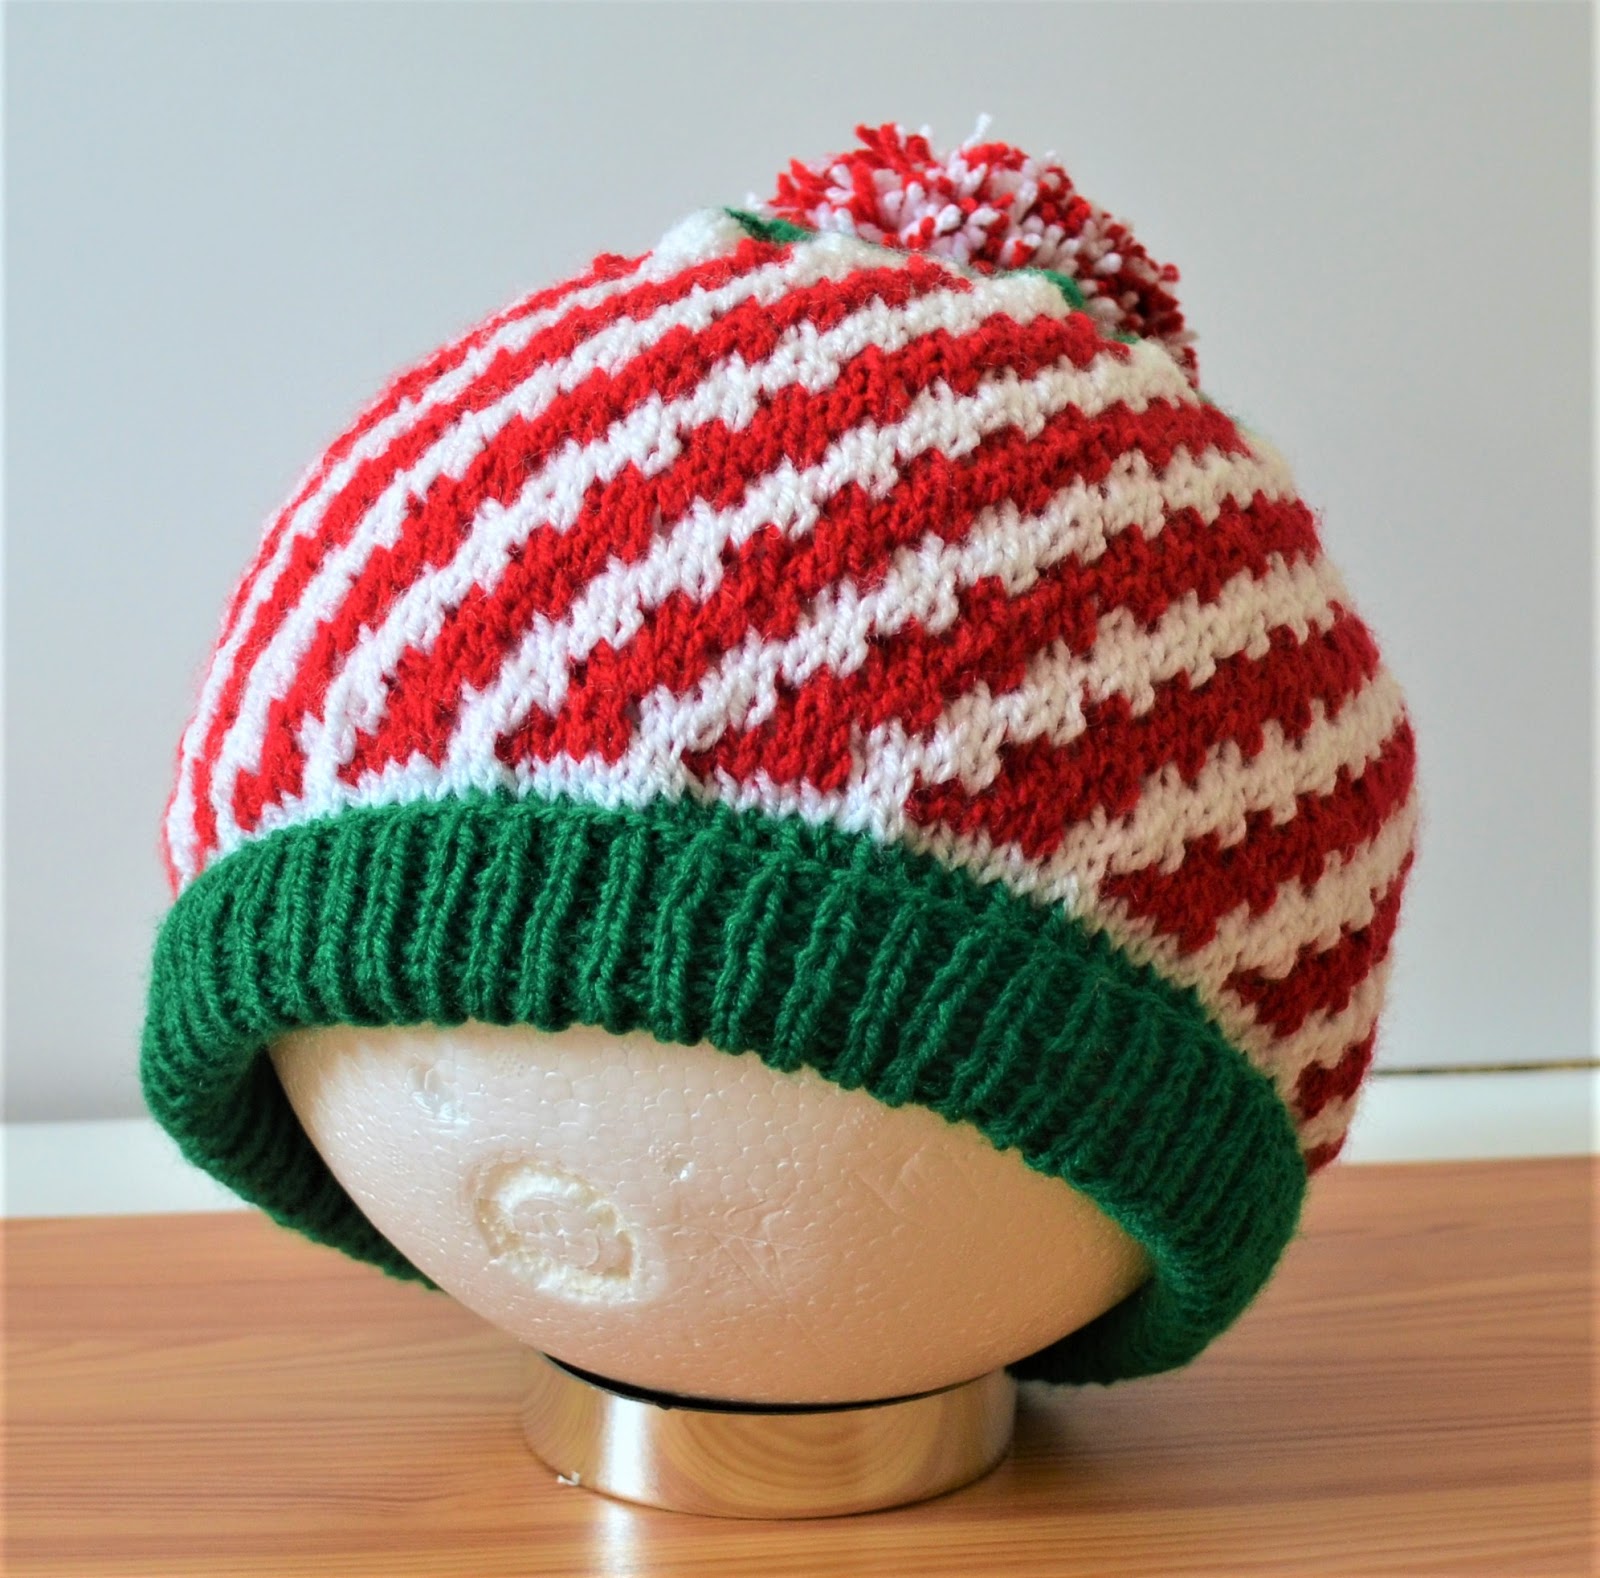
Yarn: Alize Baby Best, (90% acrylic, 10% bamboo), 3.35 oz (100 g), 262 yards (240 m), in the following colors and quantities: white 55 (1 skein), red 56 (1 skein), and green 210 (1 skein).
Circular knitting needles, sizes US 4 (3.5 mm) and US 7 (4.5 mm), 16" (40 cm) long.
Gauge:20 sts and 22 rounds = 4"x 4" (10 cm x 10 cm) in stockinette stitch.
knitting Terms:
k: knit.
p: purl.
st: stitch.
sts: stitches.
sl st: slip stitch.
ssk: slip, slip, knit the two slipped stitches together through back loops.
Instructions:
With green yarn and 3.5 mm circular needles, cast on 96 (108, 120) sts, join in the round. Don't know how to join in the round? here is a short tutorial on how to do it (from 0:26 - 1:15 min):
Put a stitch marker in the beginning of it. Work as follows:
Rib round: k 1, p 1, repeat to end.
Repeat rib round 16 (18, 20) times. Cut yarn.
Note: slip stitches purl-wise, keeping the yarn at the back of the work.
Candy Cane mosaic pattern
With white yarn, and 4.5 mm circular needles, knit two rounds, then work the pattern:
Rounds 1 and 2: with red yarn, k 4, sl st 2, repeat to end.
Rounds 3 and 4: with white yarn, sl st 2, k 4, repeat to end.
Rounds 5 and 6: with red yarn, k 2, *sl st 2, k 4, repeat from * to last 4 sts, sl st 2, k 2.
Rounds 7 and 8: with white yarn, k 4, sl st 2, repeat to end.
Rounds 9 and 10: with red yarn, sl st 2, k 4, repeat to end.
Rounds 11 and 12: with white yarn, k 2, sl st 2, *k 4, sl st 2, repeat from * to last 2 sts, k 2.
Repeat these 12 rounds 3 (4, 4) times, cut red yarn, with white yarn knit two rounds, cut white yarn.
With green yarn, work decreasing rounds as follows:
Round 1: ssk, k 14 (16, 18), repeat to end. 90 (102, 114) sts
Round 2: ssk, k 13 (15, 17), repeat to end. 84 (96, 108) sts
Round 3: ssk, k 12 (14, 16), repeat to end. 78 (90, 102) sts
Round 4: ssk, k 11 (13, 15), repeat to end. 72 (84, 96) sts
Round 5: ssk, k 10 (12, 14), repeat to end. 66 (78, 90) sts
Round 6: ssk, k 9 (11, 13), repeat to end. 60 (72, 84) sts
Round 7: ssk, k 8 (10, 12), repeat to end. 54 (66, 78) sts
Round 8: ssk, k 7 (9, 11), repeat to end. 48 (60, 72) sts
Round 9: ssk, k 6 (8, 10), repeat to end. 42 (54, 66) sts
Round 10: ssk, k 5 (7, 9), repeat to end. 36 (48, 60) sts
Round 11: ssk, k 4 (6, 8), repeat to end. 30 (42, 54) sts
Round 12: ssk, k 3 (5, 7), repeat to end. 24 (36, 48) sts
Round 13: ssk, k 2 (4, 6), repeat to end. 18 (30, 42) sts
For size S: cut yarn after leaving a 6"(15 cm) yarn tail. Pass the yarn tail through the remaining sts, tighten it, then make a knot. Weave in loose ends.
Keep on decreasing rounds for sizes M and L as follows:
Round 13: ssk, k (3, 5), repeat to end. (24,36) sts
Round 14: ssk, k (2, 4), repeat to end. (18, 30) sts
For size M: cut yarn after leaving a 6"(15 cm) yarn tail. Pass the yarn tail through the remaining sts, tighten it, then make a knot. Weave in loose ends.
Keep on decreasing rounds for size L as follows:
Round 15: ssk, k 3, repeat to end. (24)sts
Round 16: ssk, k 2, repeat to end. (18)sts
For size L: cut yarn after leaving a 6"(15 cm) yarn tail. Pass the yarn tail through the remaining sts, tighten it, then make a knot. Weave in loose ends.
With both white and red yarns make a pompom and sew it on top of the hat.
Fold the gray band outwards in half, secure it in place by simple knots in four equal intervals.
Lastly, feel free to leave a comment if you have any questions or find something confusing in the pattern.
Happy crocheting/knitting! follow me on Instagram @wiams_crafts and Twitter @wiamscrafts to see my upcoming projects.
Hello friends and Merry Christmas! the holiday season is quickly approaching. I happen to quite enjoy this time of the year, with the gathering of family and loved ones, spending time with the little ones, and exchanging gifts.
My first Christmas project this year is actually old. I've started making it in the summer, but then I forgot about it for months. I finally got to finishing it a week ago. It's simple to make, even if it doesn't seem so. Just follow the instructions and it should be a smooth sailing.
Stay tuned for my next Christmas project, which will be posted hopefully soon.
❈✽✻✼✻✽❈
And if you are interested, the guys at yarncanada.ca are having their 2nd Annual event of giving yarn to individuals and groups who knit or crochet for good causes. In partnership with Bernat & Patons Yarn they are giving away $2000 worth of yarn and are hoping to get as many applicants as possible to ensure it goes to whoever it will have the maximum impact. If you would like to apply for the yarn, visit https://www.yarncanada.ca/for-good
Hello again friends! When I purchased the bulky Alize country yarn back in September, I wasn't aware it was not yarn. Turns out, it's a long cord made from something like mohair thread, and it can be knitted by hand, or very large sized needles. And since I didn't have a pair of knitting needles larger than 8 mm, I scored the local knitting and yarn shops for some large needles. For me, I found that 20 mm needles or larger were the most suitable to work with this yarn.
I experimented with not one, but three designs before I settled with the one I was most satisfied with for this kind of yarn, and the quantity I have. So here it is, a simple shawl, yet so warm and elegant. The color choices and sequence are vital factors in making it look cosy.
By presenting this post, another 2018 resolution of mine has been achieved, which was making a project with bulky warm yarn.
P.S. Please keep in mind that you are free to make the size you prefer, just keep on knitting by following the simple pattern until you get the size you desire.
level: Easy
Materials:
Alize Country New; 3.53 oz/ 100 g, 37 yds/ 34 m approx., 55% acrylic, 25% polyamide, 20% wool. Blue Mountain 5036, 5 balls.
Size U.S. 36 (20 mm) knitting needles.
Tapestry needle.
Blue Mountain Bulky Shawl - Details
Yardage: 185 yds/170 m approx. Measurements: 46 inch (117 cm) long, 28.5 inch (72 cm) wide, approx. Gauge: 5.5 sts x 8 rows = 4"x 4" (10 cm x 10 cm) in Stockinette Pattern.
Knitting Terms
k = knit
p = purl
ss = slip stitch
m1 = make 1 stitch increase by knitting 2 stitches into one.
skp= slip stitch, knit stitch, pass the slipped stitch over.
Blue Mountain Bulky Shawl - Back view
Note: This yarn is actually a cord made of light worsted yarn.To join a new skein with the previous one, you need to:
Check the colors sequence.
Undo a 4" thread of one end of the cord, then sew the two ends together through the stitches of each cord end.
Instructions
Cast on 4 stitches:
Row 1: k 2, p 2. (4 sts)
Row 2: ss 1, k 1, m 1, k 2. (5 sts)
Row 3: k 2, p 1, ss, p 1.(5 sts)
Row 4: ss 1, k 1, m 1, k 3. (6 sts)
Row 5: k 2, p 2, ss, p 1.(6 sts)
Row 6: ss 1, k 1, m 1, k all remaining sts.(7 sts)
Row 7: k 2, p to last 2 sts, ss 1, p 1.(7sts)
Repeat rows 6-7 till you have 48 sts and ending row 7.
I-cord bind off rows:
Row 1: k 2, turn.
Row 2: ss 1, p 1, turn.
Row 3: k 1, skp, return the 2 sts from right needle to left one.
Repeat row 3 to last stitch, weave in loose ends, and wear it with pride.
Blue Mountain Bulky Shawl - Full view
Lastly, feel free to leave a comment if you have any questions or find something confusing in the pattern.
Happy crocheting/knitting! follow me on Instagram @wiams_crafts and Twitter @wiamscrafts to see my upcoming projects.
Hello friends! I've been knitting for a very, very long time, and I've worked with so many weights of yarn skeins; as small as 1.76 oz (50 g) and as large as 5.30 oz (150 g). Last September, I went into a shop in Erbil's bazaar, and came upon a huge skein that weighs 12.32 oz (350 g), with a rather nice gradient of red to black and back. I ended up buying it, even though I had no Idea what I would do with it at the time. I went back home and took a closer look at the skein's materials: wool and alpaca (there is acrylic and polyester too) and I thought to myself it would be great to make it into a shawl, suitable for a really cold winter evening event.
It was hard for me to knit this particular yarn at first; the stitches often got tangled, even worse was when I made a mistake and had to undo a row or two. Nevertheless, I powered through, and the skein finally turned into an elegant shawl. I'm happy to present to you the (somehow) simple instructions for this piece. I think it's marvelous how such a beautiful large shawl came out of just a single skein.
Skill level: Intermediate
Materials:
Yarn: Alize Fancy Alpaca, 60% acrylic, 15% alpaca, 15% wool, 10% polyester. 12.32 oz (350 g), 957 yards (875 m), in the color rainbow 1008 (1 skeins).
Gauge:13 sts and 16 rows in 4" x 4" (10 x 10 cm) in stockinette stitch.
Knitting Terms:
st: stitch.
sts: stitches.
k: knit
p: purl
yo: yarn over
m1k: single knit increase.
yot: yarn over twice.
s2s1ktog: slip two sts as if to knit them together, slip the third one knit-wise, knit the three sts together through back loops (centered double decrease). You can watch my tutorial video below to learn how to knit this stitch:
Instructions:
With 8 US (5 mm) circular needles, cast on 3 sts.
Row 1: k 1, m1k, yo, k 1 (center st, place marker if you need), yo, m1k, k 1. (7 sts)
Row 2: p all sts.
Row 3: k 1, yo, k to center st, yo, k center st, yo, k to last st, yo, k 1. (11 sts)
Row 4: p all sts.
Repeat rows 3-4 till the work measures 14" (36 cm) from center.
Change the circular needle to 10 US (6 mm) and continue working in rows 3- 4 until work measures 28" (72 cm) from center.
Change the circular needle to 11 US (8 mm) and continue working in rows 3- 4 until work measures 38" (97 cm) from center and 319 sts.
Edging Lace pattern:
Row 1: k 1, yot, *k 5, s2s1ktog, k 5, yo, k 1, yo, repeat from * ten times, k 5, s2s1ktog, k 5, yo, k 5, yo, k 1 (center st), yo, k 5, **yo, k 5, s2s1ktog, k 5, yo, k 1, repeat from ** ten times, yo, k 5, s2s1ktog, k 5, yot , k 1.
Row 2: p 1, p 2 into yot, p to last yot of previous row, p 2 in yot, p 1.
Row 3: k 1, yo, k 1, *yo, k 5, s2s1ktog, k 5, yo, k 1, repeat from * eleven times, k 5, yo, k 1 (center st), yo, k 5, **k 1, yo, k 5, s2s1ktog, k 5, yo, repeat from ** eleven times, k 1, yo, k 1.
Rows 4, 6, 8 and 10: p all sts.
Row 5: k 1, yo, k 2, *yo, k 5, s2s1ktog, k 5, yo, k 1, repeat from * eleven times, k 6, yo, k 1 (center st), yo, k 6, **k 1, yo, k 5, s2s1ktog, k 5, yo, repeat from ** eleven times, k 2, yo, k 1.
Row 7: k 1, yo, k 3, *yo, k 5, s2s1ktog, k 5, yo, k 1, repeat from * eleven times, k 7, yo, k 1 (center st), yo, k 7, **k 1, yo, k 5, s2s1ktog, k 5, yo, repeat from ** eleven times, k 3, yo, k 1.
Row 9: k 1, yo, k 4, *yo, k 5, s2s1ktog, k 5, yo, k 1, repeat from * eleven times, k 8, yo, k 1 (center st), yo, k 8, **k 1, yo, k 5, s2s1ktog, k 5, yo, repeat from ** eleven times, k 4, yo, k 1.
Row 11: k 1, yo, k 5, *yo, k 5, s2s1ktog, k 5, yo, k 1, repeat from * eleven times, k 9, yo, k 1 (center st), yo, k 9, **k 1, yo, k 5, s2s1ktog, k 5, yo, repeat from ** eleven times, k 5, yo, k 1.
Row 12: p all sts.
Bind off all stitches in the stretchy method.
Bind off row: k 2, *slip the two knitted stitches back to left needle, knit them again together, k 1, repeat from * to end of stitches. You can watch my tutorial video for the stretchy bind off method here:
Weave in loose yarn ends, block, and it's ready to wear!
Lastly, feel free to leave a comment if you have any questions or find something confusing in the pattern.
Happy crocheting/knitting! follow me on Instagram @wiams_crafts and Twitter @wiamscrafts to see my upcoming projects.
Hello friends! Baby blankets are always fun to work with, for it's a medium size project. It is a blanket, though it is done in a relatively short time, especially when I choose a straight forward pattern, and not granny squares type that needs many phases to finish.
My new post is a baby blanket, which I crocheted using a multicoloured baby yarn that I found in a popular bazaar in Erbil (which is, by the way, a very beautiful city). It's easy to make, as I wrote the chosen pattern and designed a matching simple edging.
Hello friends, it's been a while! I took a break and travelled back to my home country. I'm back now and I am very eager to post my new designs. I hope you all had a relaxing summer vacation!
I love knitting ribs patterns, so I was fascinated with the right diagonal ribs pattern the second I saw it on Pinterest. But when the lateral braid pattern came across my eyes, a sparkle lit up, and so I combined both in one shawl.
At first, I couldn't decide the difficulty level of this shawl, because working both patterns requires that you are familiar with keeping stitches in needles and knitting them more than once before dropping them. I finally settled with 'intermediate'. I think that reading the instructions carefully, and watching the videos that I linked above will help you with any difficulties you may face. I'm sure knitters of the intermediate level will be able to make this shawl.
Few months ago, I was browsing Pinterest, and I came across this new crochet technique called the Element CAL. what does it mean? I didn't know then, but I liked it so much that I started crocheting immediately. I followed the tutorial videos posted by itsallinanutshell.com, which I thank so much for the gorgeous Element CAL design and clear instructions. This technique needs a lot of concentration if its your first time trying it, nevertheless, with time your work will go smoothly. I had a small bag full of cotton yarn (catania and alize), so I started working on this project inspired by the Element CAL pattern, and now I proudly present to you my Tiny Royal Baby Blanket.
Level: Advanced
Materials:
Yarn:Schachenmayer, Catania, 100% cotton, yarn weight: sport. 50 g/ 1.75 oz. 125 m/ 137 yds. one skein of each: Anthrazit 429, Denim 421, Jade 253 and Gold 249. Alize, cotton baby, 50% cotton, 50% acrylic. Classical unbrushed, 100 g/ 3.53 oz. 270 m/295 yds. color 01, 2 skeins.
Crochet Hook: US: E-4, 3.5 mm.
Tapestry needle
Yardage: 800-850 m/ 875-930 yard. Measures: 25 inch/ 64 cm long, 20.5 inch/ 53 cm wide. Crochet Terms (US)
cc1: Corner cluster one; (ch 3, tr in the center of ch 2 space of previous round, dc).
cc2: Corner cluster two; (dc, tr in the center of ch 2 space of previous round, dc).
Note 2: cc1 and cc2 terms will be used from round 4 and on.
Note 3: To make your work easier, always weave in ends when changing yarn.
Note 4: You can make the color combinations you like for 1-6 rounds. 7-8 rounds must be worked in alize yarn.
Instructions:
The granny square (make 30):
With any catania yarn, work the next four rounds:
Round 1: make a magic ring, or chain five, ss to first ch.
Round 2: ch 3, dc, ch 2, *dc 2, ch 2, repeat from * three times, ss to third ch of first ch 3.
Round 3: ss to first ch 2 space, (ch 3, tr into round 1 (magic ring, or ch 5), dc, ch 2, dc, tr into round 1, dc) in ch 2 space.
*(dc, tr into round 1, dc, ch 2, dc, tr into round 1, dc), in next ch 2 space, repeat from * three times, ss to the third ch of first ch 3.
Round 4: ss to first ch 2 space, (cc1, ch 2, cc2) in ch 2 space, (dc, tr in between dc 2 of round 2, dc) in between the two clusters of previous round, *(cc2, ch 2, cc2) in next ch 2 space, (dc, tr in between dc 2 of round 2, dc) in between the two clusters of previous round, repeat from * three times, ss to the third ch of first ch 3.
Edging
Note: in each granny square of the border, ignore the corner sc 2 of round 8.
Round 1
With alize yarn, in any corner of the blanket, work as follows:
1. Blanket first corner: (cc1, ch 2, cc2) in the ch 2 space.
2. Granny square side: ch 1, sc in each bpsc sts 18 times, ch 1.
3. Between two granny squares: (dc, fptr in the last fptr of round 7 vertically, dc) in ch 2 space of wright side granny square, ch 2, (dc in ch 2 space, fptr in first fptr of round 7 vertically, dc) in ch 2 space of left side granny square.
Repeat 2 and 3 alternately as many as needed, until the second corner.
4. Blanket second corner: (cc2, ch 2, cc2) in the ch 2 space,
work 2, 3 and 4 all along the rest of blanket sides and corners as many as needed, sc to third ch of first ch 3, cut alize yarn.
Round 2
Bind on gold catania yarn in last ch 1 space of edging round 1.
1. Blanket first corner: (ch 3, tr in ch 2 space of round 7, dc)in ch 1 space, (cc1, ch 2, cc2) in the ch 2 space, (dc, tr in ch 2 space of round 7, dc) in next ch 1 space.
2. Granny square side: ch 1, skip sc, sc in each sc 16 times, skip sc, ch 1.
3. Between two granny squares: - Wright side granny square: (dc, tr in ch 2 space of round 7, dc) in ch 1 space, (dc, tr in bpsc of round 8 vertically, dc) in ch 2 space, ch 2.
- Left side granny square: (dc, tr in bpsc of round 8, dc) in ch 2 space, (dc, tr in ch 2 space of round 7, dc) in ch 1 space.
Repeat 2 and 3 alternately as many as needed, until the second corner.
4. Blanket second corner: (dc, tr in ch 2 space of round 7, dc) in ch 1 space, (cc2, ch 2, cc2) in the ch 2 space, (dc, tr in ch 2 space of round 7, dc) in next ch 1 space.
Work 2, 3 and 4 all along the rest of blanket sides and corners as many as needed, sc to third ch of first ch 3.
Round 3:
1. Blanket first corner: in between the first two clusters, (ch 3, fptr into fptr of edging round 1, dc), (cc2, ch 2, cc2) in the ch 2 space, (dc, fptr into fptr of edging round 1, dc) in between next two clusters, ch1.
2. Granny square side: ch 1, skip sc, sc in each sc 14 times, skip sc, ch 1.
3. Between two granny squares: (dc, fptr into fptr of edging round 1, dc) in between the first two clusters, (cc2, ch 2, cc2) in the ch 2 space, (dc, fptr into fptr of edging round 1, dc) in between next two clusters.
Repeat 2 and 3 alternately as many as needed, until the second corner.
4. Blanket second corner: ch 1, (dc, fptr into fptr of edging round 1, dc) in between the first two clusters, (cc2, ch 2, cc2) in the ch 2 space, (dc, fptr into fptr of edging round 1, dc) in between next two clusters, ch 1.
work 2, 3 and 4 all along the rest of blanket sides and corners as many as needed, ch 1, sc to third ch of first ch 3, cut gold yarn.
Round 4:
Bind on alize yarn in the first ch 2 space of any corner.
1. Blanket first corner: (ch 3, fptr into fptr of edging round 2, dc) in ch 2 space, (dc, fptr into fptr of edging round 2, dc) in between the next two clusters, (cc2, ch 2, cc2) in the ch 2 space, (dc, fptr into fptr of edging round 2, dc) in between next two clusters, (dc, fptr into fptr of edging round 2, dc) in ch 2 space.
2. Granny square side: skip sc, sc in each sc 12 times, skip sc.
3. Between two granny squares: (dc, fptr into fptr of edging round 2, dc) in ch 1 space, (dc, fptr into fptr of edging round 2, dc) in between the next two clusters, (cc2, ch 2, cc2) in the ch 2 space, (dc, fptr into fptr of edging round 2, dc) in between next two clusters, (dc, fptr into fptr of edging round 2, dc) in ch 1 space.
Repeat 2 and 3 alternately as many as needed, until the second corner.
4. Blanket second corner: (dc, fptr into fptr of edging round 2, dc) in ch 2 space, (dc, fptr into fptr of edging round 2, dc) in between the next two clusters, (cc2, ch 2, cc2) in the ch 2 space, (dc, fptr into fptr of edging round 2, dc) in between next two clusters, (dc, fptr into fptr of edging round 2, dc) in ch 2 space.
Work 2, 3 and 4 all along the rest of blanket sides and corners as many as needed, ch 1, sc to third ch of first ch 3.
Round 5:
1. Blanket first corner: (ch 3, fptr into fptr of edging round 3, dc) in between first two clusters, (dc, fptr into fptr of edging round 3, dc) in between the next two clusters, (cc2, ch 2, cc2) in the ch 2 space, (dc, fptr into fptr of edging round 3, dc) in between next two clusters twice, ch 1.
2. Granny square side: ch 1, skip sc, sc in each sc 10 times, skip sc, ch 1.
3. Between two granny squares:(dc, fptr into fptr of edging round 3, dc) in between two clusters tiwce, (cc2, ch 2, cc2) in the ch 2 space, (dc, fptr into fptr of edging round 3, dc) in between next two clusters twice,
Repeat 2 and 3 alternately as many as needed, until the second corner.
4. Blanket second corner: ch 1, (dc, fptr into fptr of edging round 3, dc) in between two clusters tiwce, (cc2, ch 2, cc2) in the ch 2 space, (dc, fptr into fptr of edging round 3, dc) in between next two clusters twice, ch 1.
work 2, 3 and 4 all along the rest of blanket sides and corners as many as needed, ch 1, sc to third ch of first ch 3, cut yarn, weave in loose ends.
Lastly, feel free to leave a comment if you have any questions or find something confusing in the pattern. Happy crocheting/knitting! follow me on Instagram @wiams_crafts and Twitter @wiamscrafts to see my upcoming projects.


