Greetings, fellow crochet enthusiasts! My original plan was to unveil this pattern back in February, but it was unfortunately delayed. Nevertheless, I still wanted to share this delightful Granny Square with you all. Inspired by the unique features of Chinese dragons – from their sinuous shapes to the vibrant colors, I bring you another animal face granny square. Making each face feature should be a simple task, and a chart has been included to make the instructions clearer. What follows is basically assembling the crocheted pieces by sewing them in their place. If you haven’t noticed, I have decided to leave the sides of the scales and the upper tips of the horns detached to add dimension to the face. So, I hope you join me - Whether you're a seasoned crochet expert or just starting your yarn-filled adventure- in weaving a piece of art that captures the spirit of the Year of the Dragon. Get your hooks ready, and let's crochet!
Overview:
- Skill level: Intermediate.
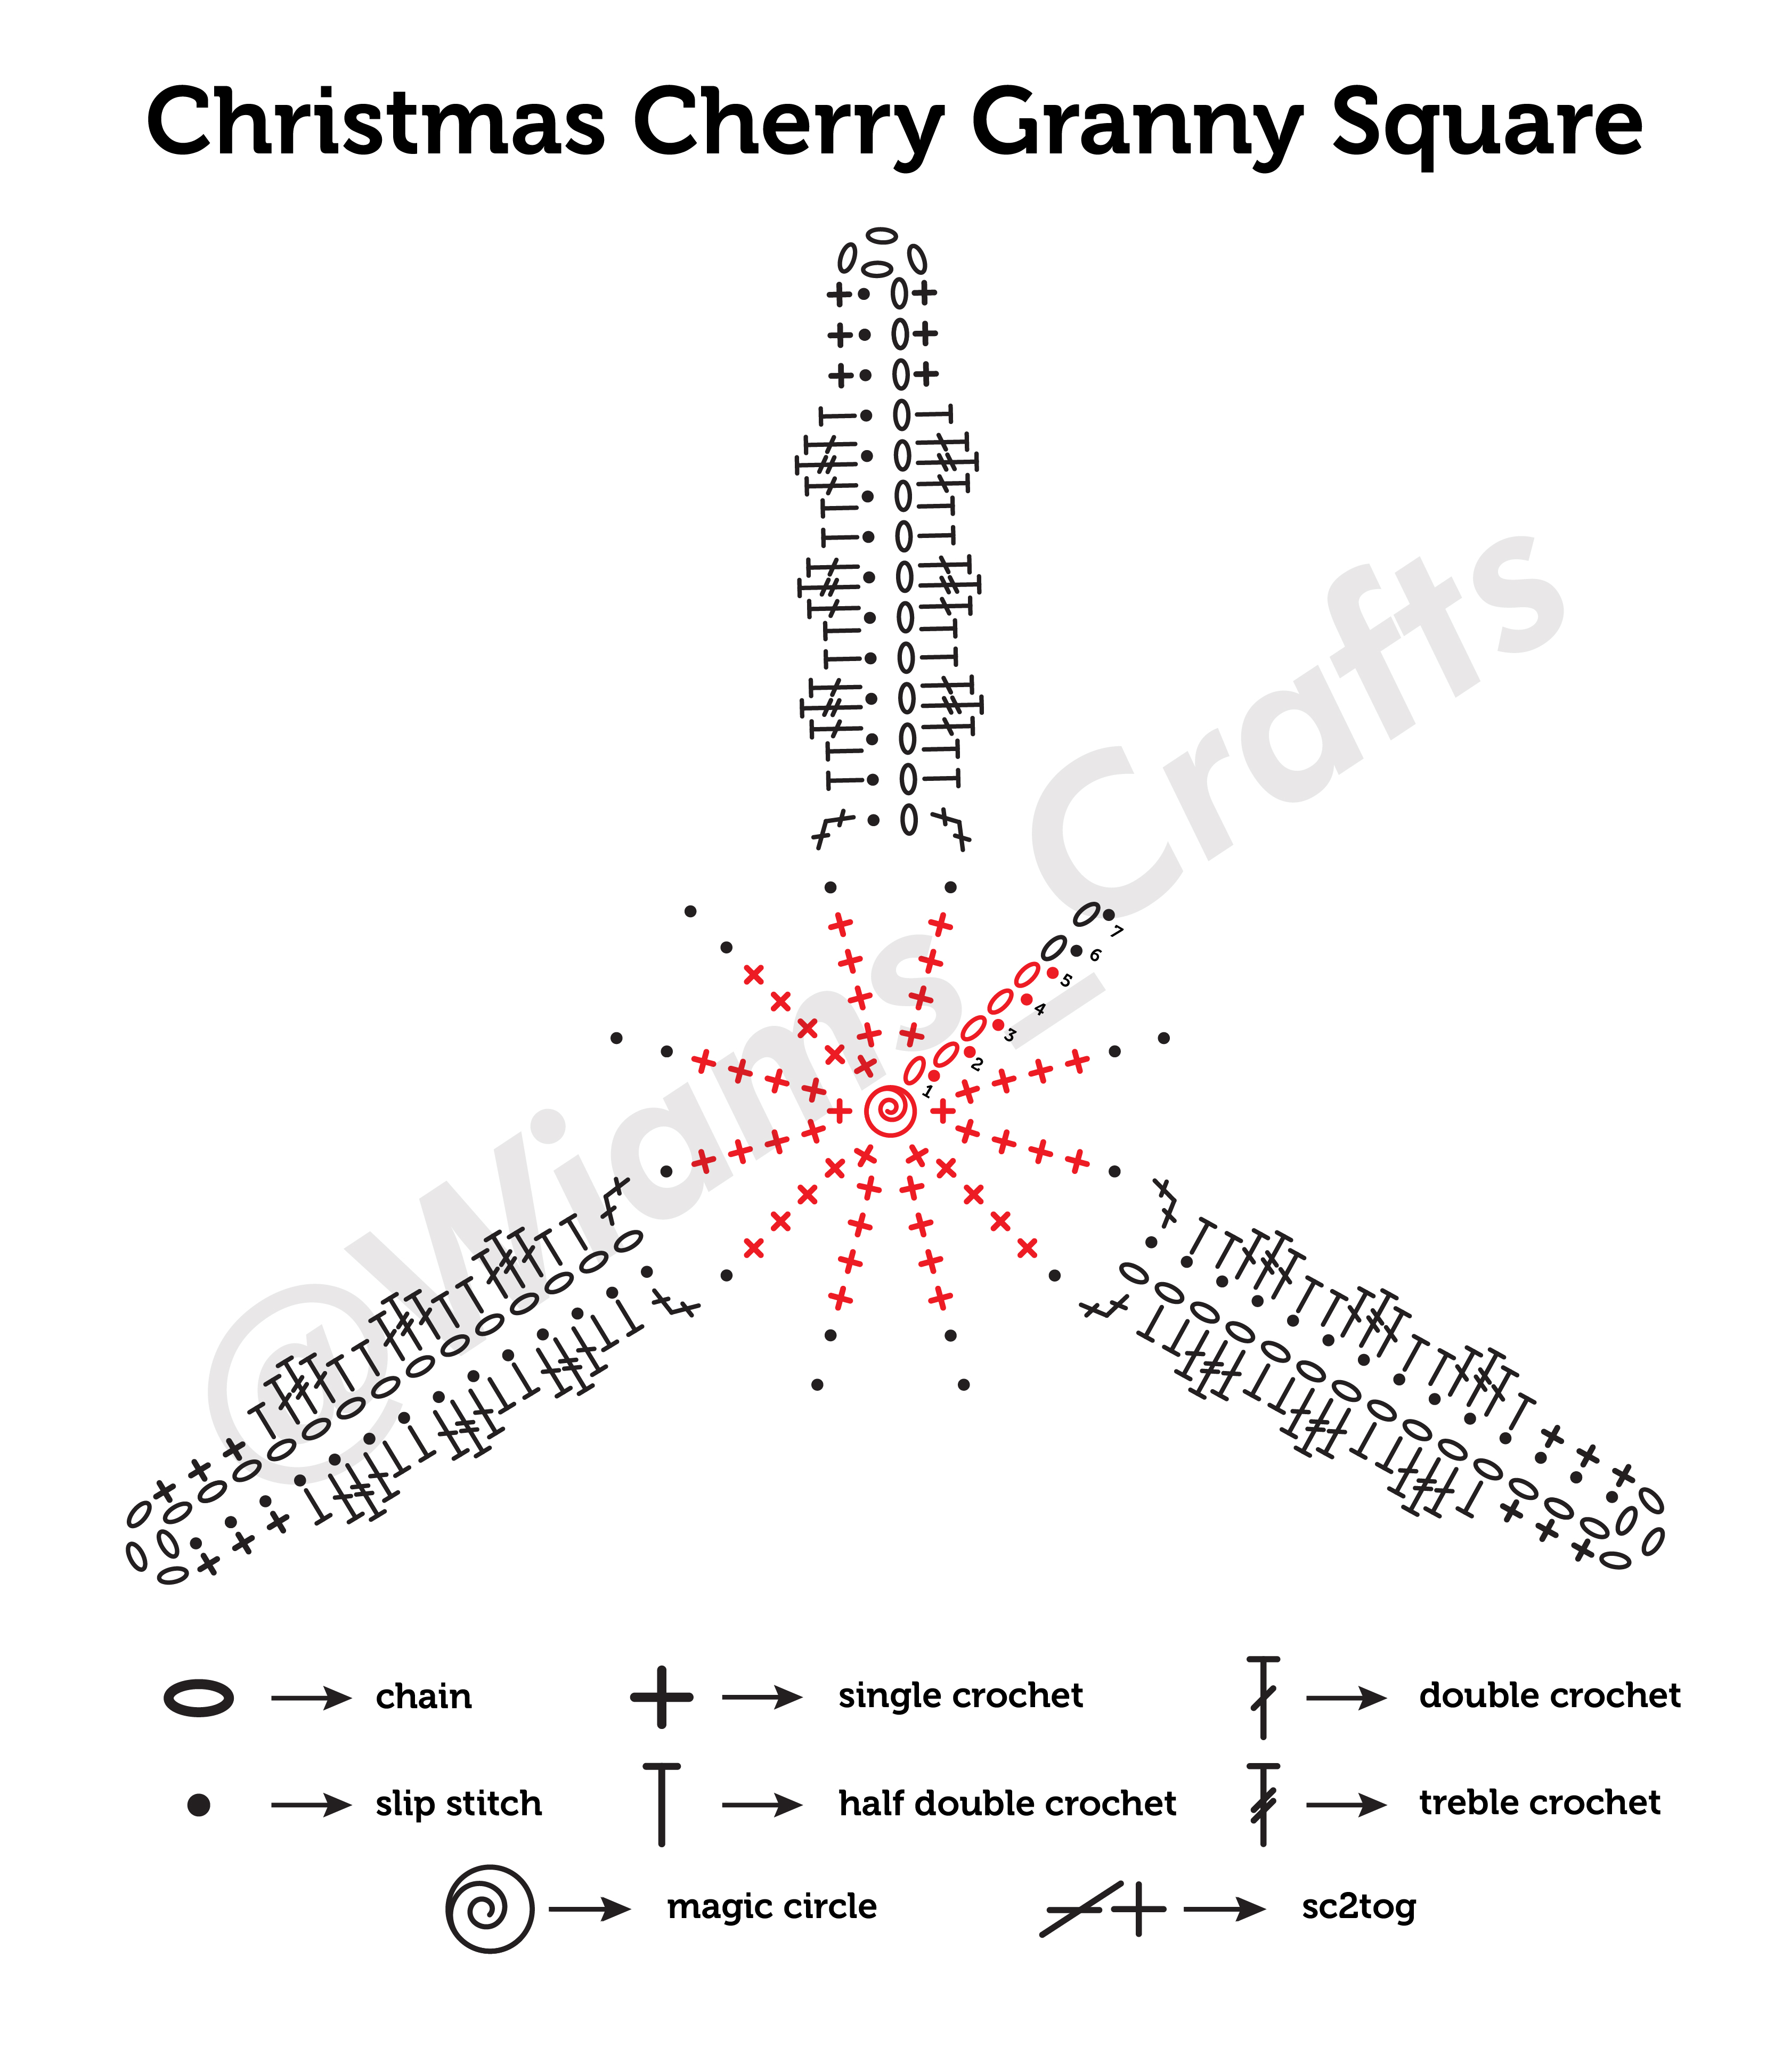
- Instructions style: written instructions + charts.

Want to pin this project for later? Just hover or click on the image below or any of the images in this post then click the red "save" button.

Materials:
- Yarn: any cotton yarn in the following colors and quantities: one white skein, one red skein, one yellow skein, a few yards (meters) of light yellow and black yarn. Suggested yarn: D.M.C Happy Cotton, 0.7 oz (20 g), 47 yards (43 m).
- Crochet hook, size D/3 (3 mm).
- Tapestry needle.
Measurements of the square: 6" x 6" (15 cm x 15 cm) approx.
Gauge: 22 sts and 12 round = 4"x 4" (10 cm x 10 cm) in double crochet.
Yardage: 55- 56 yards (50- 51 m).
Crochet terms (US):
- ch: chain.
- st: stitch.
- sts: stitches.
- sl st: slip stitch.
- sc: single crochet.
- hdc: half double crochet.
- dc: double crochet.
- tr: treble crochet.
- popcorn stitch: four double crochet popcorn with ch at the end.
- sc2tog: single crochet 2 sts together.
- dc2tog: double crochet 2 together.
- tr2tog: treble crochet 2 together.

Instructions:
Granny square base:
Note: ch 1 and ch 3 at the beginning of rounds count as sc and dc respectively.
With the red yarn, make a magic circle, work as follows:
Round 1: ch 1 into the magic circle, sc 7, sl st into the first ch. (8 sts).
Round 2: ch 1 and sc in the first st, sc 2 in each st, sl st into the first ch. (16 sts).
Round 3: ch 3 and dc in the first st, dc in st, *dc 2 in st, dc in st, repeat from * to end, sl st into the third ch of the first ch 3. (24 sts).
Round 4: repeat row 3. (36 sts).
Round 5: ch 3 and dc in the first st, dc in st twice, *dc 2 in st, dc in st twice, repeat from * to end, sl st into the third ch of the first ch 3. (48 sts).
Round 6: ch 3 and dc in the first st, dc in st three times, *dc 2 in st, dc in st three times, repeat from * to end, sl st into the third ch of the first ch 3. (60 sts).
Cut off red yarn and weave in loose ends. With white yarn make a knot and at the eighth st after the end of last round, work as follows:
Round 7: (ch 4, tr, ch 2, tr 2) in the first st, *tr in st, dc in st twice, hdc in st 3 times, sc in st twice, hdc in st 3 times, dc in st twice, tr in st, (tr 2, ch 2, tr 2) in st, repeat from * 3 times, tr in st, dc in st twice, hdc in st 3 times, sc in st twice, hdc in st 3 times, dc in st twice, tr in st, sl st into the fourth ch of the first ch4.
Round 8:ch 3 in the first st, dc in st, *(dc, tr, ch 2, tr, dc) in ch 2 space, dc in each st to next ch 2 space, repeat from * 3 times, (dc, tr, ch 2, tr, dc) in ch 2 space, dc in each st to last st, sl st into the third ch of the first ch 3.
Rounds 9 and 10: ch 3 in the first st, dc in each st to the first ch 2 space, *(dc 2, ch 2, dc 2) in ch 2 space, dc in each st to next ch 2 space, repeat from * 3 times, (dc 2, ch 2, dc 2) in ch 2 space, dc in each st to last st, sl st into the third ch of the first ch 3.
Cut off white yarn and weave in loose ends.

Eye (make two):
With black yarn, make a magic circle, then work as follows:
Round 1: ch 1 and sc 8 into the magic circle, sl st into the first ch. Cut black yarn and weave in loose ends. (8 sts)
With white yarn work next round:
Round 2: make a knot and *sc 2 into any st, sc into next st, repeat from * to end. Cut white yarn, leaving a 6" (15 cm) long tail to sew the eye in place. (12 sts)
With yellow yarn work next round:
Round 3: make a knot and ch 3 (or make a standing dc) into any st, dc 3 into the same st, join the first and last dc in a slip st (this cluster is called a popcorn stitch), ch 1, repeat popcorn into next st and ch 1 four more times, make a sixth popcorn into next st and cut yarn. Weave in loose ends.
Nostril (make two):
With black yarn make a magic circle, then work as follows:
Round 1: ch 1, sc 6 into the magic ring, sl st to first ch, cut off black yarn and weave in loose ends. (6 sts)
With yellow yarn, work next round:
Round 2: make a knot and sc 2 into any st, sc 2 into each st to end, sl st to first sc. Cut yarn leaving a 6" (15 cm) long tail to sew nostril in place. (12 sts)
Right horn:
With light yellow yarn, make a knot and ch 10, hdc into the second ch from the hook, dc2tog once into next 2 chs, dc into ch twice, tr2tog into next 2 chs, tr into ch twice. Cut yarn, leaving a 4" (10 cm) long tail to sew the horn in place.
Left horn:
With light yellow yarn, make a knot and ch 8, hdc into the second ch from hook, dc 2 in ch once, dc in next ch twice, tr 2 in ch once, tr into next ch twice. Cut yarn, leaving a 4" (10 cm) long tail to sew the horn in place.
Upper lip:
With light yellow, make a knot and ch 22, then work next row as follows:
Row: sl st into second ch from hook, sc in ch twice, sc2tog in the next 2 chs, sc in ch three times, sc 2 into next ch, sc in ch three times, sc 2 into next ch, sc in ch three times, sc2tog into next 2 chs, sc in ch twice, sl st into last ch. Cut yarn, leaving a 6" (15 cm) long tail to sew the upper lip in place.
Lower lip:
With light yellow yarn, make a knot and ch 17, then work the next row as follows:
Row: sl st into the second ch from hook, sc in ch twice, (sc2tog into next 2 chs, sc in ch twice) three times, sc in ch twice, sl st into the last ch. Cut yarn, leaving a 6" (15 cm) long tail to sew the lower lip in place.
Scales:
With red yarn, make a knot and ch 54, then work next row as follows:
Row: make a 3 ch picot with the first 3 chs, skip next 4 chs, tr into the next ch, dc into next ch, hdc into next ch, sl st into next ch, *ch 6, (make a 3 ch picot with the first 3 chs, skip the other 3 chs), tr into the next ch, dc into next ch, hdc into next ch, sl st into next ch, repeat from * to end. Cut yarn, leaving a 8" (20 cm) long tail to sew the scales stripe in place.

Assembly:
- Sew the eyes in place by attaching the white ring of the eye to the base, leaving the yellow popcorn round free.
- Sew the nostrils in place.
- Sew the horns on the upper part of the face.
- Sew the scales stripe around the face starting from the left side, then over the eyes, then all the way to the right side of face.
- With white yarn, embroider the two fangs into the upper part of the jaw.
- Weave in loose ends.
Lastly, feel free to leave a comment if you have any questions or find something confusing in the pattern.
Happy crocheting/knitting! follow me on Instagram @wiams_crafts and Twitter @wiamscrafts to see my upcoming projects.